Documentation
Erae Lab
17 chapters
Introduction
What is Erae Lab?
Erae Lab is the companion editor for the Erae 2, Embodme's expressive MPE controller. It runs as a standalone desktop application on macOS, Windows, and Linux, and gives you a visual workspace for designing and managing everything that lives on your device: the layout of touch zones across the surface, how each zone sends MIDI, what it looks like, and how your projects are organized.
Everything you build in Erae Lab is transferred directly to the Erae 2 over USB. Changes sync in real time while the device is connected, so what you design on screen is what you play immediately.
Relationship to the Erae 2
Erae Lab does not make sound on its own. It is a configuration tool. The Erae 2 is the instrument; Erae Lab is how you shape it. When you add a keyboard element to the canvas, assign a MIDI channel, or choose LED colors, those settings are encoded into a layout that the device firmware interprets at performance time.
You can work in Erae Lab without a connected device — designs are saved as project files on your computer and pushed to the hardware when you reconnect. See the Erae 2 User Manual, Chapter 1 for a full introduction to the hardware itself.
Tip: You can open and edit projects while the Erae 2 is disconnected. Connect at any time and Erae Lab will sync your current project automatically.
Key Features
- Visual canvas — A 42x24 LED-grid canvas mirrors the Erae 2 surface at 1:1 resolution. Drag, resize, and arrange elements directly on screen.
- Project and layout management — Organize your work into named projects, each holding multiple layouts you can switch between on the device.
- Element library — A palette of factory elements (keys, faders, buttons, keyboards, LivePad for Ableton session launch, and more) plus a personal library of saved element presets.
- Tune and Style panels — Per-element MIDI settings (channel, note, CC, MPE configuration) and appearance settings (colors, LED styles, animations) in a unified right-side panel.
- Theme selector — Choose from available UI themes to customize the Erae Lab application appearance.
- Live sync — Edits push to the connected device within milliseconds so you can audition changes in real time.
- Firmware updates — Erae Lab installs bundled Erae firmware updates directly from the app.
Tip: Erae Lab and the Erae 2 firmware share the same release pipeline. Use the Settings menu to check for app updates or reinstall managed components when needed.
Who This Manual Is For
This manual is written for musicians, producers, and performers who want to get the most out of their Erae 2. Whether you are building a layout from scratch, adapting a factory template, or designing a complex multi-layout performance setup, each chapter walks you through a specific area of the application.
Manual Conventions
Throughout this manual:
- Parameter names appear in bold (e.g., Channel, Note).
- Parameter values appear in
code formatting(e.g.,MPE,CC74). - Screenshots are referenced by caption where applicable.
- Cross-references to other chapters in this manual are linked (e.g., Projects, Elements).
- Cross-references to the Erae 2 hardware documentation use plain text: "See the Erae 2 User Manual, Chapter X."
Tip: Look for tip callouts like this one throughout the manual for shortcuts, best practices, and things worth knowing before you need them.
Installation & First Launch
Erae Lab is available as an installer package for macOS, Windows, and Linux. Download it from embodme.com and run the installer for your platform.
System Requirements
| Minimum | Recommended | |
|---|---|---|
| macOS | macOS 10.14 (Mojave) or later, Intel or Apple Silicon (universal binary) | macOS 12 or later |
| Windows | Windows 10 (64-bit) | Windows 10/11 (64-bit) |
| Linux | Ubuntu 20.04 or equivalent, x86_64 | Ubuntu 22.04 or later |
| RAM | 4 GB | 8 GB or more |
| USB | One available USB-A or USB-C port for the Erae 2 connection | --- |
Erae Lab runs standalone — no DAW or audio interface is required. MIDI routing to your DAW or synth is handled by the Erae 2 firmware directly over USB.
Download and Install
- Go to embodme.com and navigate to the Downloads section.
- Select your operating system and download the latest Erae Lab installer.
- Run the installer and follow the on-screen prompts.
- Launch Erae Lab from your Applications folder (macOS), Start menu (Windows), or application launcher (Linux).
Tip: Once installed, Erae Lab checks for updates automatically and installs new versions in the background. No separate tool is required.
macOS: Gatekeeper and Code Signing
The macOS build of Erae Lab is code-signed and notarized with Apple. In most cases the installer opens without any warning. If you see a message stating the application is from an unidentified developer or cannot be verified, follow these steps:
- Open System Settings > Privacy & Security.
- Scroll to the Security section.
- Find the message about Erae Lab being blocked and click Open Anyway.
- Confirm when prompted.
You only need to do this once. After that, macOS will remember your choice.
Tip: On Apple Silicon Macs, Erae Lab runs natively — no Rosetta translation layer is needed.
First Launch
When you open Erae Lab for the first time, the application sets up your personal projects folder and copies the factory project library to your computer. This happens automatically and takes only a moment.
Quick Start: Open Existing Work
Use the Projects section in the left sidebar to load, import, and manage your work:
- Double-click a project row to load that project.
- Right-click any project row to open the project menu: Rename, Duplicate, Delete, Import..., Export..., and Open Projects Folder.
- To import a full project, choose Import... from that right-click menu and select an
.erprojfile,.eraeprojectfile, or exported project folder. - To import a single layout, select the destination layout slot first, then use the layout import/open button in the toolbar or drag the layout file onto Erae Lab.
Tip for v1 users: Old
.emkfiles are layout files, not full projects. Import an.emkinto the active project's current layout slot. Use.erprojfiles or exported project folders when you want to import a whole project.
Auto-load Last Project
After the first launch, Erae Lab remembers which project you had open when you last closed the application. On subsequent launches it reopens that project immediately, so you can pick up where you left off without any extra steps.
Factory Project Initialization
On first run, Erae Lab checks whether the factory project content exists in your projects folder. If it does not, it copies a set of factory projects from the application bundle. These projects give you ready-made starting points for common setups such as keyboards, drum pads, and performance-focused layout variations.
Factory projects are installed into your normal project library, not kept as locked templates. You can open, edit, rename, duplicate, delete, save, and revert them like any other Erae Lab project. The bundled factory source stays in the application installer, so reinstalling or updating factory content can recreate the original starting points if needed.
Tip: Factory projects are a great way to learn how elements are configured. Open one, explore the canvas and settings panels, and modify it freely. Duplicate it only when you want to keep a separate copy of your own variation.
Connecting the Erae 2
Plug the Erae 2 into any available USB port before or after launching Erae Lab. The application detects the device automatically. When a connection is established, the connection indicator in the top bar lights up and the active project syncs to the device.
You do not need to install drivers on macOS or Windows — the Erae 2 appears as a standard USB MIDI device. On Linux, Erae Lab automatically detects USB permission. If the device is not detected, a Fix Now notification appears. Click it and enter your admin password to install the udev rule.
Tip: If Erae Lab does not detect your device, try a different USB cable or port. Some passive USB hubs can prevent detection. A direct connection to the computer is always most reliable.
Auto-Save
Erae Lab saves your project automatically almost immediately after any edit. There is no manual file-save button you need to remember. When a project row shows Save/Revert controls, the project is still already saved on disk; those controls manage a snapshot baseline you can return to. See Projects for details.
Troubleshooting
Application does not open on macOS
See the Gatekeeper instructions above. If the problem persists after clicking Open Anyway, try re-downloading the installer from embodme.com and running it again.
Device not detected after connecting
- Check that the USB cable is a data cable, not a charge-only cable.
- Try connecting directly to the computer rather than through a hub.
- Restart Erae Lab with the device already plugged in.
- On Linux, if a Fix Now notification appears in Erae Lab, click it and enter your admin password to install the udev rule, then reconnect the device.
Projects folder location
By default, Erae Lab stores projects in its app-data folder under EraeLab/projects:
| Operating system | Default project folder |
|---|---|
| macOS | ~/Library/Application Support/Embodme/EraeLab/projects |
| Windows | %APPDATA%\Embodme\EraeLab\projects |
| Linux | $XDG_DATA_HOME/Embodme/EraeLab/projects or ~/.local/share/Embodme/EraeLab/projects when XDG_DATA_HOME is not set |
To access the folder quickly, right-click a project in the Projects section and choose Open Project Folder. This opens the exact location Erae Lab is using on your system.
For further diagnostics, see Troubleshooting.
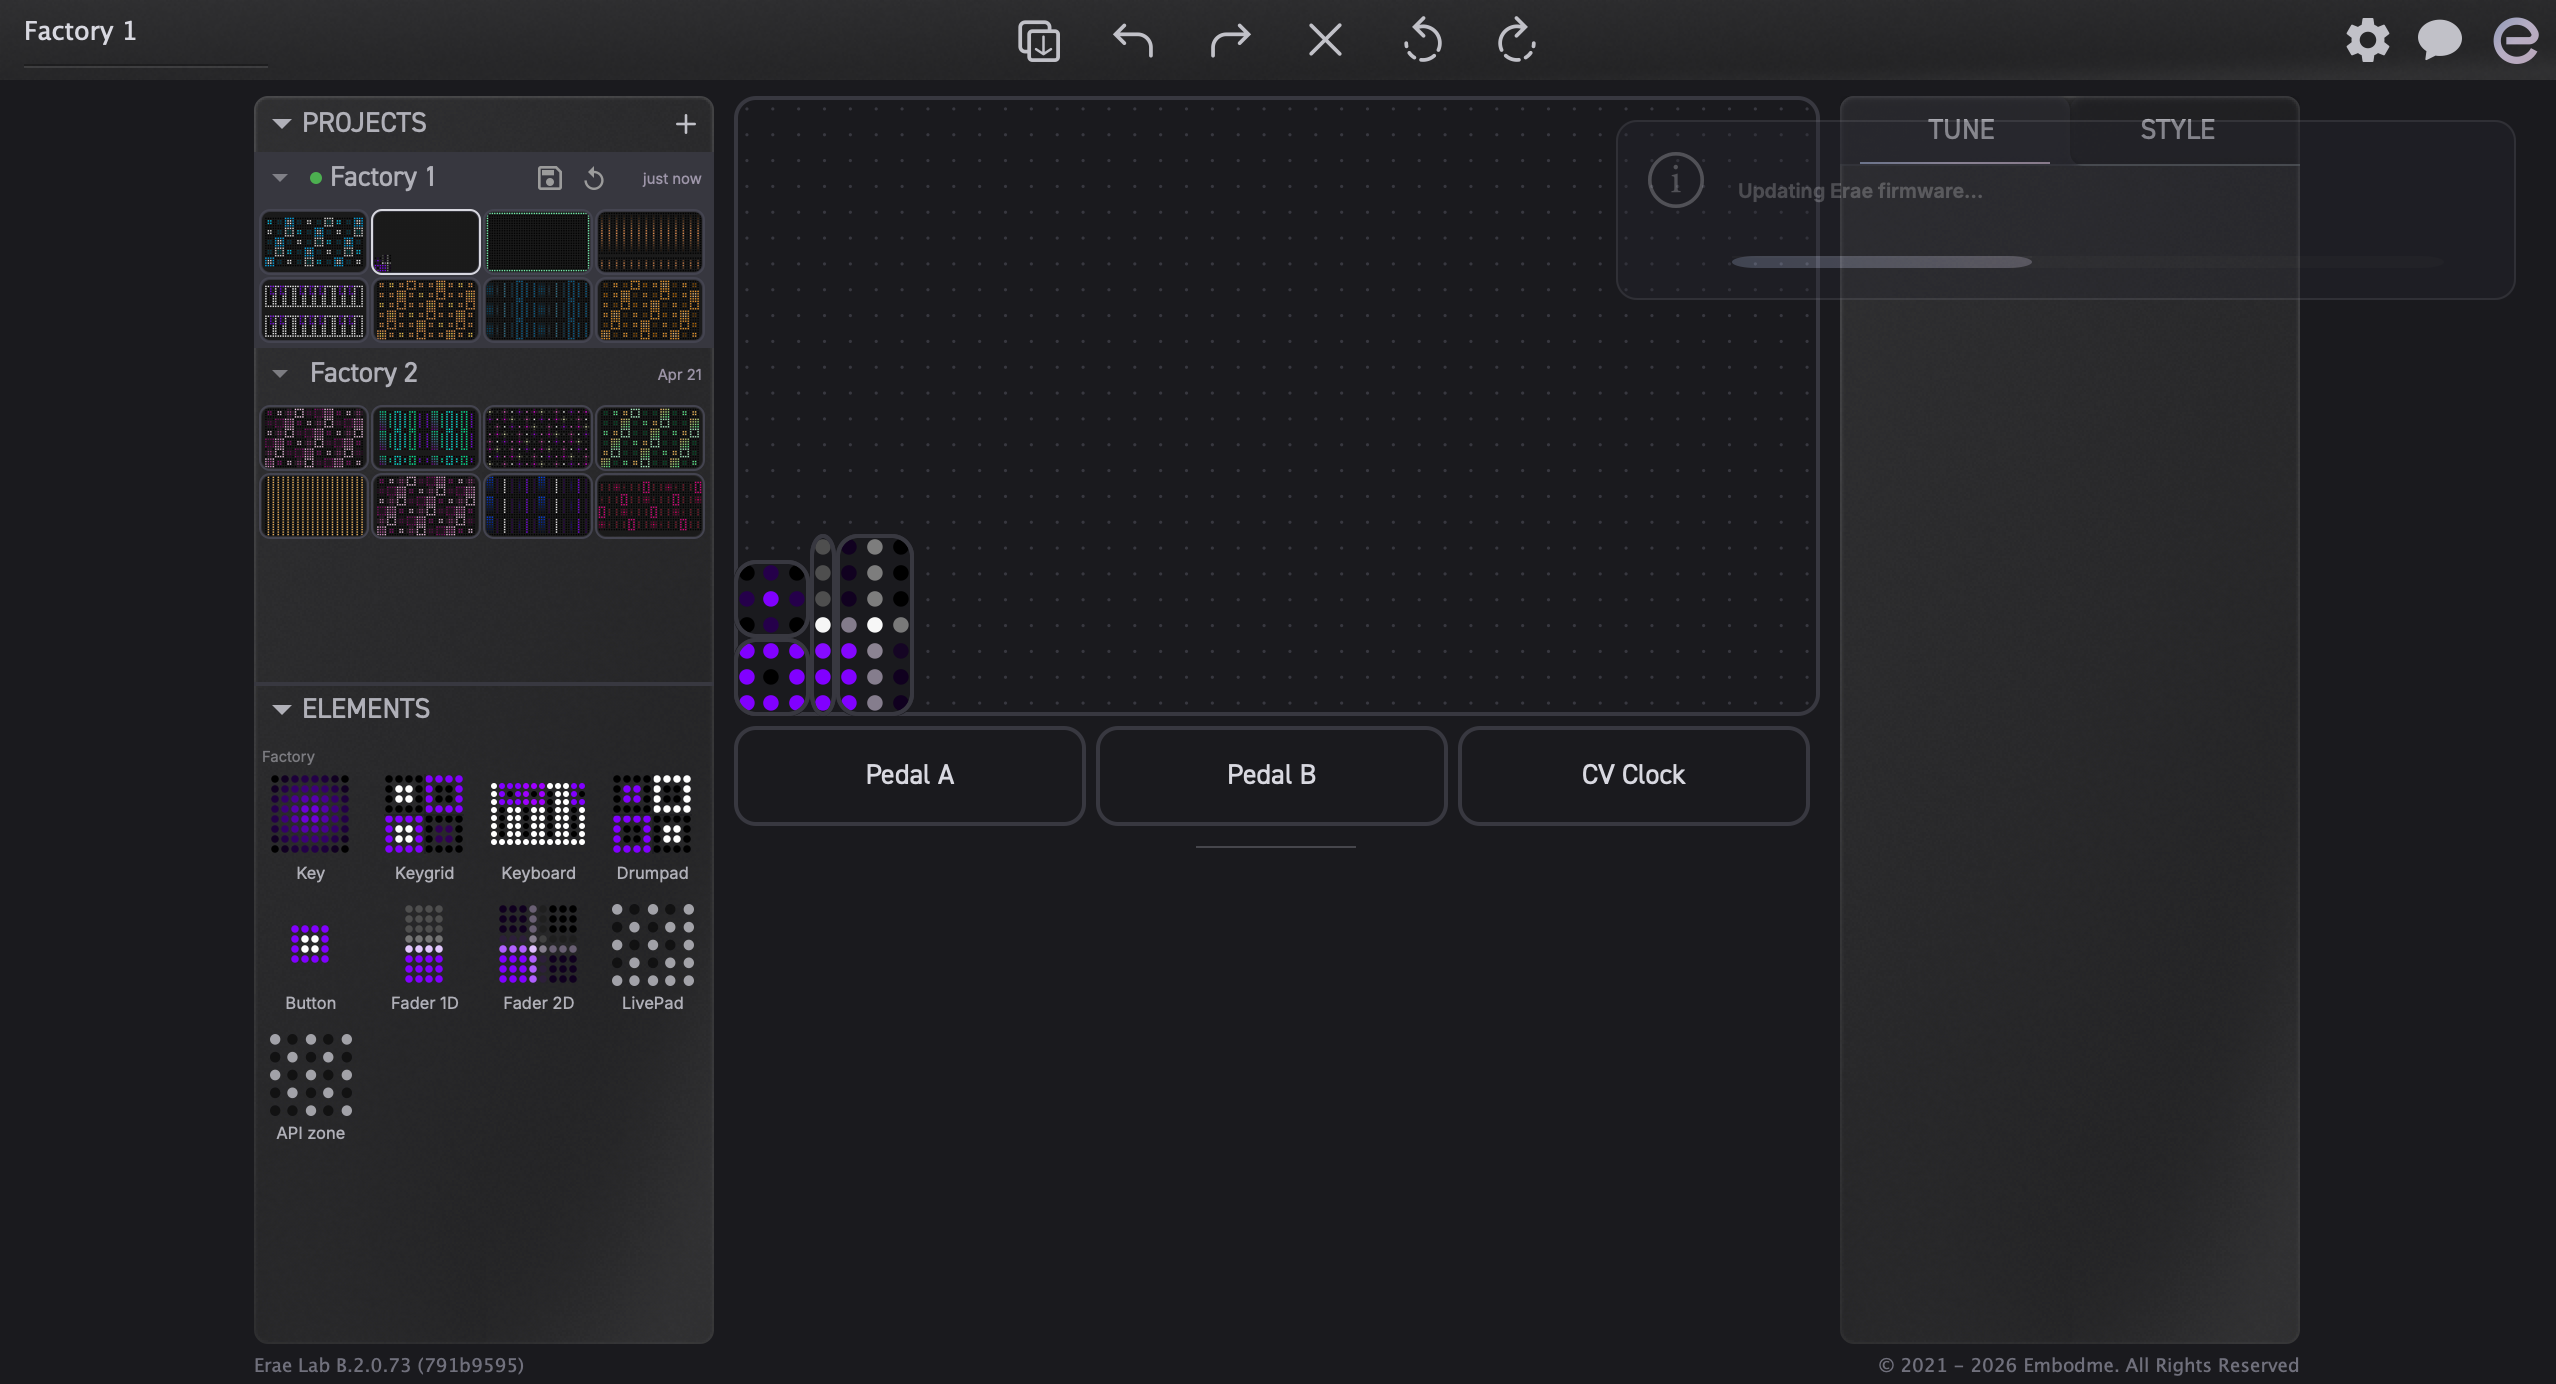
Interface Overview
This chapter walks you through the main areas of the Erae Lab window. Understanding where things live before diving into detail makes every later chapter easier to follow.
Window Layout
The Erae Lab window is divided into five regions arranged around a central canvas:
| Region | Position | Purpose |
|---|---|---|
| Top bar | Top strip | Lab/Sound controls, project name, editing tools, bug reports, settings, device status |
| Left sidebar | Left column | Project library and element palette |
| Central canvas | Center area | Visual representation of the Erae 2 surface |
| Right settings panel | Right column | Per-element Tune and Style settings |
| Learn panel | Bottom of the center area | Contextual help for the control or section under the pointer |
| Bottom bar | Bottom strip | Application version and copyright |
Each region is described in detail below. Later chapters cover the controls in each region at full depth.
Top Bar

The top bar spans the full width of the window and remains visible at all times. Depending on the current mode and installed components, it contains:
- Lab / Sound toggle -- switches between Erae Lab editing and hosted EraeSound controls when EraeSound is available.
- Sound power -- starts or stops the hosted EraeSound engine.
- Project name -- shows the active Lab project.
- Editing tools -- duplicate, undo, redo, delete, and rotate buttons for canvas work.
- Bug report button -- opens the in-app bug report flow when available.
- Settings gear -- opens device, audio/MIDI, update, and component settings.
- E logo status -- shows the active Erae connection state.
Embodme Logo
The E logo sits at the far right of the top bar. It doubles as a device connection indicator: its color changes based on the current EraeStatus -- lit when connected, dimmed when disconnected, and a warning color when a device error is detected.
Project Name
The current project name is displayed as a label in the top bar. It updates whenever you switch projects from the left sidebar. The label is read-only here — to rename a project, right-click it in the Projects section of the left sidebar.
Editing Tool Buttons
A row of icon buttons gives quick access to the most common canvas operations:
| Button | Action |
|---|---|
| Duplicate | Copy the selected element and place it adjacent to the original |
| Undo | Revert the last change (also available with Cmd+Z / Ctrl+Z) |
| Redo | Reapply a reverted change (also available with Cmd+Shift+Z / Ctrl+Shift+Z) |
| Delete | Remove the selected element from the canvas |
| Rotate CCW | Rotate the selected element 90 degrees counter-clockwise |
| Rotate CW | Rotate the selected element 90 degrees clockwise |
Tip: Most editing operations also work with keyboard shortcuts. See Shortcuts and Interactions for the full list.
Device Connection Indicator
The E logo at the far right of the top bar serves as the connection indicator. Its color reflects the current EraeStatus: connected (lit), disconnected (dim), or error (warning color). When the indicator is dim, Erae Lab is still fully functional — you can edit projects and they will sync when the device is next connected.
Left Sidebar
The left sidebar is a narrow column running the full height of the window (excluding the top and bottom bars). It contains the Projects and Elements sections. Use it to switch between projects, manage layouts, and drag elements onto the canvas.
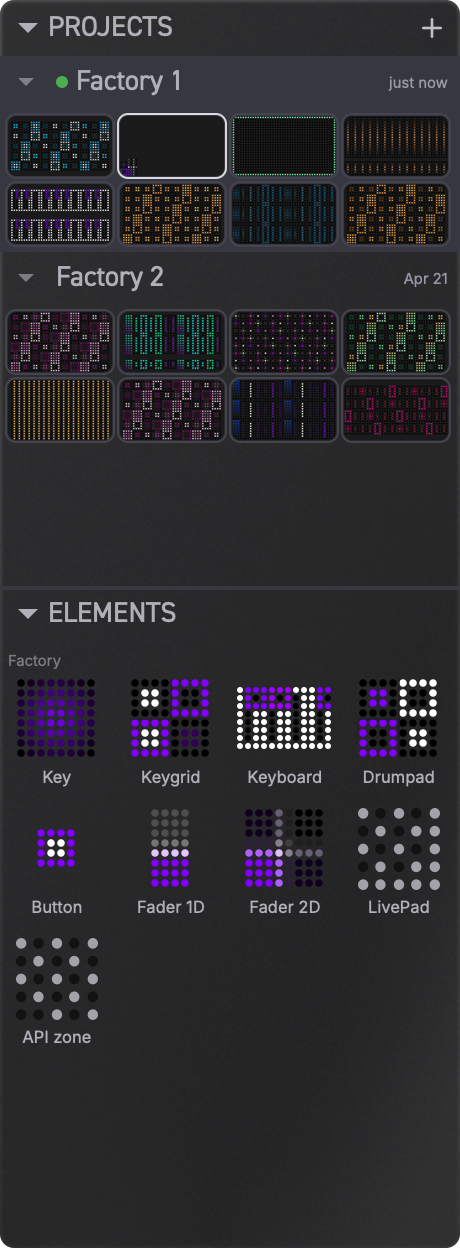
Projects Section
The Projects section lists every project in your Erae Lab library. Each row represents one project and shows its name along with a row of small layout thumbnails — one thumbnail per layout slot in that project.
What you can do here:
- Expand or collapse a project — Click the project name to show or hide its layout thumbnails.
- Load a project — Double-click an inactive project name to load it.
- Rename the active project — Double-click the active project name to rename it inline.
- Switch layouts — Click a layout thumbnail in the active project row to switch the canvas to that layout. Double-click an inactive project's thumbnail to open that project at that layout.
- Create a new project — Use the + button at the top of the section.
- Rename a project — Right-click the project row and choose Rename.
- Duplicate a project — Right-click and choose Duplicate.
- Delete a project — Right-click and choose Delete. If you delete the last project, Erae Lab creates a new empty project automatically.
- Import or export projects — Right-click a project row and choose Import... or Export.... The same menu also includes Open Projects Folder.
- Drag layouts between projects — Drag a layout thumbnail from one project row and drop it onto a layout slot in another row to copy or move it.
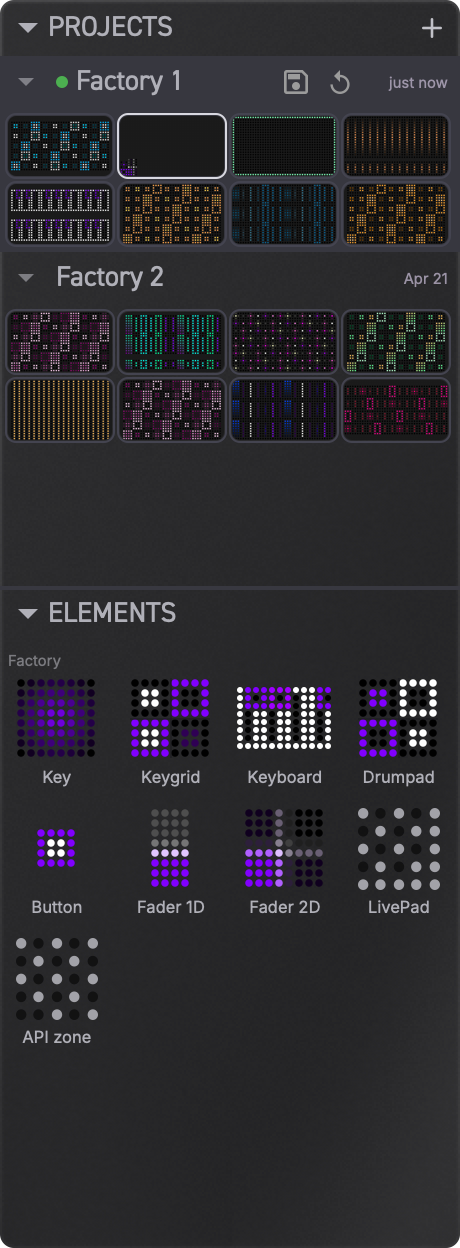
- Save a project snapshot — When the live project differs from its snapshot baseline, click the per-row Save icon to accept the current saved-on-disk state as the new snapshot.
- Revert to snapshot — Click the per-row Revert icon to restore the last snapshot baseline and discard the live changes for that project.
The active project is highlighted. The active layout within that project is also highlighted among its thumbnails.
Tip: Erae Lab auto-saves almost immediately after any change. Even when a project shows Save/Revert controls, it is not waiting to be written to disk. Save creates a snapshot checkpoint; Revert restores the last checkpoint.
For a full walkthrough of project management, see Projects. For layout-specific operations, see Layouts.
Elements Section
The Elements section is your palette for building layouts. It contains all the building blocks you can drag onto the canvas.
The section is divided into two sub-groups:
Factory Elements
The upper group shows the built-in element types that ship with Erae Lab. Each factory element is displayed as a small square thumbnail showing a preview of the element's default LED appearance. The available element types include:
- Key — A single pressure-sensitive pad, typically used for notes or chords.
- Fader 1D — A one-dimensional fader that sends a continuous control value as you slide along it.
- Fader 2D — A two-dimensional pad that sends two independent continuous values (X and Y axes).
- Iso Keyboard — An isomorphic keyboard layout spanning multiple rows.
- Chroma Keyboard — A chromatic keyboard with piano-style white and black key coloring.
- Drumpad Keyboard — A grid of pads laid out for drum programming.
- Button — A unified button element with selectable output mode: Note, Control Change, Program Change, Control Voltage, or Tap Tempo. The mode is switched via the Type parameter in the settings panel, so there is one Button type rather than separate Note/CC/PC button elements.
- LivePad (Ableton Launchpad) — A dedicated Ableton Live session launcher surface that mimics the Launchpad protocol. LED color feedback from Live is reflected on the Erae 2 surface.
- API Zone — A programmable area that delivers raw multi-touch data to external applications via the Erae USB API protocol, for custom or developer use cases.
To add any factory element to the canvas, drag it from this section and drop it onto the canvas. Erae Lab finds the best available space near your drop point.
My Elements
The lower group shows your personal element presets — elements you have previously saved from the canvas with a custom configuration. These are displayed as thumbnail cells in a 4-column grid, sorted by type and name, and support inline renaming.
To save a canvas element as a preset, drag it from the canvas into the My Elements area. To rename or delete a preset, right-click its thumbnail.
Tip: Element presets capture the element's type, size, MIDI settings, and appearance together. Use them to quickly replicate a configuration across multiple layouts or projects.
For detailed coverage of every element type and its settings, see Elements.
The Canvas
The central canvas is the main workspace. It shows a visual representation of the Erae 2 surface as a grid of 42 columns by 24 rows — one cell per LED on the physical device.
Each element you place on the canvas occupies a rectangular region of that grid. The canvas renders each element using its configured LED style, so the view closely approximates what you will see on the device surface.
Working on the Canvas
| Action | Result |
|---|---|
| Click an element | Select it and populate the right settings panel with its parameters |
| Drag an element | Move it to a new position; Erae Lab checks for overlaps and constrains placement to the grid |
| Click empty space and drag | Draw a selection rectangle to select multiple elements at once |
| Drop from Elements section | Place a factory or preset element at the drop location |
| Right-click | Open a context menu with copy, paste, delete, and rotate options |
Tip: Use
Cmd+A(macOS) orCtrl+A(Windows/Linux) to select all elements on the current layout at once. With multiple elements selected, the right settings panel shows shared parameters you can edit in bulk.
Below the main canvas grid, two small areas labeled A and B represent the Erae 2 pedal inputs. Clicking a pedal area opens its dedicated Pedal settings panel — separate from the canvas element panel — where you configure pedal type and MIDI routing.
For a complete guide to working on the canvas, see The Canvas.
Learn Panel
The Learn panel has its own dedicated area at the bottom of the center section, below the canvas. It updates with contextual help as you hover controls, project rows, element presets, canvas elements, and settings. This keeps guidance visible without taking space from the Projects and Elements sidebar.
Right Settings Panel
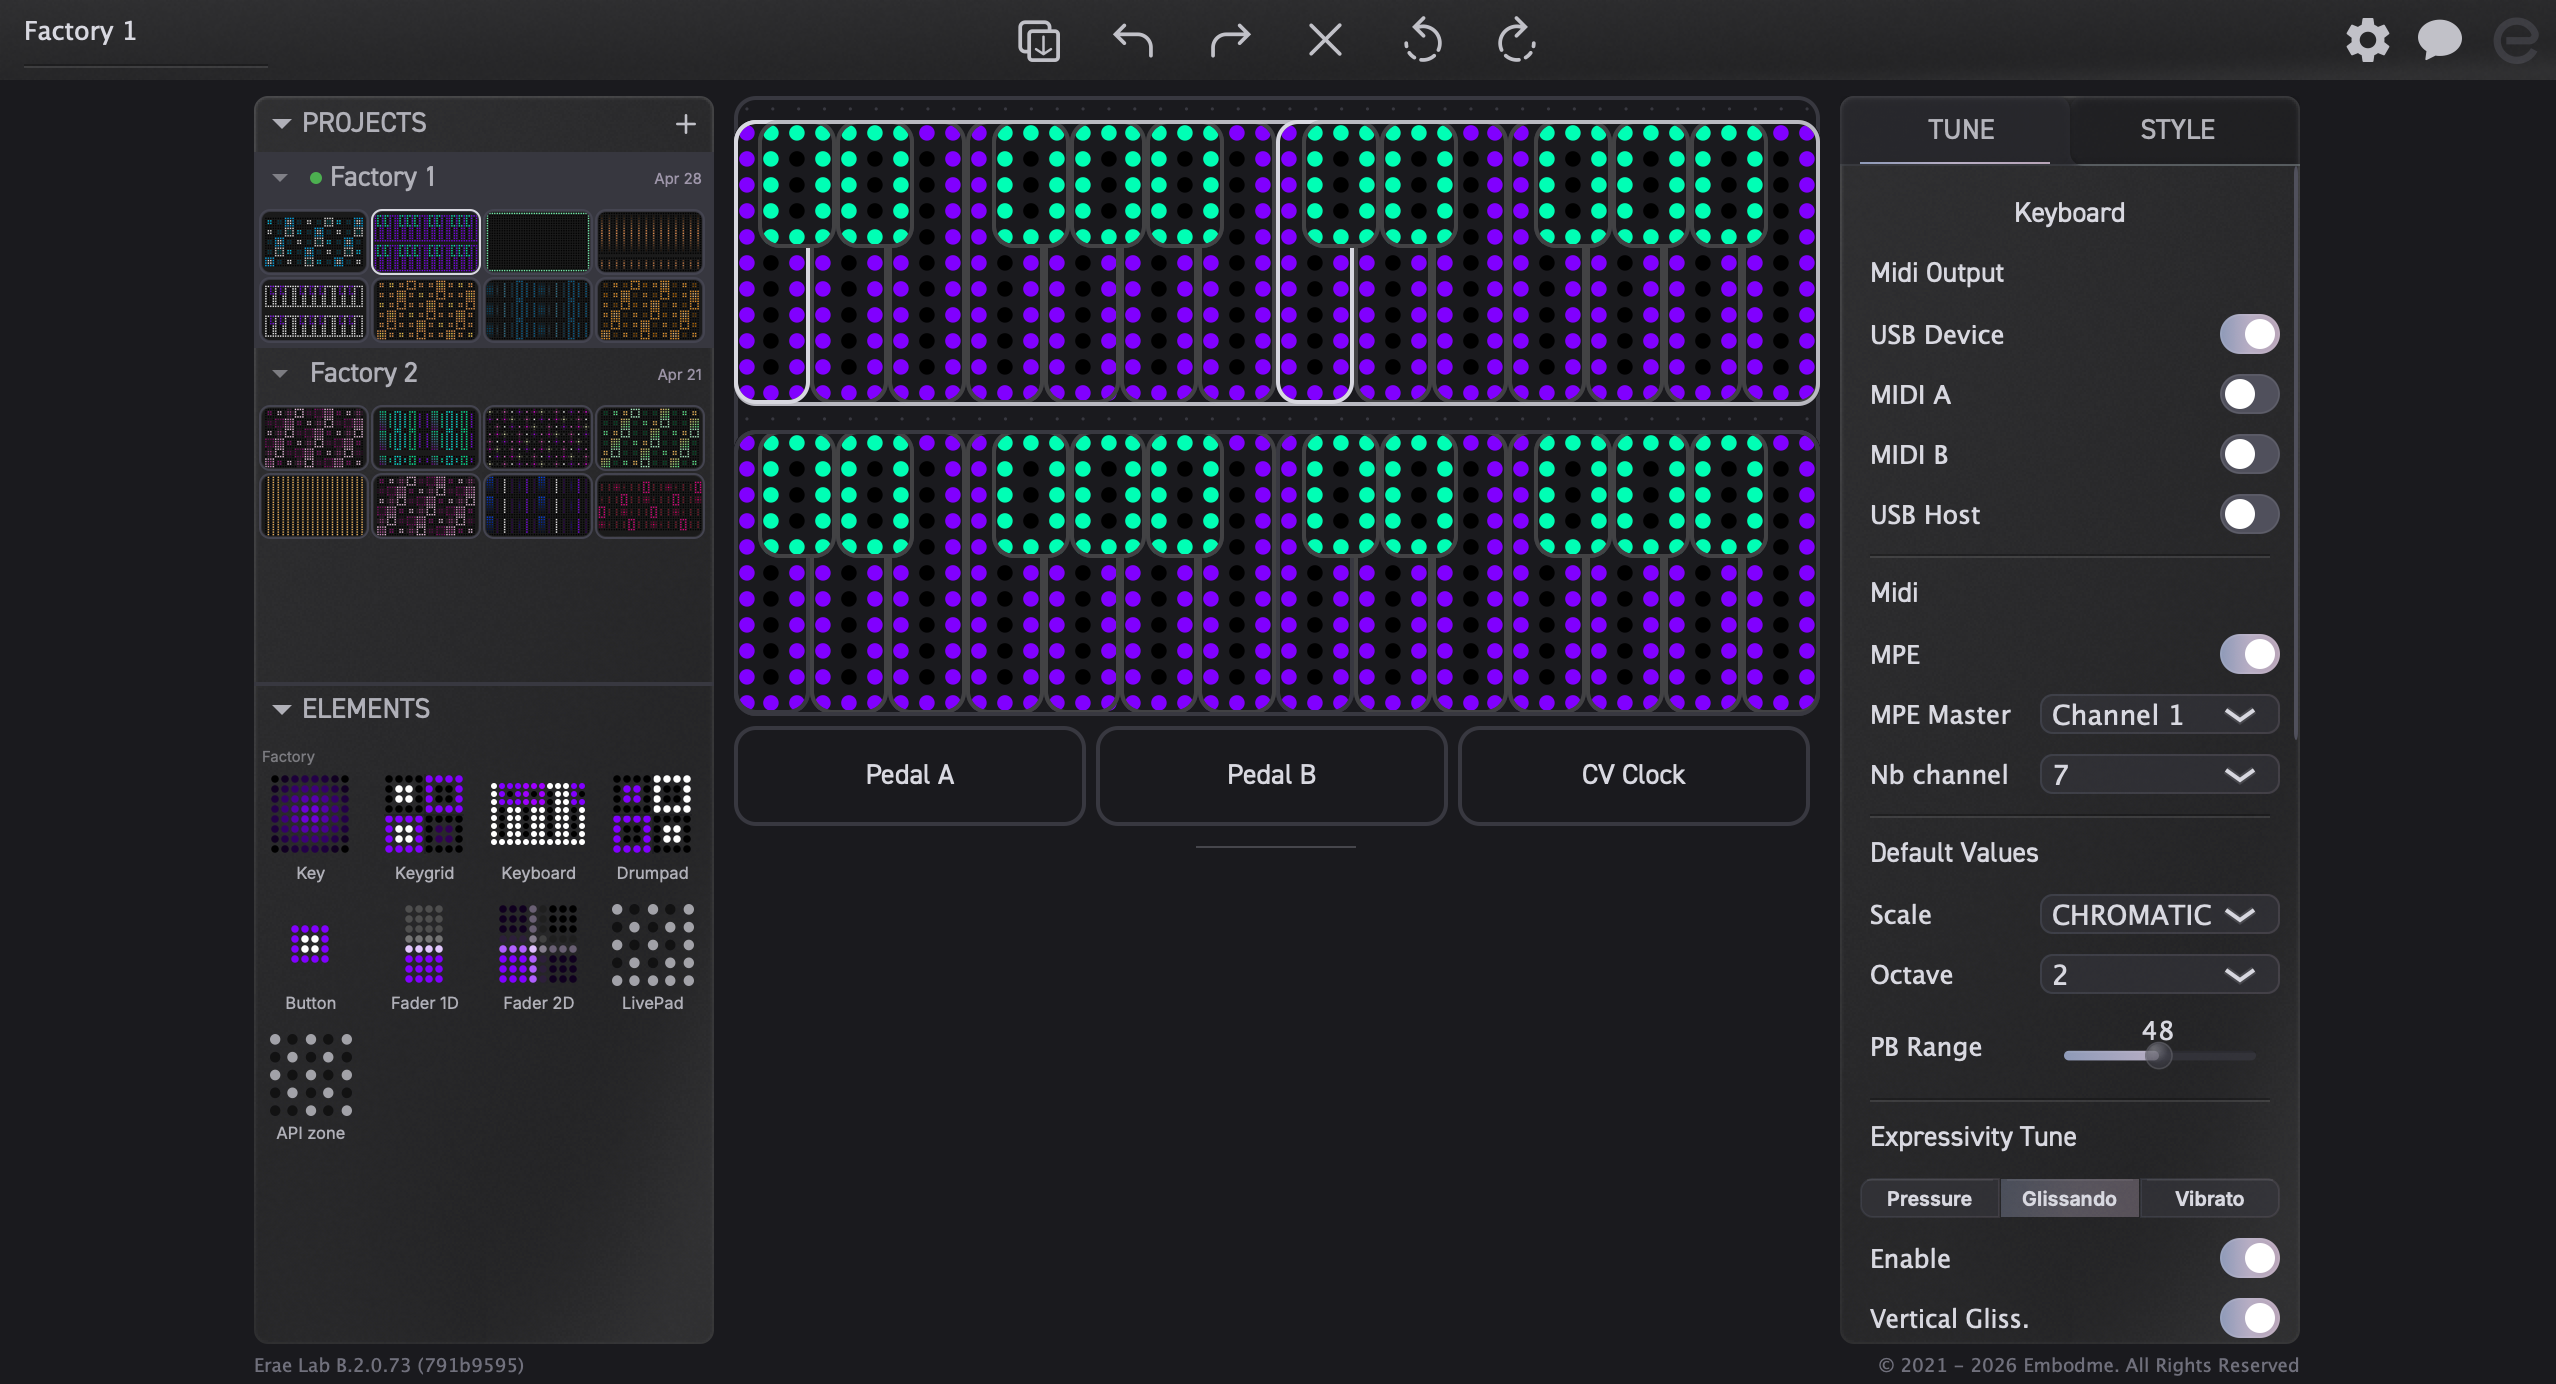
When an element is selected on the canvas, the right settings panel shows its configuration. The panel has two tabs: Tune and Style.
Tune Tab
The Tune tab contains all MIDI-related settings for the selected element. What you see here depends on the element type — a key element shows note, channel, and MPE settings; a fader shows CC number, range, and channel; a button shows its trigger mode and message type.
Common parameters found in the Tune tab:
| Parameter | What it controls |
|---|---|
| Channel | MIDI channel (1–16, or MPE for per-voice mode) |
| Note | MIDI note number for note-sending elements |
| CC | Control Change number for CC-sending elements |
| Min / Max | Output value range for faders and continuous elements |
| Mode | Element behavior, such as momentary or toggle modes where available |
Tip: When multiple elements are selected, the Tune tab shows only the parameters that are shared by all selected types. Editing a shared parameter updates all selected elements simultaneously.
For a full breakdown of Tune parameters by element type, see MIDI Settings.
Style Tab
The Style tab controls the visual appearance of the selected element — what it looks like on the Erae 2 surface.
Key parameters in the Style tab:
| Parameter | What it controls |
|---|---|
| Color | LED color for the element's active or idle state |
| Brightness | Overall LED intensity |
| Style | Lighting pattern (solid, gradient, radial, etc.) |
| Key Style | For keyboard elements: per-key color assignments for white and black keys |
Use this tab to edit the selected element's colors and animations directly.
Tip: The Style tab updates in real time on a connected Erae 2. Adjust colors and brightness while watching the device — no need to save or push manually.
For complete coverage of all appearance options, see Appearance and Styling.
Bottom Bar

The bottom bar is a thin strip at the very bottom of the window. It displays:
- Application version — The current Erae Lab version number (e.g.,
Erae Lab 2.0.3). - Copyright notice — Embodme copyright information.
Update prompts and component install progress are shown by the updater, Settings menu, or toast notifications rather than by the bottom bar.
What's Next
Now that you have a map of the interface, the following chapters go deep into each area:
- Projects — creating, switching, and organizing projects.
- Layouts — managing multiple layouts within a project.
- The Canvas — placing and editing elements.
- Elements — every element type and its settings.
- MIDI Settings — the Tune panel in full detail.
- Appearance and Styling — the Style panel and LED colors.
- Presets — element presets.
- Device Sync — how Erae Lab communicates with the Erae 2.
Chapter 4 — Projects
A project is the top-level container for your Erae Lab work. Each project holds eight layouts (up to 32 for legacy Erae projects), a project name, and project metadata. Projects are stored as folders on your computer and sync automatically with your connected Erae 2 device.
The Projects Sidebar
The left panel's Projects section lists every project in your library. Each row shows:
- The project name, which expands or collapses the row when clicked.
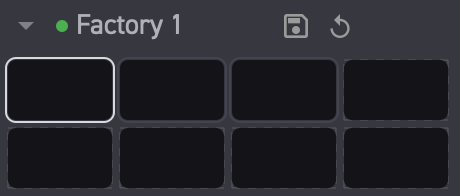
- A grid of up to eight layout thumbnails displayed as two rows of four, each showing a miniature preview of that layout's content. Filled slots appear highlighted; empty slots are shown as dimmed placeholders.
- A device badge (e.g.
MK2) when the project is currently loaded on a connected Erae 2.
Click a project name to expand or collapse its layout thumbnails. Double-click an inactive project name to load that project. Double-click the active project name to rename it inline. Press Enter to confirm a rename or Escape to cancel.
Click a filled thumbnail in the active project row to switch to that layout. Double-click a thumbnail in an inactive project row to open that project at that layout. Click an empty slot to create a new layout in that slot.
Right-click a project row to open the project menu. It includes Rename, Duplicate, Delete, Import..., Export..., and Open Projects Folder. Right-click a layout thumbnail to copy, paste, or clear that layout slot.
Creating a New Project
To create a new project, click the + button at the top of the Projects sidebar. Erae Lab initialises the project with a default name (Untitled) and a single empty layout. The new project becomes the active project immediately.
On first launch — or whenever the projects library is empty — Erae Lab automatically populates factory content so you always have a starting point to explore.
Factory projects are regular editable projects once they have been copied into your library. You can modify them directly, or duplicate one first if you want to preserve an untouched copy inside your own library.
Loading a Project
Click any project row in the sidebar to load it. The active project is highlighted and its first layout is sent to the connected device.
You can also open a project file from outside the library:
- Right-click a project row in the Projects sidebar and choose Import....
- Browse for an
.erprojlegacy XML file, a legacy.eraeprojectfile, a current project folder, or one of the supported project parts. - Erae Lab reads the project, adds it to the library, and activates it.
You can also use the toolbar load/import button or drag a supported file directly onto the Erae Lab window.
Legacy .emk layout files can also be imported individually:
- Select the project and layout slot where the layout should go.
- Use the layout import/open button in the toolbar or drag the
.emkfile onto Erae Lab. - Erae Lab replaces the active layout slot with the imported layout and syncs the change like any other layout edit.
Tip for v1 users:
.emkfiles are individual layouts. They do not appear as standalone projects in the Projects sidebar. Use.erprojfiles or exported project folders when you want to import a complete project.
Last-project auto-load: When Erae Lab starts, it automatically reopens the last project you had active, so you can pick up exactly where you left off.
Saving
Erae Lab saves your project automatically. Any change to the project -- moving an element, adjusting a parameter, switching layouts -- triggers a short autosave timer of about 300 ms. Once the timer fires with no further edits, the project is written to disk. Saves are granular: only the layouts and project data that have actually changed since the last save are written, keeping disk activity minimal.
Tip: The autosave debounce batches rapid edits (such as live-dragging an element) into a single write once you pause, rather than writing on every mouse move.
Save and Revert Snapshot
Autosave keeps the project files up to date. Even when the Projects sidebar shows Save/Revert controls, your latest edits have already been saved to disk. The controls do not mean "write this project now"; they manage a return snapshot.
Each project has an explicit snapshot baseline: the last version you accepted with the project-row Save button. It lets you try edits freely, keep working across launches, and return to the previously accepted version at any time.
When a project differs from its snapshot baseline, two small icons appear on that project row in the Projects sidebar:
- Save snapshot — captures the project's current saved-on-disk bytes as the new snapshot baseline. After this, the Save and Revert icons disappear until you make another change.
- Revert snapshot — restores the project from the last snapshot baseline. This discards changes made since the last snapshot Save.
If the reverted project is connected to an Erae 2, Erae Lab marks it to sync back to the device through the normal sync flow. If the device is disconnected, the reverted project remains marked for sync and will be pushed the next time syncing is available.
If a snapshot baseline is missing, Erae Lab shows only the Save icon. If a snapshot baseline is corrupt, Revert is disabled and Save replaces the corrupt snapshot with the current project state.
Tip: Think of autosave as "write my current work to disk" and project-row Save as "make this saved version my checkpoint." Revert returns to that checkpoint.
Duplicating a Project
Right-click a project row and choose Duplicate. Erae Lab creates an independent copy of the project, including all layouts, under a new name. The first duplicate is named <Project> Copy; if that name already exists, Erae Lab adds a numeric suffix. The duplicate is added to the library and becomes the active project.
Deleting a Project
Right-click a project row and choose Delete. Erae Lab removes the project from the active library immediately and there is no in-app undo. Rather than permanently erasing data immediately, Erae Lab archives the project under its app-data archive folder with a timestamped name. A deletion record is also written so that sync can propagate the deletion to connected devices.
If you delete the last remaining project, Erae Lab automatically resets to a new empty Untitled project so the application always has something active.
Tip: Archived projects are retained for 7 days before being purged automatically. If you accidentally delete a project, use the app's folder/open-folder action or contact support to locate the app-data archive folder before the purge window expires.
Exporting a Project
To share a project or back it up outside the library:
- Right-click the project row and choose Export….
- A file picker opens. Choose a destination folder.
- Erae Lab copies the selected project row's full project folder -- header, layouts, shared project data, and Lab-managed metadata -- to that location.
The exported folder can be re-imported on any machine running Erae Lab.
Tip: Exported project folders are self-contained. You can zip them for email, store them in cloud storage, or commit them to version control.
Importing a Project
To bring a project into your library:
- Right-click any project row in the Projects sidebar and choose Import....
- Select an
.erprojlegacy XML file, legacy.eraeprojectfile, current project folder, or supported project part. - Erae Lab reads the project, resolves any name conflicts with an auto-incremented suffix, and adds it to the library.
You can also drag a supported project file or folder directly onto the Erae Lab window.
When importing a project folder, Erae Lab discards imported snapshot/, snapshot.tmp, snapshot.old, and .live_stamp state, then creates a fresh local snapshot baseline for the imported copy. This prevents another machine's snapshot/checkpoint state from affecting your local Save/Revert controls.
You can also import individual layout files (.eraebin or legacy .emk format) using the layout import/open button in the toolbar or by dragging the file onto Erae Lab. The layout is placed in the active project's current layout slot.
The Project Folder Format
Project folders contain several binary parts. Current project headers are stored as settings.eraebin; legacy .eraeproject headers are still import-compatible but are not the primary current format. Each .eraebin part begins with a 5-byte header containing a format version tag and a hash of the payload, ensuring integrity on load. Individual layouts, the project header, and shared project data are each stored as separate files within a project folder hierarchy:
MyProject/
  settings.eraebin         ← project header
  project_elements.eraebin ← shared project elements
  sync.eraebin             ← sync metadata (dirty flags, device ID)
  .live_stamp              ← Lab-managed live edit marker
  snapshot/                ← accepted Save/Revert checkpoint
    .snapshot_stamp        ← snapshot marker
  layout_0/
    data.eraebin           ← layout data
  layout_1/
    data.eraebin
  ...
The project folder is a plain directory -- you can inspect it in Finder or Explorer, copy individual layout files, or back it up with any standard file tool. snapshot/, .live_stamp, and snapshot/.snapshot_stamp are managed by Erae Lab. sync.eraebin stores sync state and is excluded from snapshot comparisons.
Toolbar Device Operations
The toolbar provides two operations for transferring projects between Erae Lab and a connected device:
- Send to Device — pushes the current project from your computer to the connected Erae 2, overwriting the device's stored project with your latest version.
- Receive from Device — pulls the project currently stored on the connected Erae 2 back into Erae Lab, useful when recovering from a device that has diverged from the computer copy.
These operations are available in the toolbar when a device is connected and the active project matches the device's project slot.
Project Library Location
By default, projects are stored in Erae Lab's app-data folder under EraeLab/projects:
| Operating system | Default project folder |
|---|---|
| macOS | ~/Library/Application Support/Embodme/EraeLab/projects |
| Windows | %APPDATA%\Embodme\EraeLab\projects |
| Linux | $XDG_DATA_HOME/Embodme/EraeLab/projects or ~/.local/share/Embodme/EraeLab/projects when XDG_DATA_HOME is not set |
Archives are stored beside it under EraeLab/archive. To jump to the active project's folder, right-click a project in the Projects section and choose Open Project Folder. This is the safest way to reveal the exact location for your operating system and installation type.
See Chapter 5 — Layouts for details on working with the layouts within a project.
Chapter 5 — Layouts
A layout is a canvas of elements assigned to one of your project's layout slots. Each layout is independent: it has its own set of elements and its own visual/MIDI configuration. Switching layouts on your Erae 2 sends the new layout to the device in real time.
Layouts per Project
Erae 2 projects hold exactly eight layout slots, numbered 0 through 7. Legacy Erae projects may have up to 32 layout slots. Slots can be empty or filled. An empty slot contains no elements and takes up no space on the device; a filled slot holds a complete canvas configuration.
The Projects sidebar shows each project's layout slots as two rows of four small thumbnails directly beneath the project name. Filled slots render a miniature preview of the elements they contain; empty slots appear as dimmed placeholders. This gives you an at-a-glance picture of how densely each project is populated.
Tip: Each layout can hold up to 256 elements. This limit is per-layout, not per-project. Plan your element distribution within each layout before building a dense configuration.
The Layout Selector Panel
The Layout Selector Panel runs across the top of the central canvas area. It displays eight numbered buttons, one per layout slot.
- Filled slots are shown with a coloured indicator.
- Empty slots are shown dimmed (grey).
- The active layout is highlighted.
Click any button to switch to that layout. The canvas updates immediately to show the selected layout's elements, and the layout is pushed to the connected device.
Tip: You can navigate layouts with keyboard shortcuts. See Chapter 15 — Shortcuts and Interactions for the full list.
Layout Operations
Right-click a layout thumbnail in the Projects sidebar (or use the layout slot context menu in the Layout Selector Panel) to access the following operations:
| Operation | Description |
|---|---|
| Rename | Opens an inline rename field for the layout. Press Enter to confirm or Escape to cancel. |
| Duplicate | Creates an independent copy of the layout in the next available slot within the same project. |
| Copy | Copies the layout to the internal clipboard so it can be pasted into another slot or project. |
| Delete | Removes the layout from the slot. The slot becomes empty; the operation is undoable. |
Tip: Use Duplicate before making significant edits to preserve a known-good version of a layout in an adjacent slot.
The Layouts Browser
The left panel's Layouts section provides a browsable grid of all layouts across all projects in your library. Each card shows a thumbnail preview, the layout name, and its parent project name.
Use the search box at the top to filter by layout or project name. Toggle the Fav button to show only layouts you have marked as favourites.
Clicking a layout card loads that layout — and its parent project if it is not already active — into the canvas.
Drag-and-Drop Between Projects
You can move or copy a layout from one project to another by dragging its thumbnail in the Projects sidebar:
- In the Projects sidebar, expand both the source and destination project rows.
- Drag a layout thumbnail from the source project and drop it onto a slot in the destination project row.
- The layout data is copied into the target slot.
If the target slot is already filled, the existing layout is replaced. The operation is undoable at the project level.
Tip: Dragging a layout between projects is a fast way to assemble a new project from your best layouts across multiple existing ones.
Layouts as Containers
A layout is a container for elements — it holds nothing by itself other than a name and a list of element definitions. All visual and behavioural properties live on the elements placed within the layout.
Undo and redo operate on project actions, including layout edits. When you switch layouts, Erae Lab keeps enough context to undo recent layout-aware edits safely.
See Chapter 6 — The Canvas for how to place, move, and configure elements within a layout.
The Canvas
The canvas is the central workspace for the current layout. It represents the Erae surface as a 42 x 24 grid, matching the playable area of Erae 2.
Placing Elements
Drag a supported element from the Elements section onto the canvas. Erae Lab shows a placement preview while you drag. Release to place the element.
If the drop position overlaps another element or falls outside the grid, Erae Lab rejects the placement. Try a different position or resize nearby elements first.
Element presets can also be dragged from the User area of the Elements section. They create a new element with the saved size, behavior, and appearance from that preset.
Moving, Resizing, and Rotating
- Move -- drag a selected element to a new grid position.
- Resize -- drag the handles shown around the selected element.
- Rotate -- use the toolbar rotate buttons when the selected element supports rotation.
- Drag-copy -- hold Alt (Option on macOS) while dragging to copy instead of move.
Erae Lab prevents elements from overlapping. When several selected elements move together, they keep their relative positions and are checked against all non-selected elements.
Multi-Select
You can select multiple elements in two ways:
- Lasso selection -- drag across empty canvas space to select every element touched by the rectangle.
- Cmd/Ctrl-click -- hold Cmd on macOS or Ctrl on Windows/Linux while clicking an element to add or remove it from the current selection.
Use Cmd+A / Ctrl+A to select all elements in the current layout.
Undo and Redo
Erae Lab records canvas edits as undoable project actions.
- Undo --
Cmd+Z/Ctrl+Z - Redo --
Cmd+Shift+Z/Ctrl+Shift+Z
The toolbar also exposes Undo and Redo buttons.
Copy, Paste, and Duplicate
With one or more elements selected:
- Copy --
Cmd+C/Ctrl+C - Paste --
Cmd+V/Ctrl+V - Duplicate --
Cmd+D/Ctrl+D - Delete --
BackspaceorDelete
Duplicating or pasting within the same layout may adjust MIDI CC or CV assignments to avoid conflicts. Pasting across layouts preserves the copied element data unless Erae Lab needs to resolve a conflict.
Layout Drops
You can drag a layout thumbnail from the Projects sidebar onto a layout slot to copy or replace that slot's layout. This is useful for building a new project from an existing layout.
Live Device Updates
When an Erae device is connected, canvas edits are autosaved and sent to the device after the edit settles. You do not need to run a normal manual push/pull step after every change.
Elements
Elements are the building blocks of a layout. Erae Lab currently supports the following element types.
Keyboards
Keygrid
An isomorphic grid for interval-based playing. Good for chords, transposition-friendly patterns, and expressive performance.
Keyboard
A piano-style chromatic layout for users who want a familiar note arrangement.
Drumpad
A pad grid tuned for drum and percussion layouts.
Continuous Controls
Fader 1D
A single-axis fader for values such as volume, cutoff, or send level.
Fader 2D
An XY pad for controlling two values at once.
Triggers and Pads
Button
A configurable trigger element. It can send note, CC, program change, CV, or tap-tempo style actions depending on configuration.
Key
A single expressive note pad. Useful for large one-shot pads, drones, or dedicated performance triggers.
Integrations and Utility Elements
Ableton Launchpad
An Ableton Live session control surface for supported workflows.
API Zone
A programmable touch area that exposes raw touch data to external software.
Pedal Input
A non-surface element that maps an attached pedal input to MIDI or CV behavior.
Working with Elements
For every supported element, the normal workflow is the same:
- Drag it from the sidebar onto the canvas.
- Resize and position it.
- Tune its behavior in the Tune tab.
- Style its LEDs in the Style tab.
MIDI Settings
The Tune panel controls how each supported element sends MIDI and CV data.
Common Settings
Most playable elements share these core parameters:
- MIDI Channel
- MIDI Group
- Trigger on Entry
- note range or root note where relevant
- CC assignments
- CV assignments where supported
Speed mappings use the finger detector's continuous movement speed, not note-on velocity. The value is smoothed and normalized so 0 cm/s is minimum and 100 cm/s reaches the maximum configured CC or CV value.
MIDI Output Destination
Each element can send to any combination of the available destinations:
- USB Device -- the Erae appears as a USB MIDI device to your computer
- TRS MIDI A / TRS MIDI B -- the physical TRS MIDI output jacks
- USB Host -- for connecting to a USB MIDI host device directly
Disable all outputs to silence an element without deleting it.
Keyboards
Keyboard-style elements let you configure:
- root note and octave
- note layout across the grid
- pitch bend range
- pressure, vibrato, and glide-style expressivity
- optional CC mappings for position, pressure, and speed
Scale selection is available for the built-in scale choices shown in the UI.
Faders
Supported faders are:
- Fader 1D
- Fader 2D
They provide:
- initial values
- absolute axis mappings
- pressure mappings
- speed mappings where supported
- CV routing where supported
Buttons and Keys
Buttons and keys can be configured for note, CC, program change, CV, or tap-tempo style behavior depending on the element type.
MPE and Expressivity
Where supported, MPE and expression settings control how finger pressure and motion are translated into MIDI. Match the pitch-bend range in your target synth for correct behavior.
Pedal Inputs
Pedal inputs have a Type selector that switches between supported pedal modes such as switch, sustain, kick, and expression behavior. The Tune panel changes to show the parameters for the selected pedal type.
Appearance & Styling
The Style tab controls how elements look on the Erae surface.
What You Can Edit
For supported elements, you can configure:
- colors
- gradients
- edge styles
- touch animations
- shared style updates across multi-selection
Color Picker
Click a color control in the Style tab to open the color picker. Use the hue wheel, saturation/value area, or hex field to choose the color applied to the selected style property.
Keyboard Styling
Keyboard-style elements support degree-aware or note-aware coloring depending on the element. This lets you keep root notes, playable zones, and performance areas visually clear.
Fader Styling
Faders expose direct color controls for their active area, edge, and background so their current position stays easy to read.
Multi-Select Editing
When several elements are selected, changes in the Style tab apply to all of them at once. Color items that differ across the selection display as Mixed until you assign a new value.
Presets
This manual covers the preset workflows that are available in the current release.
Element Presets
Element presets save a configured canvas element so you can reuse it later. A preset captures the element type, size, MIDI/CV behavior, and appearance settings. It does not store the element's current canvas position.
Saving an Element Preset
To save an element preset, drag an element from the canvas into the User area of the Elements section. Erae Lab creates a new preset entry that can be reused in any project.
Loading an Element Preset
Drag an element preset from the User area of the Elements section onto the canvas. Erae Lab creates a new element with the saved configuration.
Renaming and Organizing
User element presets can be renamed from the Elements section when the UI exposes rename controls for that preset. Use clear names that describe the intended use, such as lead-keygrid-mpe or filter-fader-cc74.
EraeSound Factory Presets
If EraeSound is installed or hosted from Erae Lab, its sound preset browser includes factory sound presets. These are separate from Erae Lab element presets.
EraeSound factory presets are read-only. You can load them and edit sound parameters while you work, but you cannot rename, delete, or overwrite the factory preset file. Use Save As... in EraeSound to create an editable user preset from a factory preset.
Chapter 12 — Device Sync
Erae Lab maintains a live, bidirectional link between your project library and connected Erae 2 hardware. When you connect a device, Lab compares what is on the hardware against what is in your library and reconciles the two automatically — pushing new or updated projects to the device, pulling projects that were created or edited on the device, and resolving any naming conflicts it detects along the way.
For hardware-side sync behavior, see the Erae 2 User Manual, Chapter 14.
Requirements
Full bidirectional sync requires:
- Erae 2 connected over the vendor USB binary protocol (requires firmware 2.0 or later on the device).
- An SD card inserted in the Erae 2. Projects are stored on and read from the SD card during sync. Without an SD card, sync is not possible.
Note: When no compatible device is connected, the settings panel and sync status indicator reflect a disconnected state. Edits made in Erae Lab while disconnected are queued and pushed the next time a compatible Erae 2 is connected.
Connection Detection
Erae Lab detects a connected Erae 2 automatically over USB as soon as the device is ready. No manual pairing step is required. The status indicator in the toolbar changes to reflect the connection state:
- Disconnected — no device detected, or device is starting up
- Syncing — project manifest comparison and file transfer in progress
- Connected — sync is complete and the device is idle

Tip: Leave your Erae 2 powered on and connected while working in Erae Lab. The sync engine keeps the device up to date in the background as you edit, so your hardware always reflects your most recent work.
Note: Best USB synchronization performance is guaranteed only when Erae 2 is powered from its dedicated USB power supply. Powering the device from a computer USB port can introduce shared-bus power constraints that affect sync reliability. For stable and consistent device sync, always use the dedicated supply.
Multi-Device Support
Erae Lab can detect more than one connected Erae 2. Only one device is the active device at a time: this is the device Lab edits, syncs, updates, and uses for hosted EraeSound input.
When multiple devices are connected, open the Settings menu and choose the intended device in the Device selector before editing or syncing. The selected device is remembered between launches.
Each Erae 2 carries a unique hardware identifier. Erae Lab uses this identity when reconciling projects, dirty flags, deletion tombstones, and sync history. This prevents Lab from treating two different physical devices as the same sync target just because they contain projects with matching names.
Use the active device selector when you:
- Connect a studio device and a performance device at the same time.
- Want to copy Lab changes to one device without touching another connected device.
- Need to pull edits from a specific device after editing layouts directly on hardware.
- Host EraeSound inside Lab and need its MIDI/touch input to follow a specific Erae.
Lab and hosted EraeSound share the same active device selection. Changing the active device in Lab also changes which connected Erae is used by hosted EraeSound.
The Sync Protocol
When a device connects, the sync engine runs through a structured sequence:
- Save to media — Lab asks the device to flush its active layout to its SD card before reading the manifest, ensuring no in-memory edits are lost.
- Request manifest — Lab reads the full list of projects on the device, including each project's name, unique ID, format version, and dirty flag.
- Compare manifests — Lab compares the device manifest against the local project library, building a list of sync actions.
- Execute actions — Lab works through each action in sequence: pushing Lab projects to the device, pulling device projects to Lab, renaming projects where the name has changed, and deleting projects that were removed in Lab since the last sync.
Progress is shown as a toast notification during sync. When all actions complete, the engine returns to Idle and the toast clears.
Push and Pull Operations
Push to Device
A project is pushed from Lab to the device when:
- The project exists in Lab but not on the device (new project).
- The project exists on both sides but the Lab copy has been edited since the last sync.
Pushing sends the project's settings file and all layout files as a batch transfer over the vendor USB binary protocol.
Pull from Device
A project is pulled from the device to Lab when:
- The project exists on the device but not in Lab (created on device).
- The project exists on both sides but the device copy carries the dirty flag (edited directly on the hardware since the last sync).
Pulled project files arrive as raw binary payloads and are assembled in memory before being written to disk.
Tip: Editing a layout directly on the Erae 2 — for example, switching active layouts using the hardware controls — sets the dirty flag on the device. When you reconnect, Lab pulls the updated version automatically. You do not need to manually initiate a pull.
Rename Detection
If a project's unique ID matches on both sides but the name differs, the sync engine detects a rename. Depending on which side the rename happened on:
- Renamed in Lab — the old name is deleted from the device and the project is pushed under the new name.
- Renamed on device — Lab adopts the device's name as the new local name.
Conflict Resolution
If you edit the same project in two places — once in Lab and once directly on the Erae — Lab cannot know which version you want to keep. When you reconnect, it pauses sync and asks you with a notification that offers three buttons:
Keep Device · Keep Both · Keep Lab
Pick one and Lab finishes the sync accordingly. Until you choose, nothing on either side is changed.
What each choice does
Keep Device — Lab replaces its copy with the version on your Erae. The edits you made in Lab on that project are discarded. There is no automatic backup.
Keep Lab — Lab sends its version to the Erae, overwriting the device's copy. The edits you made on the device for that project are discarded. There is no automatic backup.
Keep Both — Lab keeps both versions, side by side, on both your computer and your Erae:
- Your Lab version keeps its original name (e.g.
My Song). - The version that was on the Erae is renamed by adding
_eraeto the end (e.g.My Song_erae) and copied into Lab as a separate project. - After sync finishes, both projects exist in Lab and on the device. You can open them, compare, and delete whichever you don't want later.
If a project called My Song_erae already exists, Lab uses My Song_erae_2, then _erae_3, and so on, so nothing is ever overwritten.
If you are unsure which side has the changes you need, choose Keep Both. It is the only choice that never destroys work. You can always clean up the extra copy afterwards.
Closing the notification
If you click the close button (X) on the conflict notification instead of choosing, Lab treats it as Keep Lab — your Lab version is pushed to the Erae and the device's changes are discarded. The notification itself reminds you of this when you hover Close. If you want to think about it first, just leave the notification on screen: sync stays paused until you decide.
What triggers a conflict
A conflict only appears when both sides have unsaved changes since the last successful sync — your Lab project shows unsaved edits and the same project was edited on the Erae. If only one side changed, Lab simply syncs that side automatically with no notification.
Flash-Only Projects
Some projects on the device exist only in flash memory — they were written by a firmware process and never migrated to the SD card. These projects are flagged in the device manifest as flash-only and are treated as read-only by the sync engine. Lab will not attempt to delete or overwrite a flash-only project.
Active Layout Debouncing
When you are actively editing a layout in Lab while the device is connected, Lab does not push every keystroke to the device. Instead, it waits until editing activity has been idle for 200 ms before sending an updated active layout push. This debounce prevents a flood of partial transfers during rapid edits.
Tip: The debounce delay is imperceptible during normal editing. If you need the device to reflect a change immediately — for example, before a performance — make your edit and pause for a moment, or save the project explicitly.
Deletion Tombstones
When you delete a project from Lab while no device is connected, Lab records a deletion tombstone — a persistent record containing the project's unique ID. The next time a device is connected, the sync engine checks this tombstone list and sends a DeleteProject command to the device for each recorded entry.
If a device is connected at the moment of deletion, the delete command is sent immediately without waiting for the next connection cycle.
Tip: Tombstones are cleaned up automatically after the delete is confirmed by the device. You do not need to manage them manually.
Sync Status Notifications
The sync engine communicates its progress through brief toast notifications that appear in the Lab interface:
- A "Syncing…" toast appears when the manifest comparison and file transfers begin.
- The toast updates with the name of each project being transferred.
- A "Sync complete" toast confirms that all actions finished successfully.
- If a timeout or protocol error occurs during a sync step, an error toast appears. Reconnecting the device restarts the sync sequence.
Tip: Sync errors most often result from briefly disconnecting the USB cable during a transfer. Reconnect the cable and Erae Lab will restart the sync from the beginning automatically.
Chapter 13 — Firmware Updates
Erae Lab handles firmware updates for connected Erae 2 hardware. Firmware files are bundled with the Erae Lab installation — no internet download is required at update time. Keeping Erae Lab itself up to date ensures you always have the latest firmware available for your device.
Automatic Update Checking
When an Erae 2 connects, Erae Lab compares the device's reported firmware version against the latest version included in the current Lab installation. If the bundled firmware is newer than what is on the device, the update starts automatically.
Tip: Keep Erae Lab up to date to ensure the bundled firmware is current. Firmware files ship inside the Erae Lab application package, so installing a new version of Lab is the primary way to receive new firmware.
Single-Stage SysEx Streaming
For Erae 2 hardware, the update is a single-stage process:
- Reboot to bootloader — Lab sends a
RebootForUpdatecommand via the vendor USB binary protocol. The device reboots into bootloader mode and re-enumerates on the host as a MIDI device named "Bootloader". - Bootloader detection — Lab scans for the bootloader MIDI port. Once detected, it switches from the vendor USB protocol to MIDI SysEx for the transfer.
- SysEx streaming — Lab streams the firmware file (
erae_touch.syx) as a sequence of SysEx packets over the bootloader MIDI port. A progress indicator tracks the transfer as packets are sent. - Reboot to firmware — When the full stream is complete, the device reboots automatically into the new firmware and reconnects as a normal Erae 2. There is no per-packet acknowledgement — the reboot is triggered by stream completion.
Tip: Do not disconnect the USB cable during a firmware update. If the transfer is interrupted, reconnect the device — if it re-appears in bootloader mode, Lab will detect the orphaned bootloader and offer recovery options (see below).
Bootloader Detection and Orphan Recovery
Lab continuously scans for the bootloader MIDI port whenever no vendor USB device is present. This scan is active even when no update is in progress, allowing Lab to detect a device that is stuck in bootloader mode — for example, after a failed or interrupted previous update.
Orphan Bootloader Recovery
If Lab detects a bootloader port without having initiated an update, it recognizes the device as an orphan bootloader — a device waiting for a firmware file that was never delivered. After a 3-second confirmation window, Lab presents a dialog:
- Select file — Lab opens a file chooser so you can select a
.syxfirmware file manually. Streaming then proceeds as a normal SysEx update. - Dismiss — Lab ignores the bootloader port. The device remains in bootloader mode until you reconnect and confirm recovery.
Tip: If your device is stuck showing a bootloader status and Erae Lab does not automatically offer recovery, disconnect and reconnect the USB cable. The 3-second orphan detection window restarts on each connection.
Progress Tracking
A toast notification in the Lab interface tracks the update in real time:
- "Updating Erae firmware..." appears when streaming begins.
- Progress advances as SysEx packets are sent.
- "Firmware updated!" confirms a successful reboot into the new firmware.
- If an error occurs at any stage, an error toast appears with a brief description. In most cases, reconnecting the device and retrying the update resolves the issue.
Tip: After a successful update, Erae Lab suppresses the update prompt until the device disconnects and reconnects. Reconnecting will trigger a fresh version check.
macOS: MIDI Device Reset After Update
After a firmware update completes on macOS, the Erae 2 re-enumerates as a new MIDI device. If Erae Lab does not automatically reconnect, or if the device does not appear in other MIDI applications:
- Open Audio MIDI Setup (in
/Applications/Utilities). - Locate any stale Erae 2 entries and remove them using the minus (−) button.
- Unplug and replug the USB cable. The device re-enumerates cleanly.
- Relaunch Erae Lab if the connection indicator does not respond.
Boot Failure Troubleshooting
If the device does not boot normally after a firmware update:
- Blank or frozen surface — hold Settings while rebooting the Erae to enter update recovery. When Erae Lab detects the device in this state, it shows a toast suggesting an update to the current bundled firmware.
- No USB enumeration — try a different USB cable and port. If the device still does not enumerate, contact Embodme support (support@embodme.com) — do not attempt to power-cycle repeatedly.
- Recovery
.syxfile — the bundled firmware file is located inside the Erae Lab application package. On macOS: right-click Erae Lab in/Applications, choose Show Package Contents, and navigate toContents/Resources/firmware/. You can also use any previously downloaded.syxfile if you have one available.
Settings Menu
Open the Settings menu by clicking the gear icon in the top-right toolbar. The menu opens as an overlay and groups device selection, EraeSound audio/MIDI settings, update checks, and component installation tools.
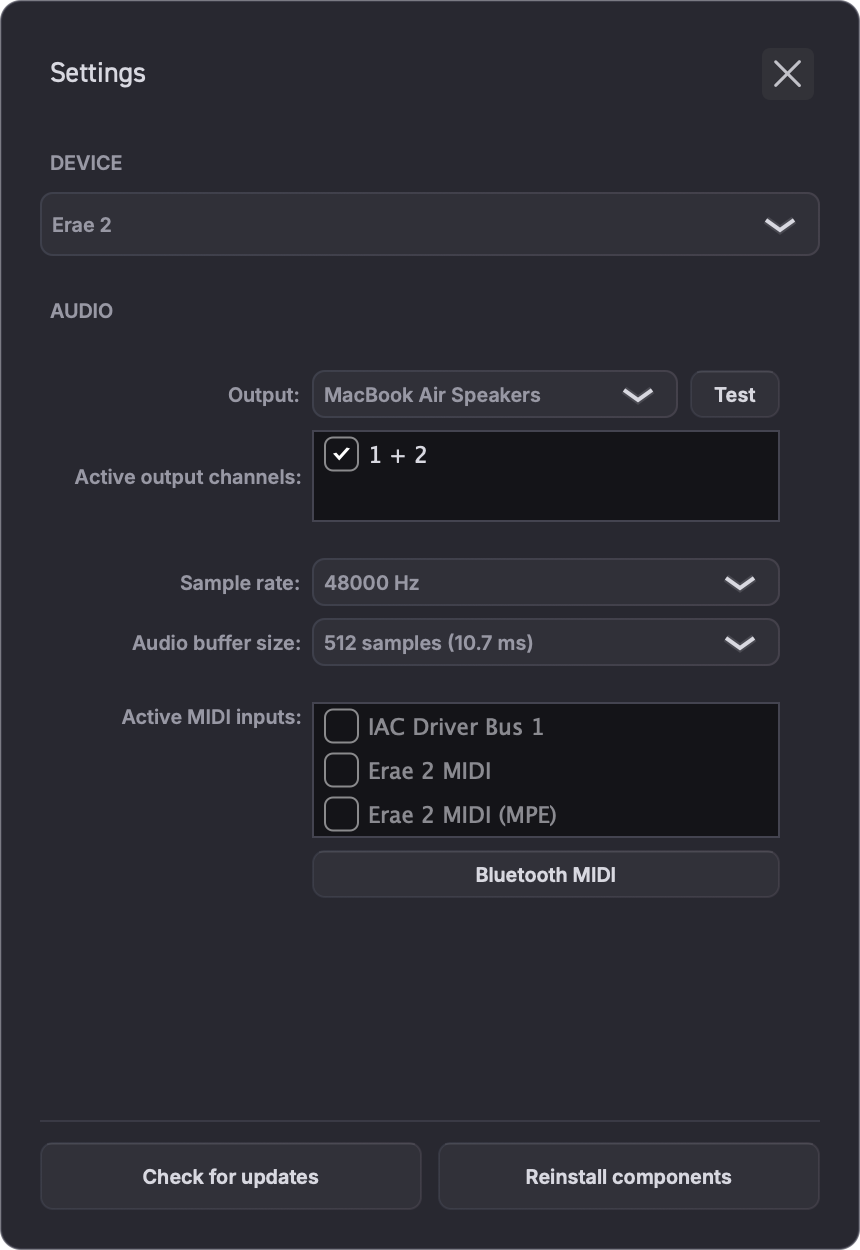
Device Selection
If more than one Erae device is connected, the Settings menu shows a Device section with a device selector. Choose the device you want Erae Lab to control before editing, syncing, updating firmware, or hosting EraeSound. The active device selection is remembered for the next launch.
If only one Erae device is connected, this section is hidden because there is nothing to choose.
Sound Settings
When the hosted EraeSound engine is running or enabled inside Erae Lab, the Settings menu shows an Audio section. Use it to choose the audio output device, output channel configuration, sample rate, buffer size, and related driver options exposed by the operating system.
These settings affect hosted EraeSound playback. Erae Lab's project editing features do not require an audio interface; they continue to work even if no audio output is configured.
MIDI Settings and Auto Erae
The same Audio section includes MIDI input checkboxes when EraeSound is hosted. Erae Lab automatically enables connected Erae MIDI inputs for EraeSound so notes, pressure, and performance gestures reach the sound engine without manual setup.
This automatic selection is sometimes called Auto Erae. It runs on first launch and again when the operating system reports MIDI devices being connected or reconnected. After a firmware update or USB reconnect, Erae Lab re-checks the available MIDI inputs and re-enables detected Erae ports.
You can still use the MIDI input list to inspect or adjust the enabled inputs manually. Erae Lab claims non-bootloader Erae MIDI inputs automatically; bootloader/update ports are ignored for performance input.
Check for Updates
Click Check for updates to ask Erae Lab's app updater to look for a newer Erae Lab version immediately. Erae Lab also checks for app updates automatically in the background, but this button is useful when you want to verify your installation before a session.
If an app update is available, follow the updater prompts. Your open project is not overwritten by checking for updates. Managed components are checked automatically on launch and can be refreshed manually with Reinstall components.
Install or Reinstall Components
Click Reinstall components to force Erae Lab to reinstall its managed component packages. This includes the EraeSound package, firmware package, scripts, and factory content package.
Use this when a component appears missing or broken, when factory content did not install correctly, or when support asks you to refresh bundled content. Erae Lab clears the local component manifest, rechecks the release source, and shows progress or failure toasts while reinstalling. On Windows, the installer may ask for administrator approval when it needs to update protected component locations. Factory content is merged safely: bundled read-only content can be added or replaced, but your projects and user presets are not deleted.
If you are offline, Erae Lab can use available cached installer content where possible; otherwise it reports the failure and you can retry when the network is available.
CV Clock
The bottom bar can expose a CV Clock control for configuring clock output from the Lab project. Open it to set:
- Enable -- turns CV clock output on or off.
- Beat Division -- chooses the clock rate:
1,2,4,8,24, or48 ppqn. - Output -- chooses the CV output pair used for the clock signal. Erae Lab reserves the adjacent output for reset behavior when the device/project requires it.
Project and Element Settings
Project-specific settings still live in their dedicated panels rather than in the gear menu. For example, CV Clock and per-element MIDI settings are configured from the canvas and right-side settings panel. See MIDI Settings, The Canvas, and Device Sync for those workflows.
Saved State
Erae Lab remembers app-level state between launches, including the active device, the current Lab/Sound view, hosted EraeSound power state, hosted plugin state, and audio/MIDI settings used by hosted Sound.
Keyboard Shortcuts & Interactions
This chapter is a quick-reference guide to every keyboard shortcut, mouse gesture, and drag-and-drop interaction available in Erae Lab. Keep it open while you explore the canvas.
Keyboard Shortcuts
Shortcuts are available when the canvas is in focus. Undo and redo also work from any panel, except inside text fields where Cmd+Z (macOS) / Ctrl+Z (Windows) applies to the text field's edit history instead.
| Action | macOS | Windows / Linux |
|---|---|---|
| New layout | Cmd + N | Ctrl + N |
| Open / Import | Cmd + O | Ctrl + O |
| Export current layout | Cmd + S | Ctrl + S |
| Undo | Cmd + Z | Ctrl + Z |
| Redo | Cmd + Shift + Z | Ctrl + Shift + Z |
| Copy | Cmd + C | Ctrl + C |
| Paste | Cmd + V | Ctrl + V |
| Duplicate | Cmd + D | Ctrl + D |
| Delete selected | Delete or Backspace | Delete or Backspace |
| Select all | Cmd + A | Ctrl + A |
Tip: Duplicate (
Cmd + D) pastes a copy of the selected element immediately adjacent to the original with CC and CV values automatically incremented — useful for building a row of faders without manually adjusting each channel.
Tip: Undo and redo history is per-project and survives panel switches. You can undo across multiple edits made in the MIDI or Appearance panels, not just canvas moves.
Mouse Interactions on the Canvas
Selecting Elements
| Gesture | What it does |
|---|---|
| Click an element | Select it. Any previous selection is cleared. |
| Cmd + click (macOS) / Ctrl + click (Windows) an element | Add the element to the current selection, or remove it if it is already selected. |
| Click + drag on empty canvas area | Draw a lasso rectangle. All elements fully or partially inside the rectangle are selected when you release the mouse. |
| Click on empty canvas area | Deselect all. |
Tip: The lasso selection uses a batch-set mechanism — the right panel updates once after the drag completes, not on every element, so it stays responsive even on a full 16-element layout.
Moving and Resizing Elements
| Gesture | What it does |
|---|---|
| Click + drag a selected element | Move it. All elements in the current selection move together. Erae Lab snaps elements to the pad grid as you drag. |
| Drag a resize handle (corner or edge) | Resize the element. The element snaps to the nearest valid grid size. |
Elements cannot overlap. If you drop an element onto an occupied cell, it snaps back to its previous position.
Drag-and-Drop
Sidebar to Canvas
Drag an element type from the element sidebar (left panel) and drop it onto the canvas. Erae Lab shows a ghost outline as you drag, snapping to the grid. Release the mouse to create the element at that position.
Element Preset to Canvas
Drag an element preset from the User area of the ELEMENTS section in the left sidebar and drop it onto the canvas. The element is created with all saved MIDI, CV, and appearance settings from the preset applied.
Layout Drag-and-Drop
Drag a layout thumbnail from the Layouts panel and drop it onto the canvas area to switch to that layout. This is the fastest way to jump between layouts during a live performance setup session.
UI Feedback Conventions
Erae Lab uses a consistent set of visual cues to communicate state:
| State | What you see |
|---|---|
| Selected | Element gains a bright accent border (color depends on theme). |
| Multi-selected | All selected elements show the same accent border simultaneously. |
| Hovered | Element lightens slightly on mouse-over; cursor changes to a move pointer. |
| Dragging | A semi-transparent ghost of the element follows the cursor; valid drop positions are highlighted on the grid. |
| Conflict / overlap | Ghost outline turns red when the drop position is occupied. |
| Lasso active | A translucent rectangle with a thin border appears as you drag across empty canvas space. |
| Changed since snapshot | The project row shows Save/Revert controls when the autosaved project differs from its snapshot checkpoint. |
| Syncing | A toast notification and a spinner in the toolbar appear while the Erae 2 is receiving data. |
Tip: The status bar at the bottom of the canvas shows the position and size of the selected element in pad-grid units (columns x rows). Use this to align elements precisely without counting grid squares by eye.
Troubleshooting
This chapter covers the most common problems you may encounter while using Erae Lab. For hardware-specific issues, refer to the Erae 2 User Manual, Chapter 10.
If you cannot resolve an issue using this guide, use the in-app bug report button when available, or contact Embodme support at support@embodme.com.
Device Not Detected
Symptom: The connection indicator in the toolbar stays grey after plugging in the Erae 2.
Steps to resolve:
- Try a different USB cable. A charge-only cable will not work — make sure the cable supports data.
- Try a different USB port, preferably a port directly on the computer rather than a hub.
- On macOS, open System Information > USB and check whether the Erae 2 appears. If it does not appear there either, the hardware or cable is the problem.
- On Linux, Erae Lab requires USB permission. If the device appears in
lsusbbut not in Erae Lab, add a udev rule for the Erae 2 USB vendor ID, then replug. The log will show a "USB permission denied" message if this is the cause. - Quit Erae Lab, unplug the device, wait five seconds, replug, then relaunch Erae Lab.
Tip: Erae Lab polls for the device every few seconds. If you plug in after launch you do not need to restart — wait a moment and the indicator should turn green automatically.
Device Detected but Not Connecting
Symptom: The device appears briefly then disconnects, or the indicator flickers.
Steps to resolve:
- Check the firmware version on the device (visible in the toolbar once connected). If it is below the minimum version required by this version of Erae Lab, a firmware update dialog will appear automatically — follow the instructions in Firmware Updates.
- If the Erae 2 is in recovery/update mode (the surface shows a solid color instead of the normal boot animation), see Update Recovery below.
- Force a connection reset by clicking Connection > Reset in the toolbar menu.
Sync Conflicts
Symptom: When you connect the Erae 2, a toast appears asking you to choose how to resolve conflicting project versions.
Erae Lab raises a conflict when both the Lab copy and the device copy changed since the last clean sync.
Resolution options in the toast:
| Choice | What happens |
|---|---|
| Keep Device | The device version is pulled into Lab for the conflicting project. |
| Keep Both | Lab keeps its version and imports the device version as a separate copy, typically with an _erae style suffix and a regenerated identity. |
| Keep Lab | The Lab version overwrites the device version for the conflict. |
Tip: Choose Keep Both if you are unsure which version contains the changes you need.
Project Recovery
If a project file is corrupted or accidentally deleted from the Erae Lab library, the Erae 2's onboard SD card holds the last synced copy. Connect the Erae 2 — the sync engine will pull any device projects that are missing from the local library during the standard sync cycle.
Projects are stored locally in Erae Lab's app-data folder under EraeLab/projects. Use the app's folder/open-folder action to reveal the exact path for your operating system. Time Machine or any file-level backup covering that folder provides an additional safety net.
File Format Troubleshooting
Symptom: An .erproj or .emk file does not open or import correctly.
Steps to resolve:
- Verify the file extension. Current projects are folders with
settings.eraebin;.eraeproject,.erproj, and.emkare legacy/import formats. Files with.emkextension are layout files for an older format version; select the destination layout slot, then use the layout import/open button or drag the file onto Erae Lab. - Check that the file is not zero bytes (an incomplete download or copy). If so, obtain the file again from its source.
- If the file was created with a newer version of Erae Lab than you currently have, update Erae Lab to the latest release.
- Contact support@embodme.com with the file attached if the issue persists — include the version of Erae Lab and the operating system.
MIDI Port Conflicts
Symptom: MIDI from the Erae 2 is not received by your DAW, or MIDI is received by the wrong application.
Steps to resolve:
- On macOS, some applications claim exclusive access to MIDI ports. Check that no other application has the Erae 2 MIDI port open exclusively.
- Verify the correct MIDI port is selected in your DAW's MIDI input preferences. The Erae 2 enumerates as a device named "Erae 2" on USB Device port.
- If you are using a virtual MIDI routing utility (IAC Driver on macOS, LoopBe on Windows), ensure the routing is configured correctly and does not create feedback loops.
- On macOS, open Audio MIDI Setup and check whether the Erae 2 appears and is not showing an error icon. Quitting and relaunching Audio MIDI Setup can force the system MIDI daemon to re-enumerate devices.
macOS: Forget Device After MIDI Issues
If the Erae 2 MIDI port stops responding after a firmware update or unexpected disconnection:
- Open Audio MIDI Setup.
- Select the Erae 2 device in the list.
- Press the minus (−) button to remove it.
- Unplug and replug the USB cable. The device re-enumerates with a clean entry.
Firmware Update Failures
Symptom: The progress bar stops partway through a firmware update, or Erae Lab reports an update error.
Steps to resolve:
- Do not unplug the device during an update. If the update stalls for more than 60 seconds with no progress, Erae Lab will time out and display an error.
- After a timeout, quit Erae Lab, unplug the device, wait 10 seconds, then reconnect. If the device boots normally, relaunch Erae Lab and let it retry the update automatically.
- If the device does not boot after a failed update, restart it in update recovery mode — see Update Recovery below.
Update Recovery
Symptom: The Erae 2 does not respond normally and its surface displays a solid color or is blank.
Restart the device while holding Settings. This puts the Erae into update recovery so Erae Lab can detect it and offer the current bundled firmware.
- Connect the device to the computer and keep Erae Lab open.
- Hold Settings while rebooting the device.
- Wait for the Erae Lab toast suggesting an update to the current firmware.
- Accept the update and keep the USB cable connected until the device reboots.
If Erae Lab does not show the update toast after the recovery reboot, disconnect and reconnect USB, then repeat the Settings-while-rebooting step. If the device still does not recover, contact support@embodme.com.
Tip: Do not power-cycle the device repeatedly during recovery. Enter update recovery once, accept the Lab update toast, and wait for the update to complete.
Erae Lab Crashes
Symptom: Erae Lab quits unexpectedly or becomes unresponsive.
Steps to resolve:
- If the application is unresponsive, force-quit it:
- macOS: Press
Cmd + Option + Esc, select Erae Lab, and click Force Quit. Alternatively, right-click the Dock icon and choose Force Quit. - Windows: Press
Ctrl + Shift + Escto open Task Manager, find Erae Lab, and click End Task.
- macOS: Press
- Relaunch Erae Lab. The application automatically reloads the last saved project state.
- If the bug report button is available after relaunch, submit a report from inside Erae Lab. Reconnect the device and reproduce the issue first when possible so current-session device diagnostics and recent logs are included.
- If in-app reporting is not available, email support@embodme.com with a description of what you were doing when the crash occurred.
In-App Bug Reports
When available, the bug report button in the top bar opens an in-app report form. Use it for crashes, sync issues, device communication problems, hosted EraeSound issues, and reproducible UI problems.
Bug reports can include your current project, host state, app and machine metadata, current-session device diagnostics, and recent logs. This context helps support reproduce the problem, but it can include privacy-sensitive project names, MIDI routing, preset names, and device state. Review your description before submitting and use email support if you need to discuss sensitive material first.
If the button is not visible, contact support@embodme.com and include your Erae Lab version, operating system, connected device model, firmware version, and the steps that trigger the issue.
MIDI Device Not Appearing in Settings
Symptom: A MIDI interface is connected but does not appear in the MIDI device drop-down in Settings.
Steps to resolve:
- Close the Settings panel, then reopen it. Erae Lab refreshes the device list each time the panel is opened.
- On macOS, open Audio MIDI Setup (found in
/Applications/Utilities). Verify that the device appears there and is not showing an error icon. Sometimes quitting and relaunching Audio MIDI Setup causes the system MIDI daemon to re-enumerate devices. - On Windows, check Device Manager for driver errors on the MIDI device. Reinstall the device driver if a warning icon is present.
- Verify the device is not exclusively claimed by another application. Some MIDI interfaces do not support shared access — close other DAWs or MIDI utilities that may hold the device open.
Tip: Virtual MIDI ports (such as those created by IAC Driver on macOS or LoopBe on Windows) appear in the Erae Lab device list like physical ports. If you are using a virtual port for routing, make sure it is enabled before opening Erae Lab.
Erae Compatibility
This section is for users of the original Erae hardware. The main Erae Lab manual describes the current Erae 2 workflow; original Erae differences are collected here so they do not interrupt the main setup, sync, and update chapters.
Project Sync
Original Erae hardware uses standard MIDI and does not support the Erae 2 vendor USB binary protocol. Automatic bidirectional project sync is therefore not available for Erae. MIDI output from Erae elements functions normally, but the sync engine does not run for these devices.
When an Erae is connected via standard MIDI USB, the toolbar indicator may show Connected once the MIDI port is open. This reflects MIDI connectivity only; it does not mean the Erae 2 sync protocol is active.
Firmware Updates
Erae hardware uses a two-stage update process because its internal update architecture differs from Erae 2.
Stage 1: Stage-2 Bootloader
- Reboot to bootloader - Lab sends
RebootForUpdatevia legacy SysEx on the open MIDI port. The device reboots into its primary bootloader. - Stage-2 SysEx streaming - Lab streams a stage-2 loader file (
erae_mk1_h7_stage2.syx) over MIDI SysEx. This small program bridges to the binary file transfer used in Stage 2. - Wait for stage-2 reconnect - After the stage-2 loader completes, the device re-enumerates with a status code indicating it is ready for binary transfer (
FirmwareUpdater). Lab waits up to 60 seconds for this reconnection.
Stage 2: Binary Firmware Transfer
- Binary file transfer - Lab sends the actual firmware binary (
erae_mk1_h7_update.bin) in chunks using the vendor binary file transfer protocol (FileStart,FileData, andFileComplete). - Wait for reboot - After the transfer is confirmed, the device reboots into the new firmware and reconnects normally. Lab waits up to 60 seconds for the final reboot.
The Erae two-stage process takes longer than Erae 2 updates. The progress indicator advances through both stages. Keep the device connected and powered throughout; the full update typically completes in under two minutes.
If the update fails between Stage 1 and Stage 2, the device may reconnect in a partial bootloader state. Erae Lab detects this automatically and resumes Stage 2 on the next launch.
Appendix A — Element Parameter Reference
This appendix lists every configurable parameter for each element type available in Erae Lab. Parameters are grouped by element type. The MIDI Mapping column describes which MIDI or CV signal the parameter drives when the element is active on the device.
MIDI channel and group fields share the same 4-bit storage range (0–15, displayed as 1–16 in the UI). MIDI output destination (USB Device, USB Host, MIDI A, MIDI B) is common to all MIDI-emitting elements and is noted per element. CC controller numbers follow standard MIDI 7-bit numbering (0–127). CV outputs are referenced by logical output pair index. Speed outputs use continuous detector-level finger movement speed, smoothed and normalized from 0 to 100 cm/s.
Iso Keyboard
A grid-based keyboard where each pad cell maps to a chromatic or scale degree. Key width and height (in pad units) define the cell size. The iso keyboard inherits all key-level expressivity from the shared key attribute set.
| Parameter | Description | Type | Range | Default | MIDI Mapping |
|---|---|---|---|---|---|
| MIDI Channel | MIDI channel for all keys | uint4 | 0–15 (1–16) | 0 (ch 1) | Note On/Off channel |
| MIDI Group | MIDI group for routing | uint4 | 0–15 | 0 | Internal routing group |
| MIDI Output Dest | Output port selection | flags | USB Device, USB Host, MIDI A, MIDI B | USB Device | Selects output port(s) |
| Base Note | Lowest note of the keyboard | Note | 0–127 | 0x30 (C4) | Anchor for note mapping |
| Scale | Active scale for key layout | enum | Chromatic, Major, Minor, … | Major | Determines which keys are in-scale |
| Chroma Notes Shown | Show offscale (chromatic) keys | bool | true/false | true | Affects key visibility and note index |
| Octave Fixed | Lock octave, prevent octave shift | bool | true/false | false | Prevents note range from shifting |
| Key Width | Width of each key cell (pad units) | uint8 | 1–N | 1 | — |
| Key Height | Height of each key cell (pad units) | uint8 | 1–N | 1 | — |
| Semitones Line Offset | Semitone offset per row (chroma mode) | uint6 | 0–63 | 5 | Shifts row-to-row pitch interval |
| Degrees Line Offset | Degree offset per row (scale mode) | uint6 | 0–63 | 3 | Shifts row-to-row degree interval |
| Start Note | Starting note index within the scale | uint4 | 0–11 | 0 | Offsets the key index mapping |
| Activate Same Keys | Trigger all keys sharing the same pitch class simultaneously | bool | true/false | false | Affects note trigger grouping |
| MPE Enable | Enable MPE (MIDI Polyphonic Expression) | bool | true/false | false | Routes each touch to a unique channel |
| MPE Master Channel | MPE master channel selection | enum | Channel 1 / Channel 16 | Channel 1 | Sets MPE zone master channel |
| Velocity Tune | Velocity response curve | struct | see Key Attributes | default | Note velocity |
| Lift Tune | Lift (release) velocity curve | struct | see Key Attributes | default | NoteOff velocity |
| Pressure Tune | Aftertouch/pressure response | struct | see Pressure Tune | default | Channel/poly aftertouch |
| Vibrato Tune | Pitch-bend vibrato from X axis | struct | see Vibrato Tune | default | Pitch bend |
| Glissando Tune | Chromatic note quantization | struct | see Glissando Tune | disabled | Chromatic note quantization |
| CC74 Tune | Sound Brightness expression (CC#74) from Y axis | struct | see CC74 Tune | disabled | CC#74 |
| Pressure CC | Optional CC driven by pressure | CC config | 0–127 controller, optional | disabled | Polyphonic pressure CC |
| X Absolute CC | CC driven by finger X position | CC config | 0–127 controller, optional | disabled | Absolute X CC |
| Y Absolute CC | CC driven by finger Y position | CC config | 0–127 controller, optional | disabled | Absolute Y CC |
| Motion Speed CC | CC driven by continuous finger movement speed | CC config | 0–127 controller, optional | disabled | Motion Speed CC |
| X Relative CC | Relative CC from X motion | CC config | 0–127 controller, optional | disabled | Relative X CC |
| Y Relative CC | Relative CC from Y motion | CC config | 0–127 controller, optional | disabled | Relative Y CC |
| CV Key | CV pitch output per voice | CV config | enabled/disabled | disabled | V/Oct output |
| CV Pressure | CV output driven by pressure | CV config | enabled/disabled | disabled | CV pressure |
| CV Velocity | CV output driven by velocity | CV config | enabled/disabled | disabled | CV velocity |
| CV Num Voice | Number of CV voice outputs | uint4 | 0–15 | 0 (1 voice) | Polyphony across CV outputs |
| Arpeggiator | Arpeggiator settings | struct | enabled/disabled | disabled | Modifies note trigger pattern |
| Key Styles | Per-degree and per-chroma pad colors | style array | — | — | Visual only |
Chroma Keyboard
A piano-style layout with white and black keys arranged in standard chromatic order. Shares the same key attribute set as the Iso Keyboard. The key width and height determine the physical size of white keys; black keys are scaled proportionally (5/12 of white key height).
| Parameter | Description | Type | Range | Default | MIDI Mapping |
|---|---|---|---|---|---|
| MIDI Channel | MIDI channel for all keys | uint4 | 0–15 (1–16) | 0 (ch 1) | Note On/Off channel |
| MIDI Group | MIDI group for routing | uint4 | 0–15 | 0 | Internal routing group |
| MIDI Output Dest | Output port selection | flags | USB Device, USB Host, MIDI A, MIDI B | USB Device | Selects output port(s) |
| Base Note | Lowest note of the keyboard | Note | 0–127 | 0x30 (C4) | Anchor for note mapping |
| Scale | Active scale | enum | Chromatic, Major, … | Chromatic | Determines in-scale colouring |
| Key Width | Width of each white key (pad units) | uint8 | 2–N (min 2) | 4 | — |
| Key Height | Height of white keys (pad units) | uint8 | 4–N (min 4) | full element height | — |
| Line Offset | Semitone offset for the starting key | uint6 | 0–63 | 0 | Shifts the base note position |
| Chroma Notes Shown | Show all chromatic notes | bool | true/false | true | Affects note index mode |
| Octave Fixed | Lock octave | bool | true/false | false | Prevents octave shift |
| MPE Enable | Enable MPE | bool | true/false | false | Per-touch channel routing |
| MPE Master Channel | MPE master channel | enum | Channel 1 / Channel 16 | Channel 1 | MPE zone master |
| Velocity Tune | Velocity curve | struct | see Key Attributes | default | Note velocity |
| Lift Tune | Release velocity curve | struct | see Key Attributes | default | NoteOff velocity |
| Pressure Tune | Pressure response | struct | see Pressure Tune | default | Aftertouch |
| Vibrato Tune | X-axis vibrato | struct | see Vibrato Tune | default | Pitch bend |
| Glissando Tune | Chromatic note quantization | struct | see Glissando Tune | disabled | Chromatic note quantization |
| CC74 Tune | Sound Brightness CC#74 | struct | see CC74 Tune | disabled | CC#74 |
| Pressure CC | Pressure-driven CC | CC config | 0–127 controller, optional | disabled | Pressure CC |
| X Absolute CC | X position CC | CC config | 0–127 controller, optional | disabled | Absolute X CC |
| Y Absolute CC | Y position CC | CC config | 0–127 controller, optional | disabled | Absolute Y CC |
| Motion Speed CC | CC driven by continuous finger movement speed | CC config | 0–127 controller, optional | disabled | Motion Speed CC |
| X Relative CC | Relative X CC | CC config | 0–127 controller, optional | disabled | Relative X CC |
| Y Relative CC | Relative Y CC | CC config | 0–127 controller, optional | disabled | Relative Y CC |
| CV Key | CV pitch output | CV config | enabled/disabled | disabled | V/Oct output |
| CV Pressure | CV output driven by pressure | CV config | enabled/disabled | disabled | CV pressure |
| CV Velocity | CV output driven by velocity | CV config | enabled/disabled | disabled | CV velocity |
| CV Num Voice | Number of CV voice outputs | uint4 | 0–15 | 0 (1 voice) | Polyphony across CV outputs |
| Key Styles | Per-chroma and per-scale-degree colors | style array | — | — | Visual only |
Drumpad Keyboard
A grid keyboard with a fixed chromatic scale mapping, intended for percussion. Each cell triggers a distinct note. Key width and height define pad cell size. Shares the full key attribute set (velocity, pressure, lift, vibrato, CC, CV).
| Parameter | Description | Type | Range | Default | MIDI Mapping |
|---|---|---|---|---|---|
| MIDI Channel | MIDI channel | uint4 | 0–15 (1–16) | 0 (ch 1) | Note On/Off channel |
| MIDI Group | MIDI group | uint4 | 0–15 | 0 | Internal routing group |
| MIDI Output Dest | Output port selection | flags | USB Device, USB Host, MIDI A, MIDI B | USB Device | Selects output port(s) |
| Base Note | Lowest note | Note | 0–127 | 0x30 (C4) | Anchor for note mapping |
| Key Width | Width of each pad cell (pad units) | uint8 | 1–N | 1 | — |
| Key Height | Height of each pad cell (pad units) | uint8 | 1–N | 1 | — |
| MPE Enable | Enable MPE | bool | true/false | false | Per-touch channel routing |
| MPE Master Channel | MPE master channel | enum | Channel 1 / Channel 16 | Channel 1 | MPE zone master |
| Velocity Tune | Velocity response | struct | see Key Attributes | default | Note velocity |
| Lift Tune | Release velocity | struct | see Key Attributes | default | NoteOff velocity |
| Pressure Tune | Pressure response | struct | see Pressure Tune | default | Aftertouch |
| Vibrato Tune | X vibrato | struct | see Vibrato Tune | default | Pitch bend |
| CC74 Tune | Sound Brightness CC#74 | struct | see CC74 Tune | disabled | CC#74 |
| Pressure CC | Pressure-driven CC | CC config | 0–127 controller, optional | disabled | Pressure CC |
| X Absolute CC | X position CC | CC config | 0–127 controller, optional | disabled | Absolute X CC |
| Y Absolute CC | Y position CC | CC config | 0–127 controller, optional | disabled | Absolute Y CC |
| Motion Speed CC | CC driven by continuous finger movement speed | CC config | 0–127 controller, optional | disabled | Motion Speed CC |
| CV Key | CV pitch output | CV config | enabled/disabled | disabled | V/Oct |
| CV Pressure | CV output driven by pressure | CV config | enabled/disabled | disabled | CV pressure |
| CV Velocity | CV output driven by velocity | CV config | enabled/disabled | disabled | CV velocity |
| CV Num Voice | Number of CV voice outputs | uint4 | 0–15 | 0 (1 voice) | Polyphony across CV outputs |
| Key Styles | Per-pad colors | style array | — | — | Visual only |
Key Attribute Sub-Structures
Glissando Tune
Controls chromatic note quantization during slides. As a finger moves across the grid, the pitch snaps to the nearest quantized position rather than producing a continuous glide.
| Parameter | Description | Type | Range | Default |
|---|---|---|---|---|
| Enable | Activates chromatic note quantization | bool | true/false | false |
| Y Disabled | Disables Y-axis quantization (X only) | bool | true/false | false |
| Retrigger | Re-sends note-on on each pitch change | bool | true/false | false |
| Tune Location | Snap reference point: pad center or finger position | enum | Pad, Finger | Pad |
| Smoothing | Pitch settling speed after slide | uint8 | 0–255 | 63 |
| In-Tune Width | Stable-pitch zone as a fraction of key width | uint8 | 0–255 | 50 |
Vibrato Tune
Controls pitch-bend vibrato driven by X-axis finger motion.
| Parameter | Description | Type | Range | Default |
|---|---|---|---|---|
| Enable | Activates vibrato | bool | true/false | false |
| Pitch Bend Range | Max pitch bend in semitones | uint8 | 1–96 | 12 (non-MPE), 48 (MPE) |
| Style | Vibrato curve shape | enum | Linear, Quadratic, FarQuadratic | Linear |
| Strength | Vibrato depth | uint8 | 0–127 | 64 |
| Return Speed | Speed at which pitch returns to center | uint8 | 0–127 | 64 |
Pressure Tune
Controls how surface pressure maps to aftertouch or CC output.
| Parameter | Description | Type | Range | Default |
|---|---|---|---|---|
| Enable | Activates pressure output | bool | true/false | false |
| Type | Aftertouch mode | enum | Channel Pressure, Poly Pressure | Channel Pressure |
| Tracking | Response curve shape | enum | Linear, Exponential, Logarithmic | Linear |
| Filter | Smoothing filter strength | uint8 | 0–255 | 0 |
| Min | Minimum output value | uint7 | 0–127 | 0 |
| Max | Maximum output value | uint7 | 0–127 | 127 |
| Intensity | Output gain | uint8 | 0–127 | 64 |
| Smoothing | Additional output smoothing | uint8 | 0–255 | 0 |
CC74 Tune (Sound Brightness)
Configures the Sound Brightness (CC#74) output, the MPE timbre axis, which can also be used in non-MPE contexts.
| Parameter | Description | Type | Range | Default |
|---|---|---|---|---|
| Enable | Activates CC#74 output | bool | true/false | false |
| Gesture | Physical axis that drives the output. Motion Speed is continuous finger movement speed. | enum | Pressure, X abs, Y abs, X rel, Y rel, Motion Speed | Y abs |
| Initial Value | CC value sent at finger touch | uint7 | 0–127 | 0 |
| Controller | CC number (default 74) | uint7 | 0–127 | 74 |
| Min | Minimum output value | uint7 | 0–127 | 0 |
| Max | Maximum output value | uint7 | 0–127 | 127 |
| Tracking | Response curve shape | enum | Linear, Exponential, Logarithmic | Linear |
| Filter | Smoothing filter strength | uint8 | 0–255 | 0 |
| Intensity | Output gain | uint8 | 0–127 | 64 |
| Smoothing | Output smoothing | uint8 | 0–255 | 0 |
Button (Note / Control Change / Program Change / Control Voltage / Tap Tempo)
A single-pad button element. The mode is selected at configuration time and determines the available sub-parameters. Latched mode toggles state on each press rather than sending on press and release.
Shared Button Parameters
| Parameter | Description | Type | Range | Default | MIDI Mapping |
|---|---|---|---|---|---|
| MIDI Channel | MIDI channel | uint4 | 0–15 (1–16) | 0 (ch 1) | Message channel |
| MIDI Group | MIDI group | uint4 | 0–15 | 0 | Internal routing group |
| MIDI Output Dest | Output port selection | flags | USB Device, USB Host, MIDI A, MIDI B | USB Device | Selects output port(s) |
| Latched | Toggle mode vs. momentary | bool | true/false | false | Determines press/release vs. toggle |
| Button Type | Message type | enum | Note, Control Change, Program Change, Control Voltage, Tap Tempo, Disabled | Note | Selects active sub-parameter set |
Button — Note Mode
| Parameter | Description | Type | Range | Default | MIDI Mapping |
|---|---|---|---|---|---|
| Note | MIDI note number | Note | 0–127 | 0x30 (C4) | Note On/Off note number |
| CV Note | CV pitch output for this button | CV config | enabled/disabled | disabled | V/Oct gate output |
Button — Control Change Mode
| Parameter | Description | Type | Range | Default | MIDI Mapping |
|---|---|---|---|---|---|
| Controller A | CC number sent on press (ON event) | uint7 | 0–127, optional | disabled | CC number |
| Value A | CC value sent on press | uint7 | 0–127 | 64 | CC value |
| Controller B | CC number sent on release (OFF, latched only) | uint7 | 0–127, optional | disabled | CC number |
| Value B | CC value sent on release | uint7 | 0–127 | 65 | CC value |
Button — Program Change Mode
| Parameter | Description | Type | Range | Default | MIDI Mapping |
|---|---|---|---|---|---|
| Bank MSB A | Bank select MSB on press | uint7 | 0–127, optional | disabled | CC#0 |
| Bank LSB A | Bank select LSB on press | uint7 | 0–127, optional | disabled | CC#32 |
| Program A | Program number on press | uint7 | 0–127, optional | disabled | Program Change |
| Bank MSB B | Bank select MSB on release (latched) | uint7 | 0–127, optional | disabled | CC#0 |
| Bank LSB B | Bank select LSB on release (latched) | uint7 | 0–127, optional | disabled | CC#32 |
| Program B | Program number on release (latched) | uint7 | 0–127, optional | disabled | Program Change |
Button — Control Voltage Mode
| Parameter | Description | Type | Range | Default | MIDI Mapping |
|---|---|---|---|---|---|
| CV On/Off | Gate output driven by button state | CV config | enabled/disabled | disabled | 0–5 V gate |
Button — Tap Tempo Mode
Measures the interval between consecutive taps and derives a BPM. No sub-parameters beyond the type selector.
Fader 1D
A one-dimensional continuous fader. The finger Y position (vertical axis) is tracked as the primary control value. Pressure on the surface provides an independent secondary output.
| Parameter | Description | Type | Range | Default | MIDI Mapping |
|---|---|---|---|---|---|
| MIDI Channel | MIDI channel | uint4 | 0–15 (1–16) | 0 (ch 1) | Message channel |
| MIDI Group | MIDI group | uint4 | 0–15 | 0 | Internal routing group |
| MIDI Output Dest | Output port selection | flags | USB Device, USB Host, MIDI A, MIDI B | USB Device | Selects output port(s) |
| Initial Y Value | Value sent when no finger is present | uint7 | 0–127 | 0x3F (63) | CC value on idle |
| Y Absolute CC | CC driven by Y position | CC config | 0–127 controller, optional | disabled | Absolute position CC |
| Pressure CC | CC driven by contact pressure | CC config | 0–127 controller, optional | disabled | Pressure CC |
| Motion Speed CC | CC driven by continuous finger movement speed | CC config | 0–127 controller, optional | disabled | Motion Speed CC |
| Y Absolute CV | CV output driven by Y position | CV config | enabled/disabled | disabled | 0–5 V position |
| Pressure CV | CV output driven by pressure | CV config | enabled/disabled | disabled | 0–5 V pressure |
| Motion Speed CV | CV output driven by continuous finger movement speed | CV config | enabled/disabled | disabled | 0–5 V speed |
Fader 2D
A two-dimensional continuous pad. Both X and Y axes track finger position independently, each driving a separate CC or CV output. Pressure provides a third independent output.
| Parameter | Description | Type | Range | Default | MIDI Mapping |
|---|---|---|---|---|---|
| MIDI Channel | MIDI channel | uint4 | 0–15 (1–16) | 0 (ch 1) | Message channel |
| MIDI Group | MIDI group | uint4 | 0–15 | 0 | Internal routing group |
| MIDI Output Dest | Output port selection | flags | USB Device, USB Host, MIDI A, MIDI B | USB Device | Selects output port(s) |
| Initial X Value | X value sent when no finger is present | uint7 | 0–127 | 0x3F (63) | CC value on idle |
| Initial Y Value | Y value sent when no finger is present | uint7 | 0–127 | 0x3F (63) | CC value on idle |
| X Absolute CC | CC driven by X position | CC config | 0–127 controller, optional | disabled | Absolute X CC |
| Y Absolute CC | CC driven by Y position | CC config | 0–127 controller, optional | disabled | Absolute Y CC |
| Pressure CC | CC driven by pressure | CC config | 0–127 controller, optional | disabled | Pressure CC |
| Motion Speed CC | CC driven by continuous finger movement speed | CC config | 0–127 controller, optional | disabled | Motion Speed CC |
| X Absolute CV | CV output from X position | CV config | enabled/disabled | disabled | 0–5 V X position |
| Y Absolute CV | CV output from Y position | CV config | enabled/disabled | disabled | 0–5 V Y position |
| Pressure CV | CV output from pressure | CV config | enabled/disabled | disabled | 0–5 V pressure |
| Motion Speed CV | CV output from continuous finger movement speed | CV config | enabled/disabled | disabled | 0–5 V speed |
Ableton Launchpad
A dedicated Ableton Live / Launchpad compatibility element. It occupies a fixed region of the pad surface and communicates using the Launchpad sysex protocol via USB. Only the display zoom level is user-configurable in Erae Lab.
| Parameter | Description | Type | Range | Default | MIDI Mapping |
|---|---|---|---|---|---|
| Position | Pad placement region | enum | Full Width, Left Half, Right Half | Full Width | Sets physical geometry |
| Zoom Level | Display zoom in Ableton | enum | Small, Large | Small | Launchpad protocol zoom |
API Zone
A raw multi-touch data zone. The firmware reports finger coordinates and pressure directly to the host application via the embodme API rather than converting to MIDI messages. Used for custom software integration.
| Parameter | Description | Type | Range | Default | MIDI Mapping |
|---|---|---|---|---|---|
| Zone Index | Identifier for this zone in the API | uint8 | 0–127 | 0 | API zone selector |
| Max Num Fingers | Maximum simultaneous touch points reported | uint8 | 0–10 | 10 | API finger count cap |
| Finger Data Rate | Report rate divisor for finger data | uint8 | 0–255 | 0 | API report rate |
Pedal (PedalV2)
Pedal elements are non-visible elements assigned to one of the two pedal inputs (Input A or Input B). Each pedal can be configured for one of the following modes: Switch, Kick, Sustain Binary, Sustain Continuous, Expressive, or Hi-Hat.
Shared Pedal Parameters
| Parameter | Description | Type | Range | Default | MIDI Mapping |
|---|---|---|---|---|---|
| Pedal Input | Physical input jack | enum | Input A, Input B | Input A | — |
| Pedal Type | Operating mode | enum | Switch, Kick, Sustain Binary, Sustain Continuous, Expressive, Hi-Hat, Disabled | Disabled | Selects parameter sub-set |
| MIDI Channel | MIDI channel | uint4 | 0–15 (1–16) | 0 (ch 1) | Message channel |
| MIDI Group | MIDI group | uint4 | 0–15 | 0 | Internal routing group |
| MIDI Output Dest | Output port selection | flags | USB Device, USB Host, MIDI A, MIDI B | USB Device | Selects output port(s) |
Pedal — Switch Mode
Sends Note, CC, Program Change, or Tap Tempo messages on press and release.
| Parameter | Description | Type | Range | Default | MIDI Mapping |
|---|---|---|---|---|---|
| Latched | Toggle vs. momentary | bool | true/false | false | Determines ON/OFF cycle |
| Message Type | Sub-type of switch message | enum | Note, CC, Program Change, Tap Tempo | Note | Selects message sub-parameters |
| Note | Note number (Note mode) | Note | 0–127 | 0x30 (C4) | Note On/Off |
| Controller On | CC number on press (CC mode) | uint7 | 0–127 | 64 | CC number |
| Value On | CC value on press | uint7 | 0–127 | 64 | CC value |
| Controller Off | CC number on release (CC mode) | uint7 | 0–127, optional | disabled | CC number |
| Value Off | CC value on release | uint7 | 0–127 | 65 | CC value |
| CV On/Off | Gate output | CV config | enabled/disabled | disabled | 0–5 V gate |
Pedal — Kick Mode
Detects impact transients and emits a note with velocity proportional to impact speed.
| Parameter | Description | Type | Range | Default | MIDI Mapping |
|---|---|---|---|---|---|
| Note | MIDI note triggered | Note | 0–127 | 0x24 (C2) | Note On note number |
| Velocity Sensitivity | Scales velocity from impact speed | uint8 | 0–100 (%) | 100 | Note velocity |
| Impact Threshold | Minimum delta to trigger | float | 0.0–1.0 | 0.1 (10%) | Filters noise |
| Duration Mode | Note length mode | enum | Fixed, Until Release | Until Release | NoteOff timing |
| Fixed Duration (ms) | Note duration in Fixed mode | uint16 | 1–65535 ms | 100 ms | NoteOff delay |
| CV Gate | CV gate output on kick | CV config | enabled/disabled | disabled | 0–5 V gate |
| CV Velocity | CV output proportional to velocity | CV config | enabled/disabled | disabled | 0–5 V velocity |
Pedal — Sustain Binary Mode
Sends a binary CC (typically CC#64 sustain) with distinct ON and OFF values.
| Parameter | Description | Type | Range | Default | MIDI Mapping |
|---|---|---|---|---|---|
| Latched | Toggle mode | bool | true/false | false | ON/OFF toggle |
| Controller | CC number | uint7 | 0–127 | 64 (sustain) | CC number |
| On Value | CC value when active | uint7 | 0–127 | 127 | CC value |
| Off Value | CC value when inactive | uint7 | 0–127 | 0 | CC value |
| CV On/Off | Gate output | CV config | enabled/disabled | disabled | 0–5 V gate |
Pedal — Sustain Continuous Mode
Tracks continuous pedal position and sends it as a CC value (defaults to CC#64).
| Parameter | Description | Type | Range | Default | MIDI Mapping |
|---|---|---|---|---|---|
| Controller | CC number | uint7 | 0–127 | 64 (sustain) | Continuous CC |
| Invert Continuous | Flip pedal polarity | bool | true/false | false | Reverses value curve |
| Pressure CV | CV output from pedal position | CV config | enabled/disabled | disabled | 0–5 V position |
Pedal — Expressive Mode
Tracks continuous pedal position as an expression CC (defaults to CC#11).
| Parameter | Description | Type | Range | Default | MIDI Mapping |
|---|---|---|---|---|---|
| Controller | CC number | uint7 | 0–127 | 11 (expression) | Continuous CC |
| Invert Continuous | Flip pedal polarity | bool | true/false | false | Reverses value curve |
| Pressure CV | CV output from pedal position | CV config | enabled/disabled | disabled | 0–5 V position |
Pedal — Hi-Hat Mode
Combines continuous position CC (CC#4) with impact-based chick note detection for closed hi-hat sounds.
| Parameter | Description | Type | Range | Default | MIDI Mapping |
|---|---|---|---|---|---|
| Controller | Continuous position CC | uint7 | 0–127 | 4 (foot controller) | CC#4 position |
| Invert Continuous | Flip pedal polarity | bool | true/false | false | Reverses position curve |
| Chick Note | Note triggered on foot chick | Note | 0–127 | 0x2A (F#1) | Note On/Off |
| Chick Velocity Sensitivity | Scales chick velocity | uint8 | 0–100 (%) | 50 | Chick note velocity |
| Chick Impact Threshold | Minimum delta to trigger chick | float | 0.0–1.0 | 0.1 (10%) | Filters slow closures |
| Closed Threshold | Pedal position to arm chick detection | float | 0.0–1.0 | 0.9 (90%) | Chick arming threshold |
| Chick Duration (ms) | NoteOff delay for chick | uint16 | 1–65535 ms | 50 ms | NoteOff timing |
| Chick Dead Time (ms) | Maximum valid chick duration | uint8 | 1–255 ms | 100 ms | Prevents slow-closure triggers |
| CV Gate | Gate output on chick | CV config | enabled/disabled | disabled | 0–5 V gate |
| CV Continuous | CV output from pedal position | CV config | enabled/disabled | disabled | 0–5 V position |