Documentation
Erae Sound
14 chapters
Introduction
What is Erae Sound?
Erae Sound is a software synthesizer plugin by Embodme. It combines a dual analog generator engine with a deep modulation system and built-in effects, all designed to work seamlessly with the Erae controller. Erae Sound is available through Erae Lab and as VST3/AU plugin formats where supported.
Key Features
- Dual analog generator engine -- two independent generators, each with its own volume control, feeding into a shared signal chain.
- Per-parameter modulation -- every synthesis and effects parameter has dedicated envelope and modulation sources, including LFO, MIDI (velocity, pressure, slide), and Erae-specific layout sources like keyboard position and fader movement.
- Modulation linking -- group parameters under shared modulation configurations using link groups (
A,B,C,D). Cross-modulation lets one source control another source's depth. - 4-slot effects chain -- a series chain of up to four effects chosen from Distortion, Chorus, Flanger, Phaser, Delay, Reverb, Shimmer, Compressor, and Param EQ.
- Erae integration -- layout-aware modulation sources, preset-linked layouts, and bidirectional visual sync with Erae hardware.
- Preset library -- browse, search, load, save, and import factory or user presets.
- MPE support -- per-voice pitch, pressure, and slide for expressive polyphonic performance.
Who This Manual is For
This manual is written for musicians and sound designers who want to get the most out of Erae Sound. Whether you are building patches from scratch or exploring the preset library, each chapter walks you through a specific area of the plugin.
Manual Conventions
Throughout this manual:
- Parameter names appear in bold (e.g., Cutoff, Resonance).
- Parameter values appear in
code formatting(e.g.,50%,Saw). - Screenshots are indicated by placeholder captions where applicable.
- Cross-references link to other chapters like Generators or Modulation.
Tip: Look for tip callouts like this one for shortcuts and best practices.
Installation
Erae Sound is installed from Erae Lab as part of the managed component bundle. Use Erae Lab's component installer or Reinstall components action to install or repair Erae Sound.
System Requirements
| Minimum | Recommended | |
|---|---|---|
| macOS | 11.0 (Big Sur) or later, Intel or Apple Silicon (universal binary) | macOS 12 or later |
| Windows | Windows 10 (64-bit) | Windows 10/11 (64-bit) |
| Linux | Ubuntu 20.04 or equivalent, x86_64 | Ubuntu 22.04 or later |
| RAM | 4 GB | 8 GB or more |
| CPU | Any modern multi-core processor | Quad-core processor or better |
A compatible DAW that supports VST3 (all platforms) or AU (macOS) is required for plugin use. To use Erae Sound without a DAW, run it inside Erae Lab.
Plugin Formats
Erae Lab installs the available Erae Sound plugin formats for your platform:
- VST3 -- Works in any VST3-compatible DAW on macOS, Windows, and Linux.
- AU (Audio Unit) -- macOS only. Works in Logic Pro, GarageBand, and other AU-compatible hosts.
You do not need to choose between them. Erae Lab places the available formats on your system at once.
Installation Paths
Erae Lab installs plugin components in standard plugin locations when required by the host, and may keep supporting components in its managed component folder.
macOS
| Format | Location |
|---|---|
| VST3 | ~/Library/Audio/Plug-Ins/VST3/ |
| AU | ~/Library/Audio/Plug-Ins/Components/ |
Windows
| Format | Location |
|---|---|
| VST3 | %ProgramFiles%\Common Files\VST3\ |
Linux
| Format | Location |
|---|---|
| VST3 | ~/.vst3/ |
First Launch
Licensing and Demo Mode
On first launch, Erae Sound may ask you to sign in or activate a license. The auth dialog supports magic-link sign-in, purchase flow, logout, machine-limit handling, and a short demo mode.
- Magic link -- request a link, open it from the same machine, then return to Erae Sound.
- Demo -- starts a time-limited demo session. Saving can be disabled or restricted after the demo expires.
- Machine limit -- if your account has reached its activation limit, deauthorize another machine or contact support.
If activation fails, check your internet connection, request a fresh magic link if needed, and retry from the auth dialog.
Loading in a DAW
Most DAWs automatically scan for new plugins at startup. If you installed Erae Sound while your DAW was open, you may need to trigger a manual rescan:
- Ableton Live -- Go to Preferences > Plug-Ins and click Rescan.
- Logic Pro -- Open Logic Pro > Settings > Plug-in Manager and click Reset & Rescan Selection.
- Reaper -- Go to Options > Preferences > Plug-ins > VST and click Re-scan.
- Bitwig Studio -- Go to Settings > Plug-ins and click Rescan.
- FL Studio -- Go to Options > Manage plugins and click Find plugins.
After the scan completes, look for Erae Sound in your DAW's instrument or synthesizer list. Insert it on a MIDI track to get started.
Running Inside Erae Lab
There is no separate Erae Sound standalone application. To use Erae Sound without a DAW, open Erae Lab and run Erae Sound from there.
Erae Lab owns the application-level audio, MIDI, and device setup in this mode. See Quick Start for a guided walkthrough.
Troubleshooting
Plugin does not appear in my DAW
- Rescan your plugins. Close and reopen your DAW, or use its manual rescan option (see above).
- Check the plugin path. Make sure the plugin component is in the correct folder listed in the Installation Paths table above.
- Confirm format compatibility. Some DAWs only support certain formats. For example, Logic Pro loads AU but not VST3. Ableton Live and most other DAWs use VST3.
- Reinstall components from Erae Lab. If the files are missing, open Erae Lab and use Reinstall components.
macOS Gatekeeper warning
The macOS installer is code-signed and notarized with Apple, so it should not trigger Gatekeeper warnings under normal circumstances. If you do encounter a message saying the application is from an unidentified developer or that it cannot be verified, follow these steps to allow Erae Sound to run:
- Open System Settings > Privacy & Security.
- Scroll down to the Security section.
- You should see a message about Erae Sound being blocked. Click Open Anyway.
- Confirm when prompted.
You only need to do this once. After that, macOS will remember your choice.
No sound when running inside Erae Lab
Make sure Erae Lab is using the correct audio output and MIDI input, then confirm that Erae Sound's master Vol control is turned up. See Troubleshooting for more detailed diagnostics.
Quick Start
Play Your First Sound in 2 Minutes
- Open Erae Sound -- run it inside Erae Lab, or load it as a plugin in your DAW.
- Select a preset -- in the header bar, use the left/right arrows to step through presets, or click the preset name to open the full list.
- Play some notes -- connect a MIDI controller and play, or send notes from your DAW's piano roll. You should hear sound immediately.
- Explore the tabs -- click Synth or FX in the header to shape the sound further.
That is all you need to get started.
Modulate a Parameter
Erae Sound modulation is destination-first: select the parameter you want to control, then set how much each source affects it.
- Select the destination -- click the knob you want to modulate, for example Filter Cutoff.
- Find the source -- in the Modulation Display, locate ENV, LFO, PRES, SLIDE, or another source from your Erae layout.
- Set the amount -- drag that source's depth fader up or down. Up adds positive modulation, down adds negative modulation, and the center line is zero.
Do not drag a modulation source onto a knob. The knob selection chooses the destination; the source depth fader sets the modulation amount.
Main Tabs
Erae Sound is organized into the main tabs accessible from the header:
- Synth -- where you choose and shape your sound generators and set up modulation. See Generators and Modulation.
- FX -- where you add and configure effects such as reverb, delay, and distortion. See Effects.
Where to Go Next
- For a detailed tour of every on-screen element, head to Interface Overview.
- To learn how to save and manage presets, see Presets.
- If something is not working as expected, check Troubleshooting.
Interface Overview
This chapter walks you through the main areas of the Erae Sound window. Every screen shares the same header bar at the top and a content area below it. The header gives you quick access to presets, modulation overview, and output metering no matter which tab you are working in.
Window Layout
Erae Sound uses a fixed 16:10 aspect ratio. The default size is 1280 x 800 pixels. You can resize the window and the entire interface scales proportionally, from a minimum of 800 x 500 up to 2560 x 1600.
The window is divided into two main regions:
| Region | Position | Purpose |
|---|---|---|
| Header bar | Top strip | Navigation, presets, modulation overview, master output |
| Content area | Everything below the header | Tab-specific controls, currently Synth and FX |
Header Bar
The header bar spans the full width of the window. Its dark background keeps it visually distinct from the content area below. Components are arranged left to right in the following order.

Tab Selector
The tab selector sits at the left of the header. Current builds expose Synth and FX.
- The active tab is highlighted in accent yellow with dark text.
- Inactive tabs use a dark fill with light text.
- Clicking a tab switches the content area immediately.
The Synth tab is selected by default when you first open the plugin.
Tip: You can switch tabs at any time without losing your work. All parameter changes are preserved across tabs.
Library Button
A small square button with a library icon sits just to the left of the preset navigation pill. Clicking it opens the Preset Library overlay, where you can browse, search, and filter presets. When the library is open, the button turns accent yellow. See Presets for full details.
Preset Navigation Pill
The preset navigation pill is a rounded, joined control group with several segments separated by thin vertical dividers:
| Segment | Width | What it does |
|---|---|---|
| Dropdown | Narrow, shows a chevron-down icon | Opens a dropdown list of all available presets |
| Preset name | Center area | Displays the name of the currently loaded preset (e.g., Warm Pad) |
| Previous arrow | Chevron-left icon | Loads the previous preset in the list |
| Next arrow | Chevron-right icon | Loads the next preset in the list |
Click the dropdown chevron to see and jump to any preset by name. Use the left/right arrows to step through presets one at a time.
Save Button
A separate square button with a floppy-disk icon sits to the right of the preset pill. Clicking it enters edit mode:
- The preset name area becomes an editable text field, pre-filled with the current preset name.
- A checkmark button appears to the right of the text field.
- Type a new name (or keep the current one) and press Enter or click the checkmark to save.
- Press Escape or click outside the field to cancel.
When a save completes, the button briefly flashes accent yellow as confirmation.
A few validation rules apply:
- The name cannot be empty.
- Factory presets are read-only: you cannot overwrite them under the same name.
- Duplicate names are not allowed.
If any rule is violated, a small orange warning message appears below the preset pill.
Right-click the preset area to open the preset context menu. Save overwrites the current user preset when available, while Save As... creates a new editable user preset. Factory presets keep Save disabled because they are read-only; use Save As... to make your own editable version.
Modulation Overview Button
A modulation-icon button opens the Modulation Overview panel, which shows all active modulation connections across your patch at a glance. When the overview is open, the button lights up in accent yellow. See Modulation for details.
Volume Knob
Labeled Vol, this rotary knob controls the master output level. It uses the same arc-style display as other knobs in the plugin: a grey track with an accent-yellow value arc sweeping across a 270-degree range.
The knob ranges from 0% (silence) to 100% (full output). It defaults to 65%.
VU Meter
The VU meter is the rightmost element in the header. It shows the stereo output level as two vertical columns of small LED-style dots -- one column for the left channel, one for the right.
- 10 rows per channel, spanning from
-48 dB(bottom) to0 dB(top). - The lower dots light up in white; the top dots turn accent yellow to warn you of approaching clipping.
- A peak hold indicator marks the loudest recent level and stays visible for about one second before fading away.
The meter updates in real time so you always have a clear picture of your output level.
Content Area
The content area fills the rest of the window below the header bar. What you see here depends on which tab is active.
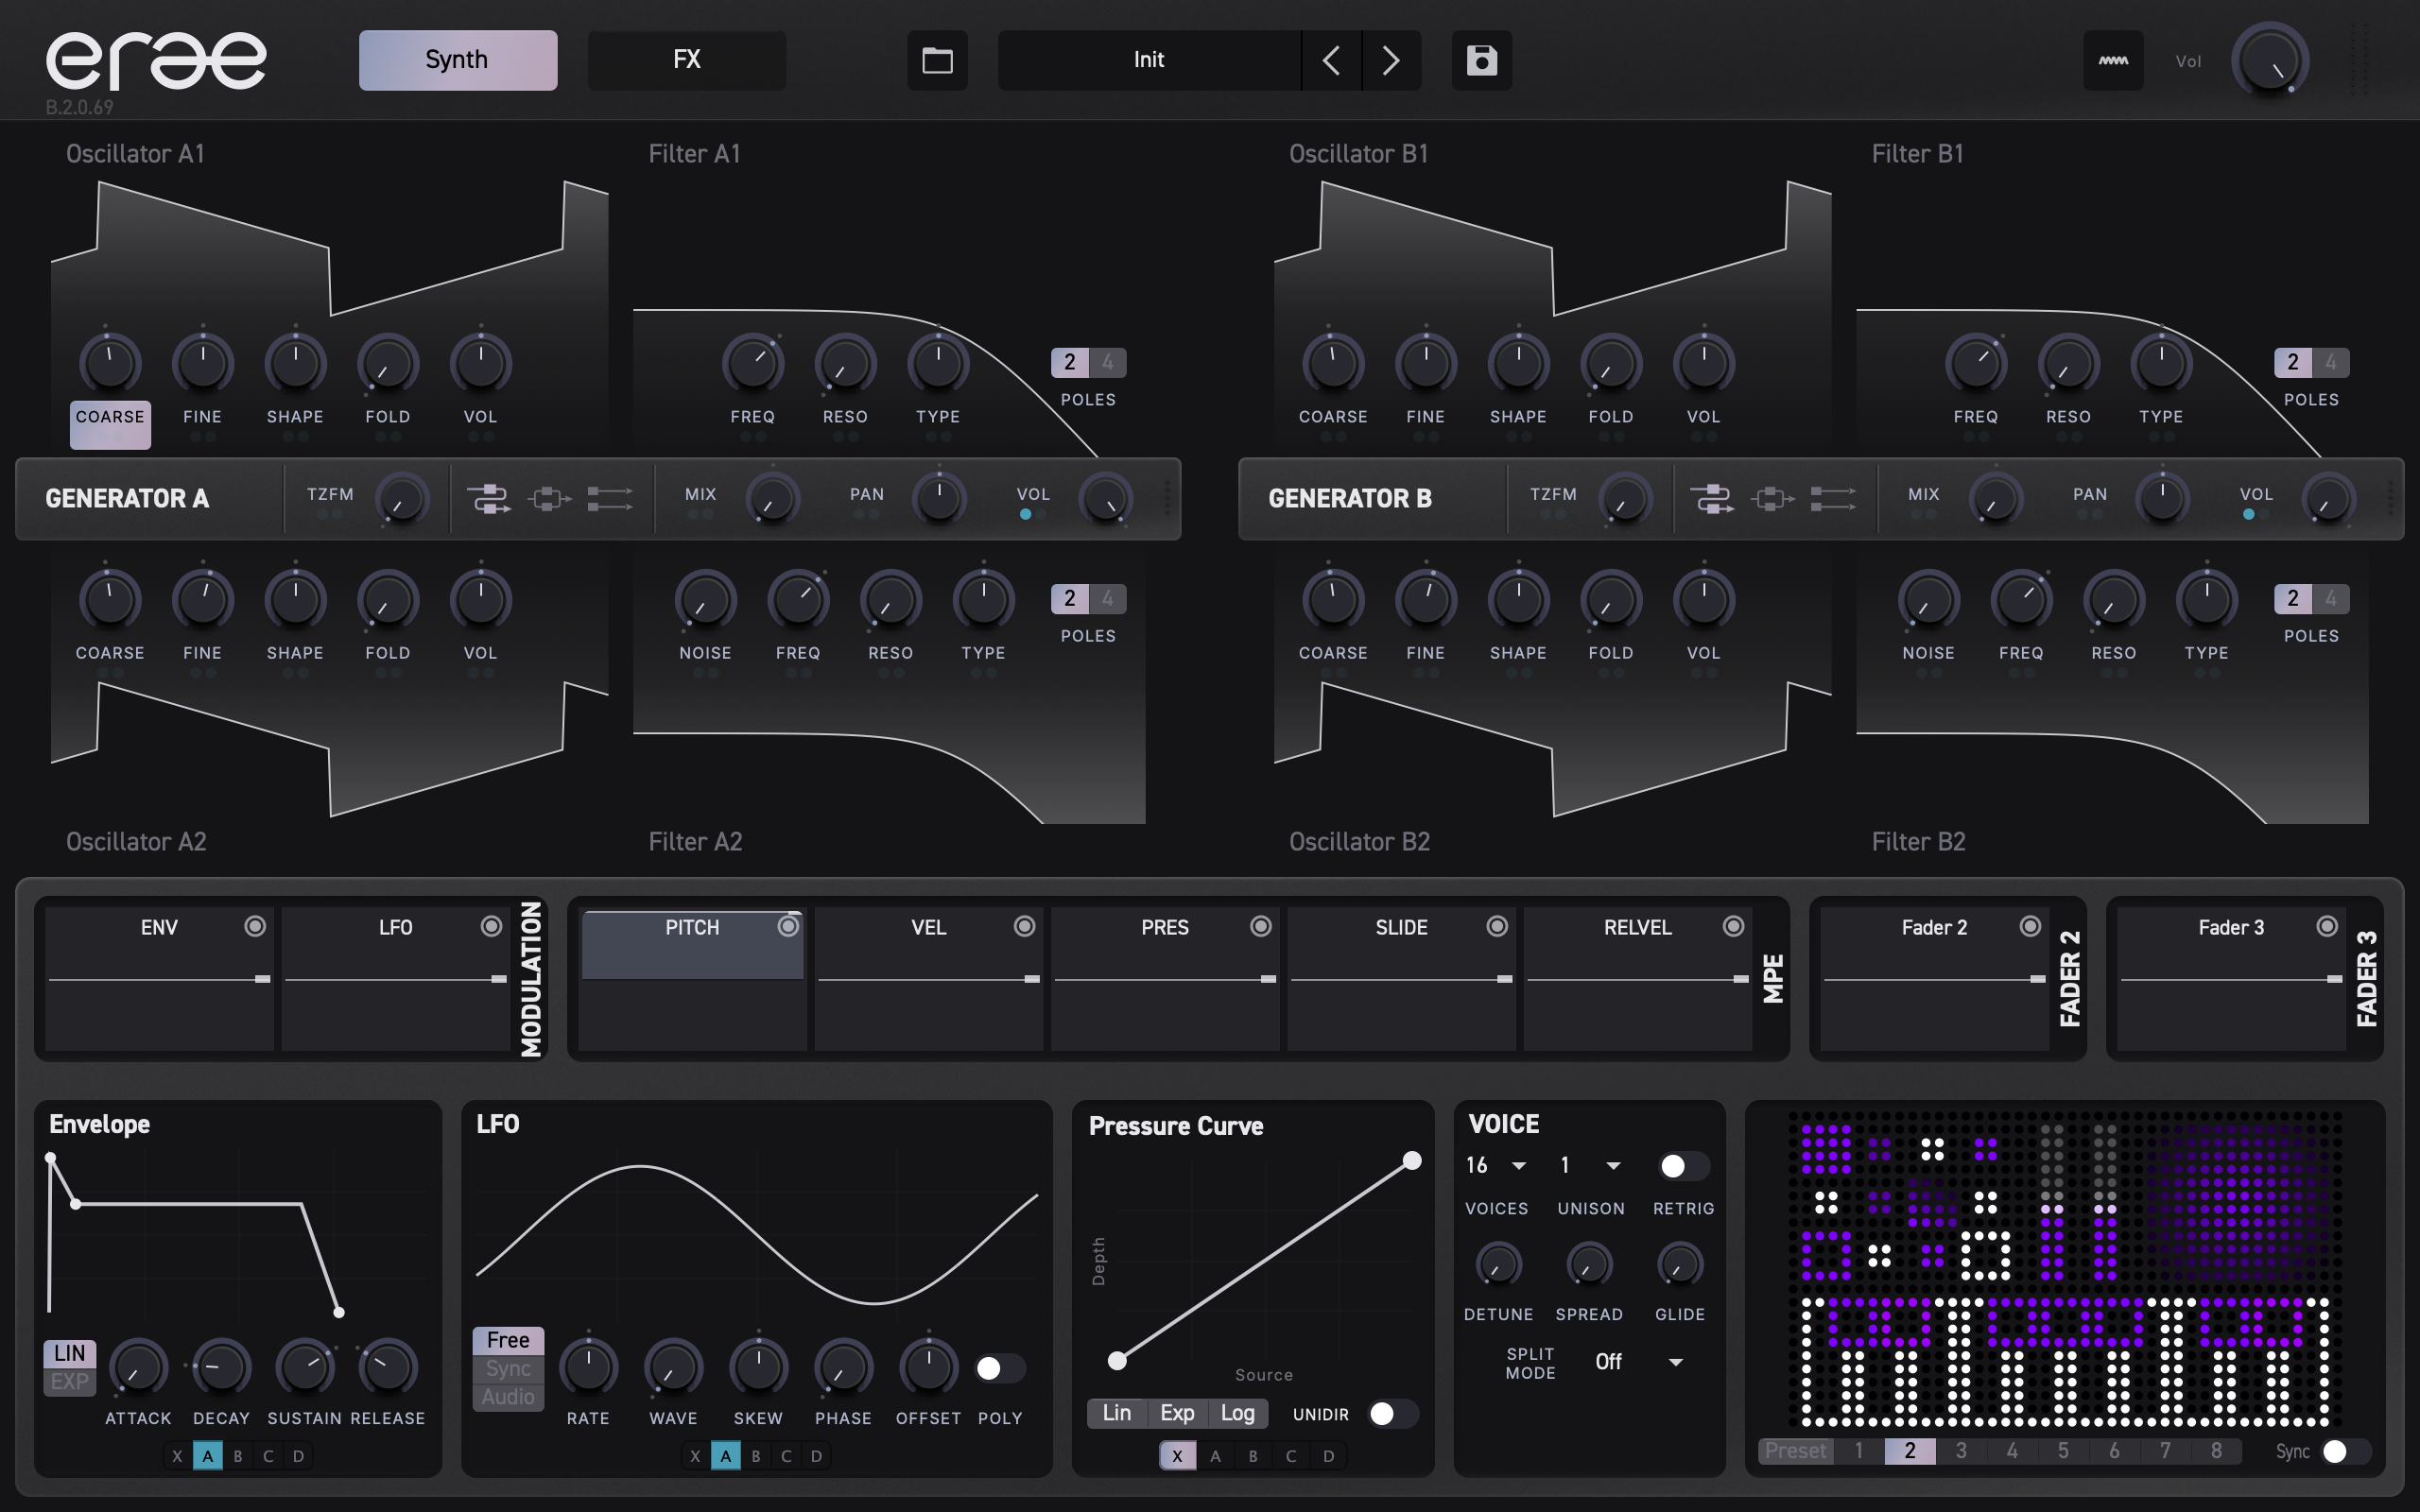
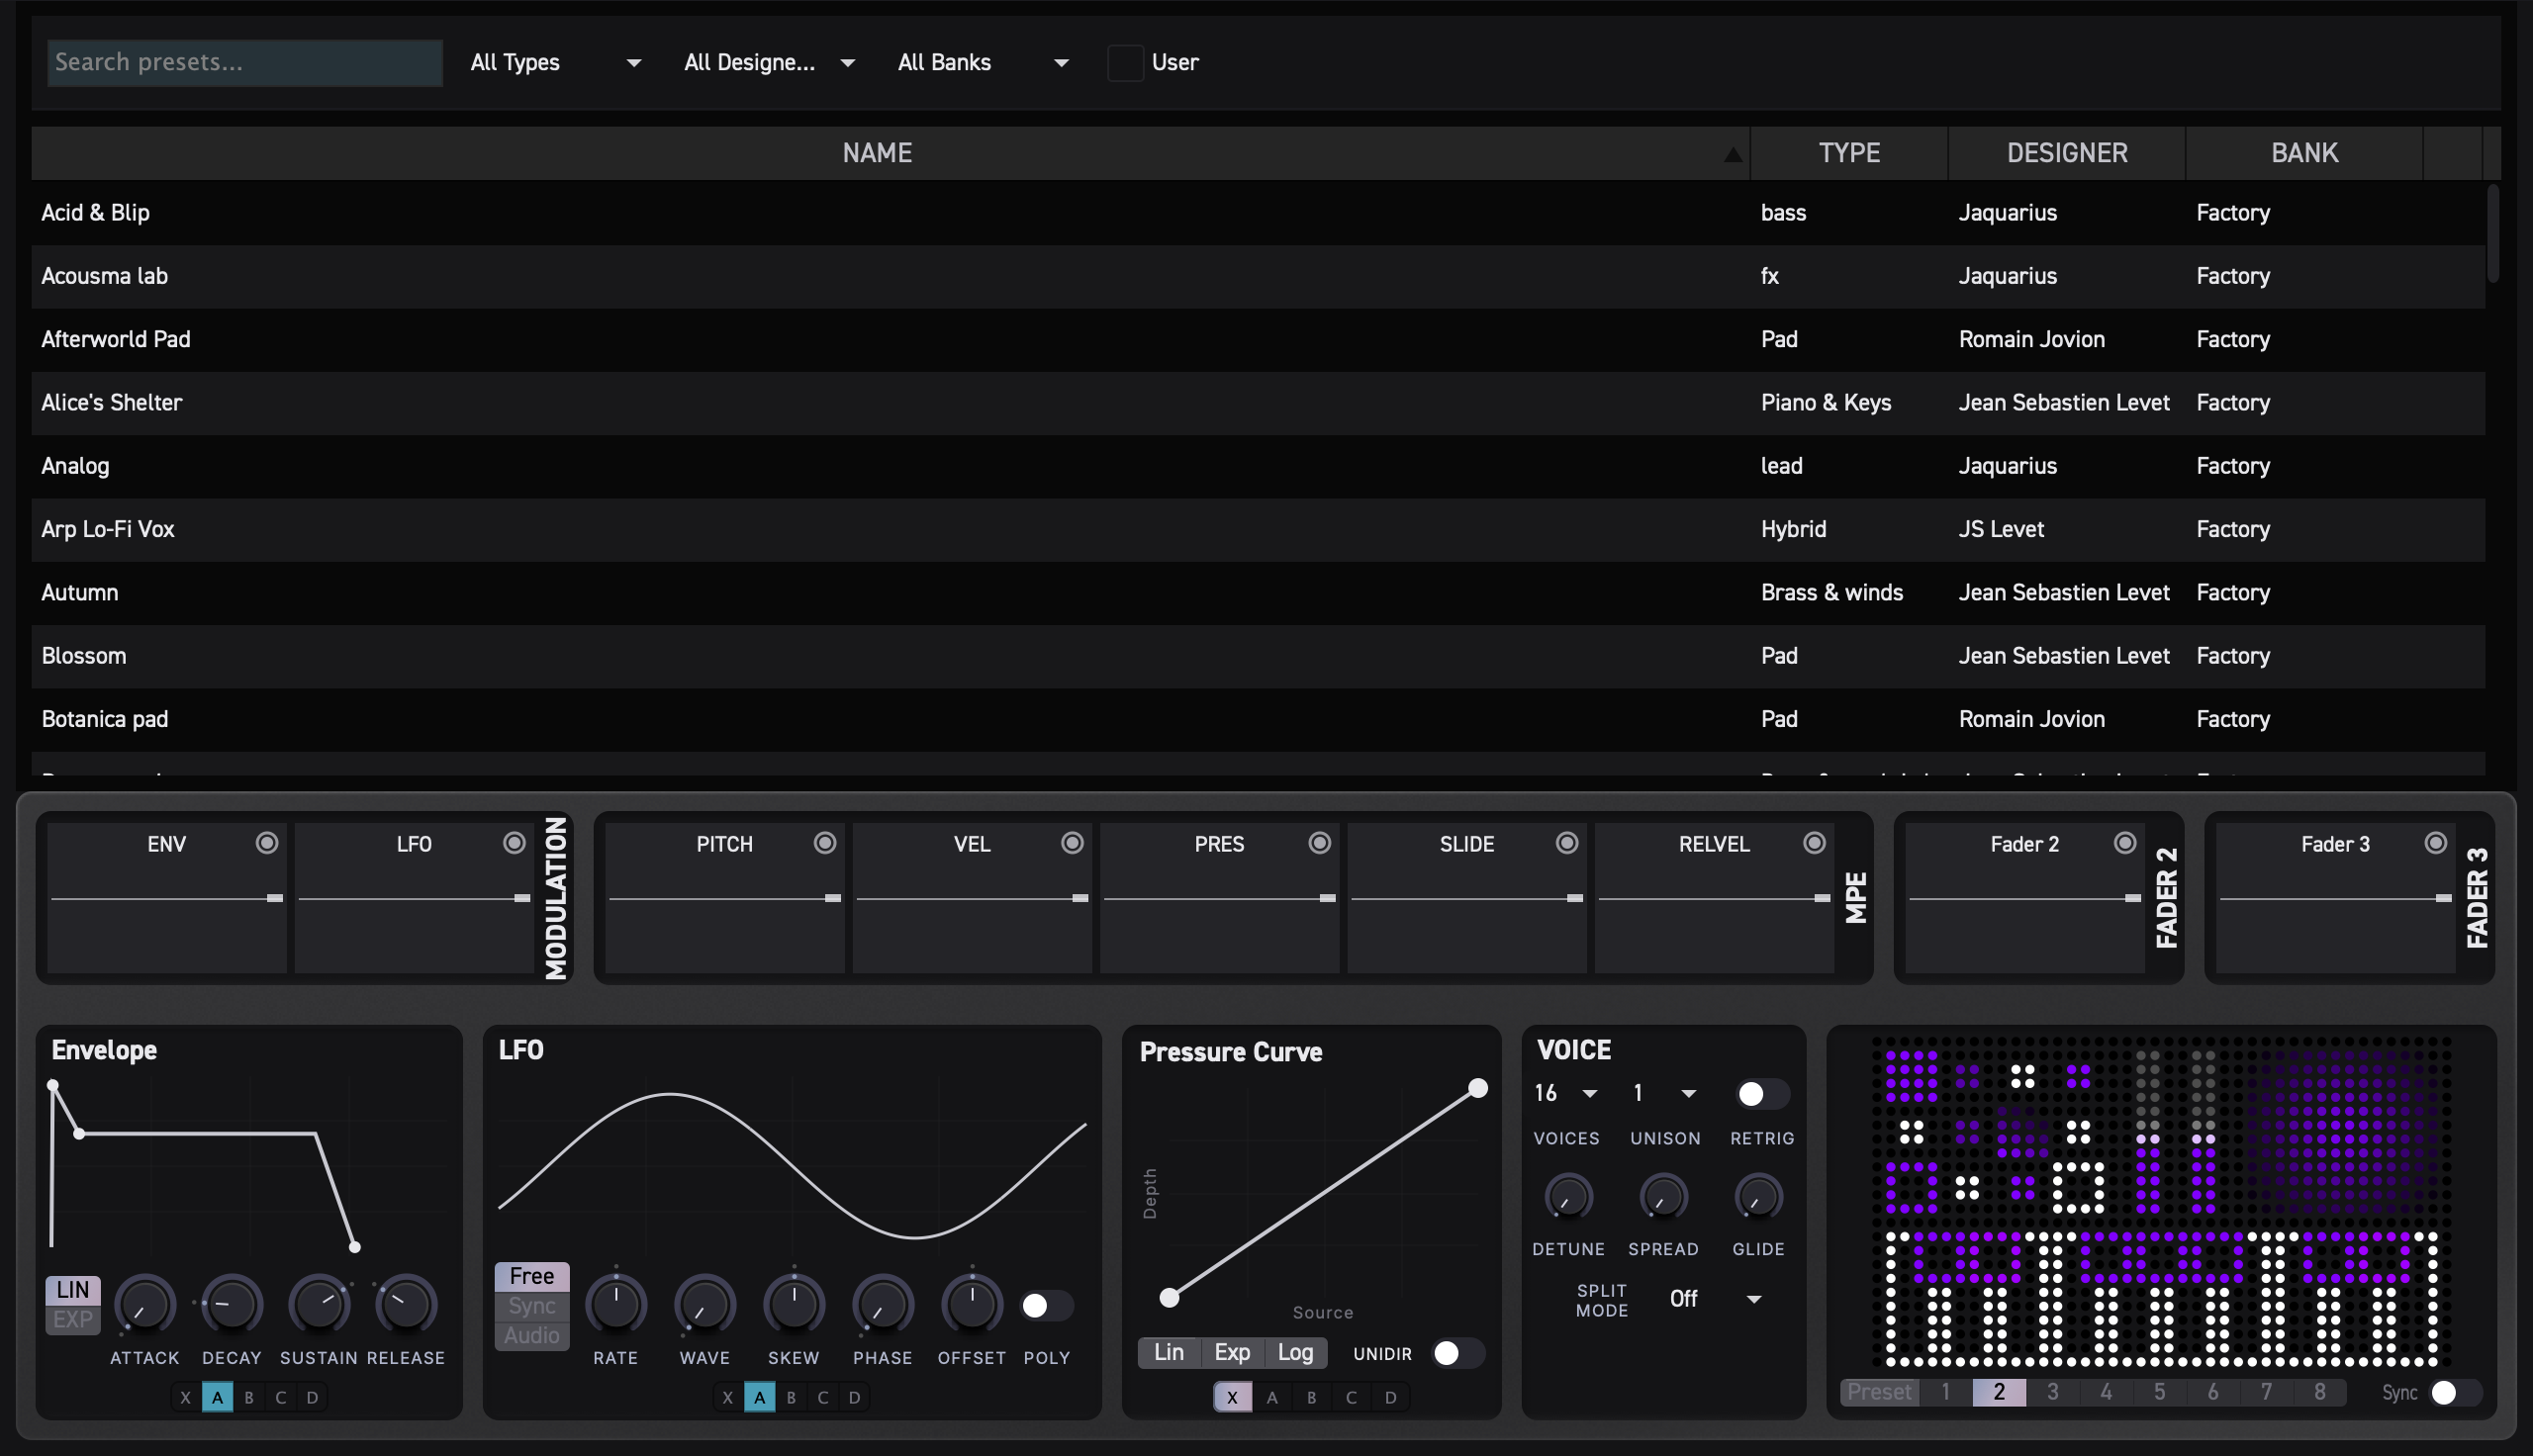
Synth Tab

The Synth tab is where you shape your sound. It is divided into three horizontal zones stacked top to bottom:
| Zone | What it contains |
|---|---|
| Generator section (top) | Two side-by-side generator panels -- Generator A on the left, Generator B on the right. Each generator has oscillators, filters, and a control bar with routing options. |
| Modulation Display (middle) | Oscilloscope-style visualizers for every modulation source connected to the currently selected parameter. Sources appear in order: Envelope, Mod (LFO), Pitch, Velocity, Pressure, Slide, Release Velocity, and any active Erae layout sources. |
| Modulator controls (bottom) | Detailed editing panels arranged side by side: Envelope editor, LFO (Mod) editor, Modulation Curve editor, Voice settings, Split settings, and an Erae layout thumbnail. |
Clicking any knob or parameter in the generator section updates the Modulation Display and modulator controls to show that parameter's modulation configuration.
Tip: The Modulation Display and modulator controls are shared between the Synth and FX tabs. Selecting a parameter in either tab updates both sections.
For a deep dive into each generator panel, see Generators. For modulation details, see Modulation.
FX Tab
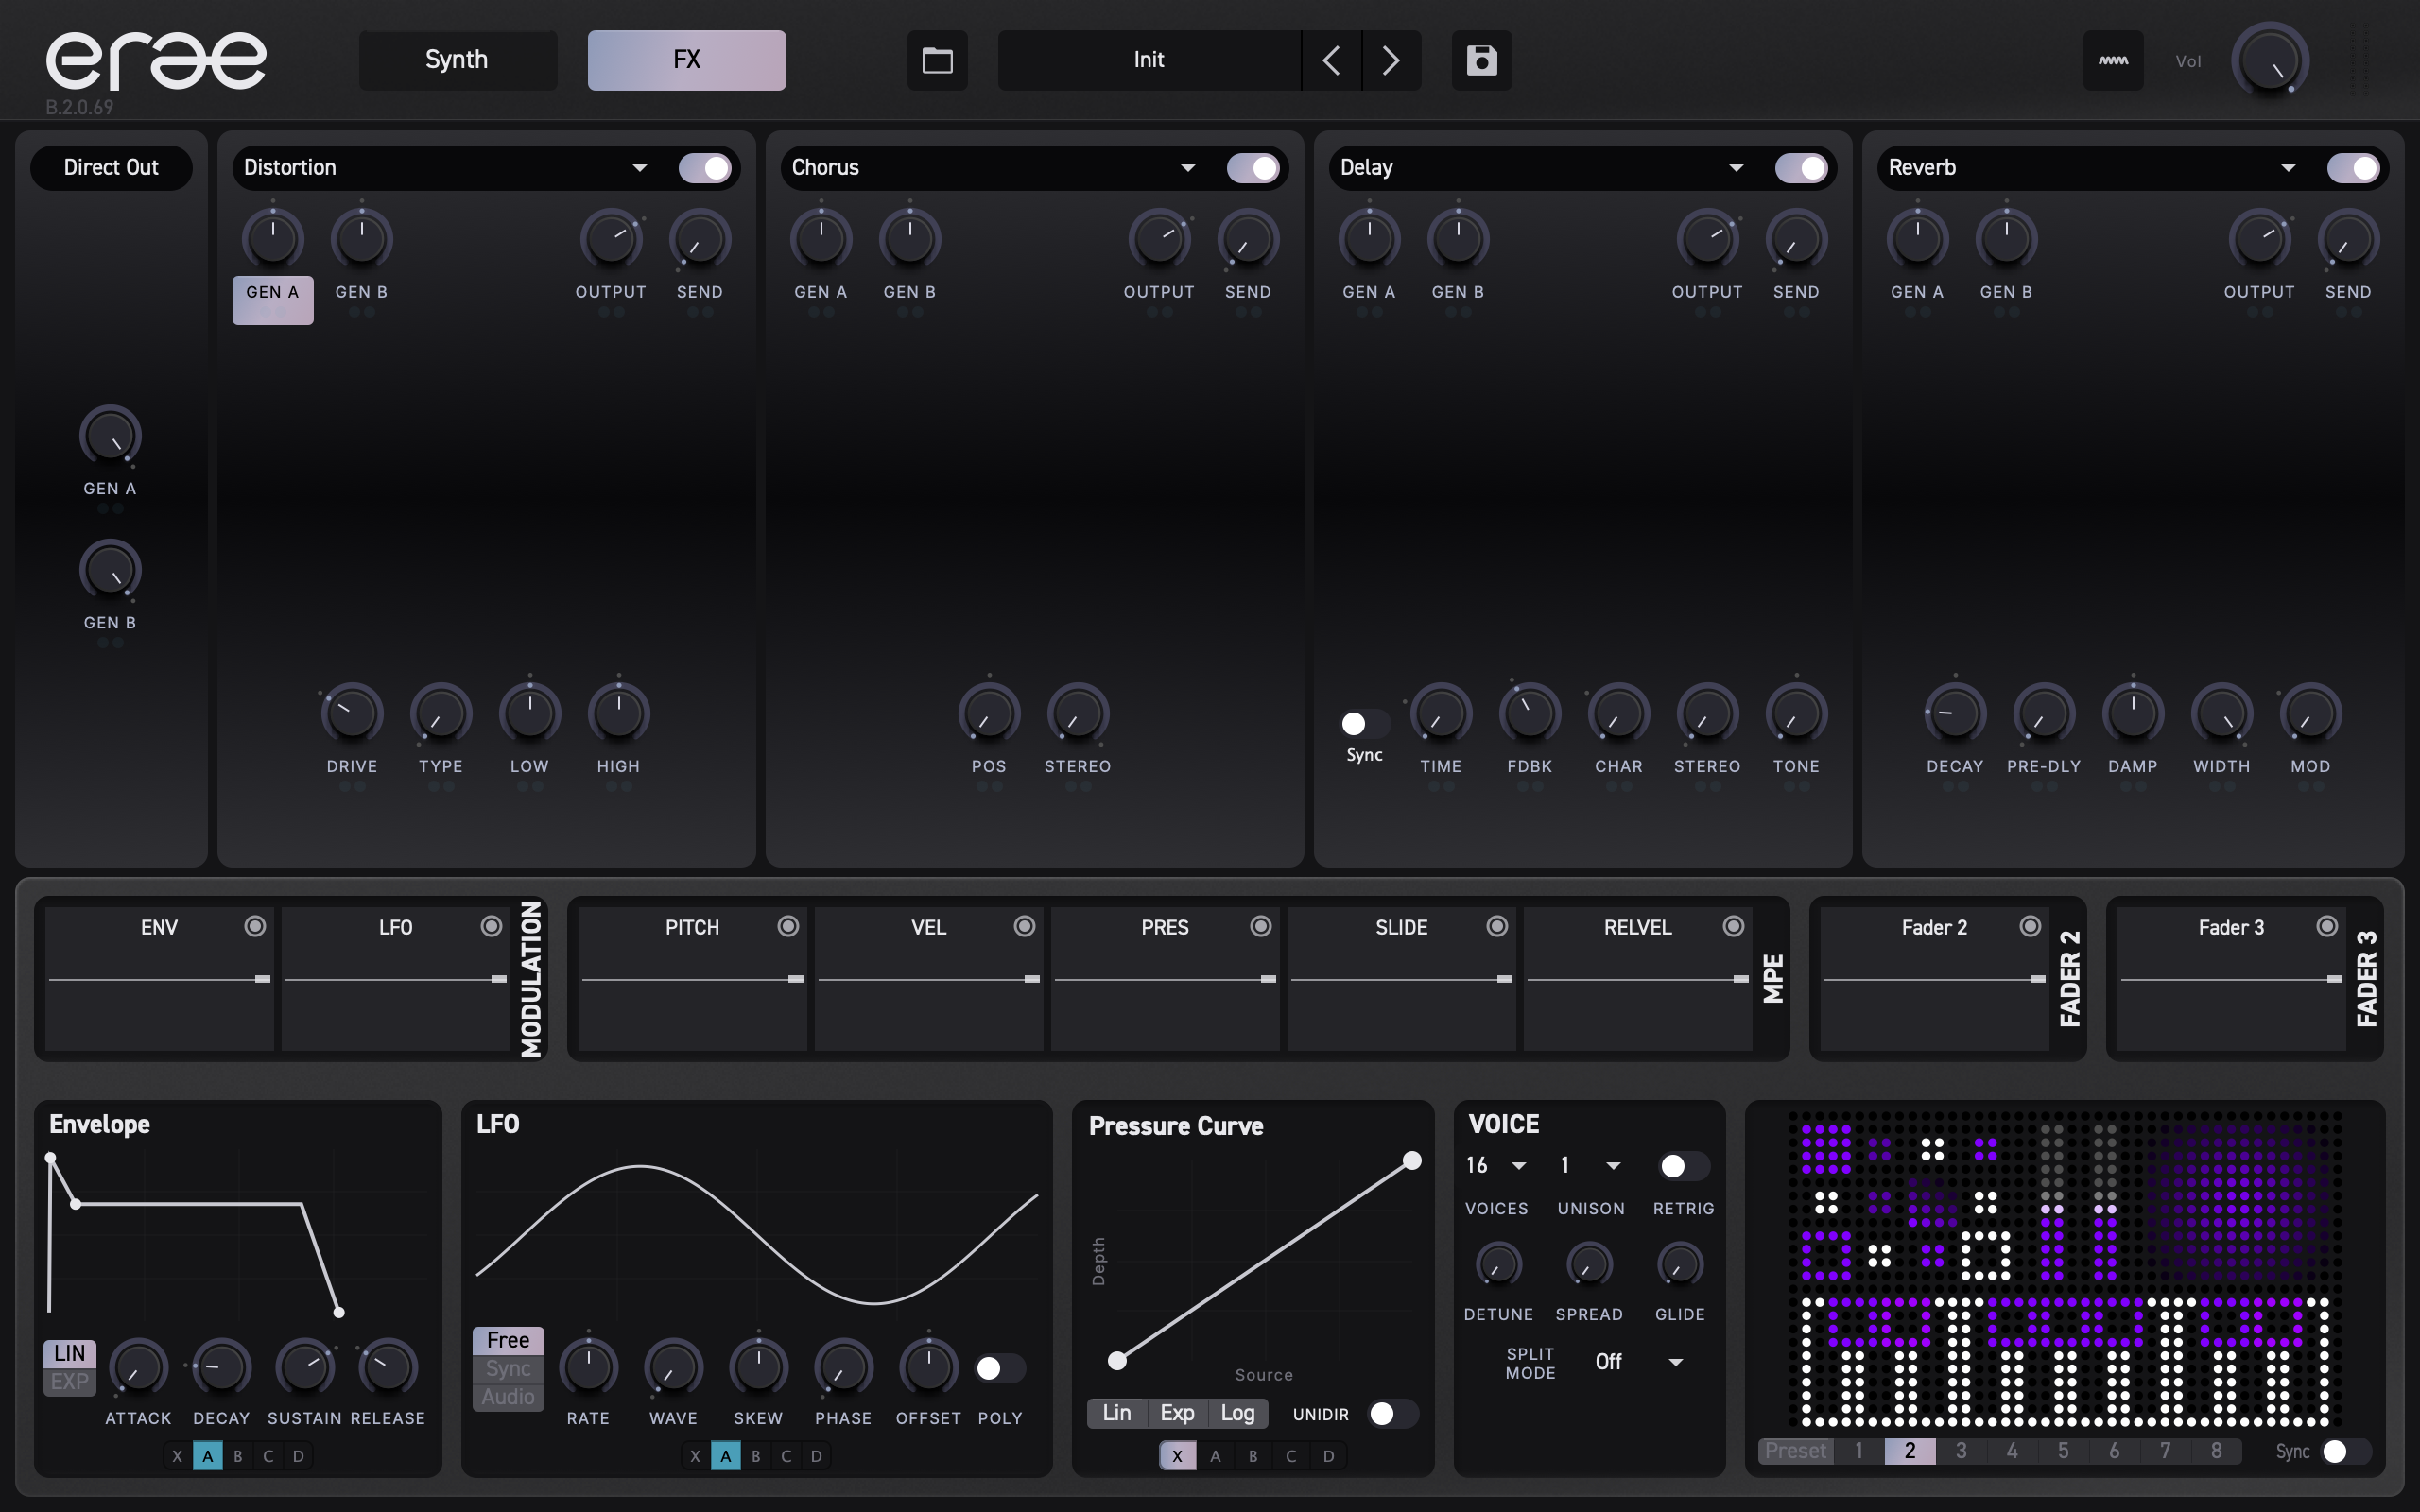
The FX tab follows the same three-zone layout as the Synth tab, but the top zone is replaced by the effects chain:
| Zone | What it contains |
|---|---|
| FX slots (top) | Four effect slots arranged side by side. Each slot holds one effect with its own set of parameter knobs. |
| Modulation Display (middle) | Same as the Synth tab -- shows modulation sources for the selected FX parameter. |
| Modulator controls (bottom) | Same panels as the Synth tab -- Envelope, LFO, Curve, Voice, Split, and Erae thumbnail. |
For full coverage of each effect type and its parameters, see Effects.
What's Next
Now that you know your way around the window, the following chapters explore each section in depth:
- Generators -- oscillators, filters, and routing inside each generator.
- Modulation -- envelopes, LFOs, link groups, and cross-modulation.
- Effects -- the four-slot FX chain and every effect type.
- Erae Integration -- connecting Erae Sound to your Erae.
- Presets -- browsing, saving, and organizing your sounds.
Generators
Erae Sound features two identical analog synthesis engines -- Generator A (left) and Generator B (right) -- that run side by side. Each generator produces its own independent signal and sends it onward to the effects chain. This chapter covers every parameter you will encounter inside each generator.
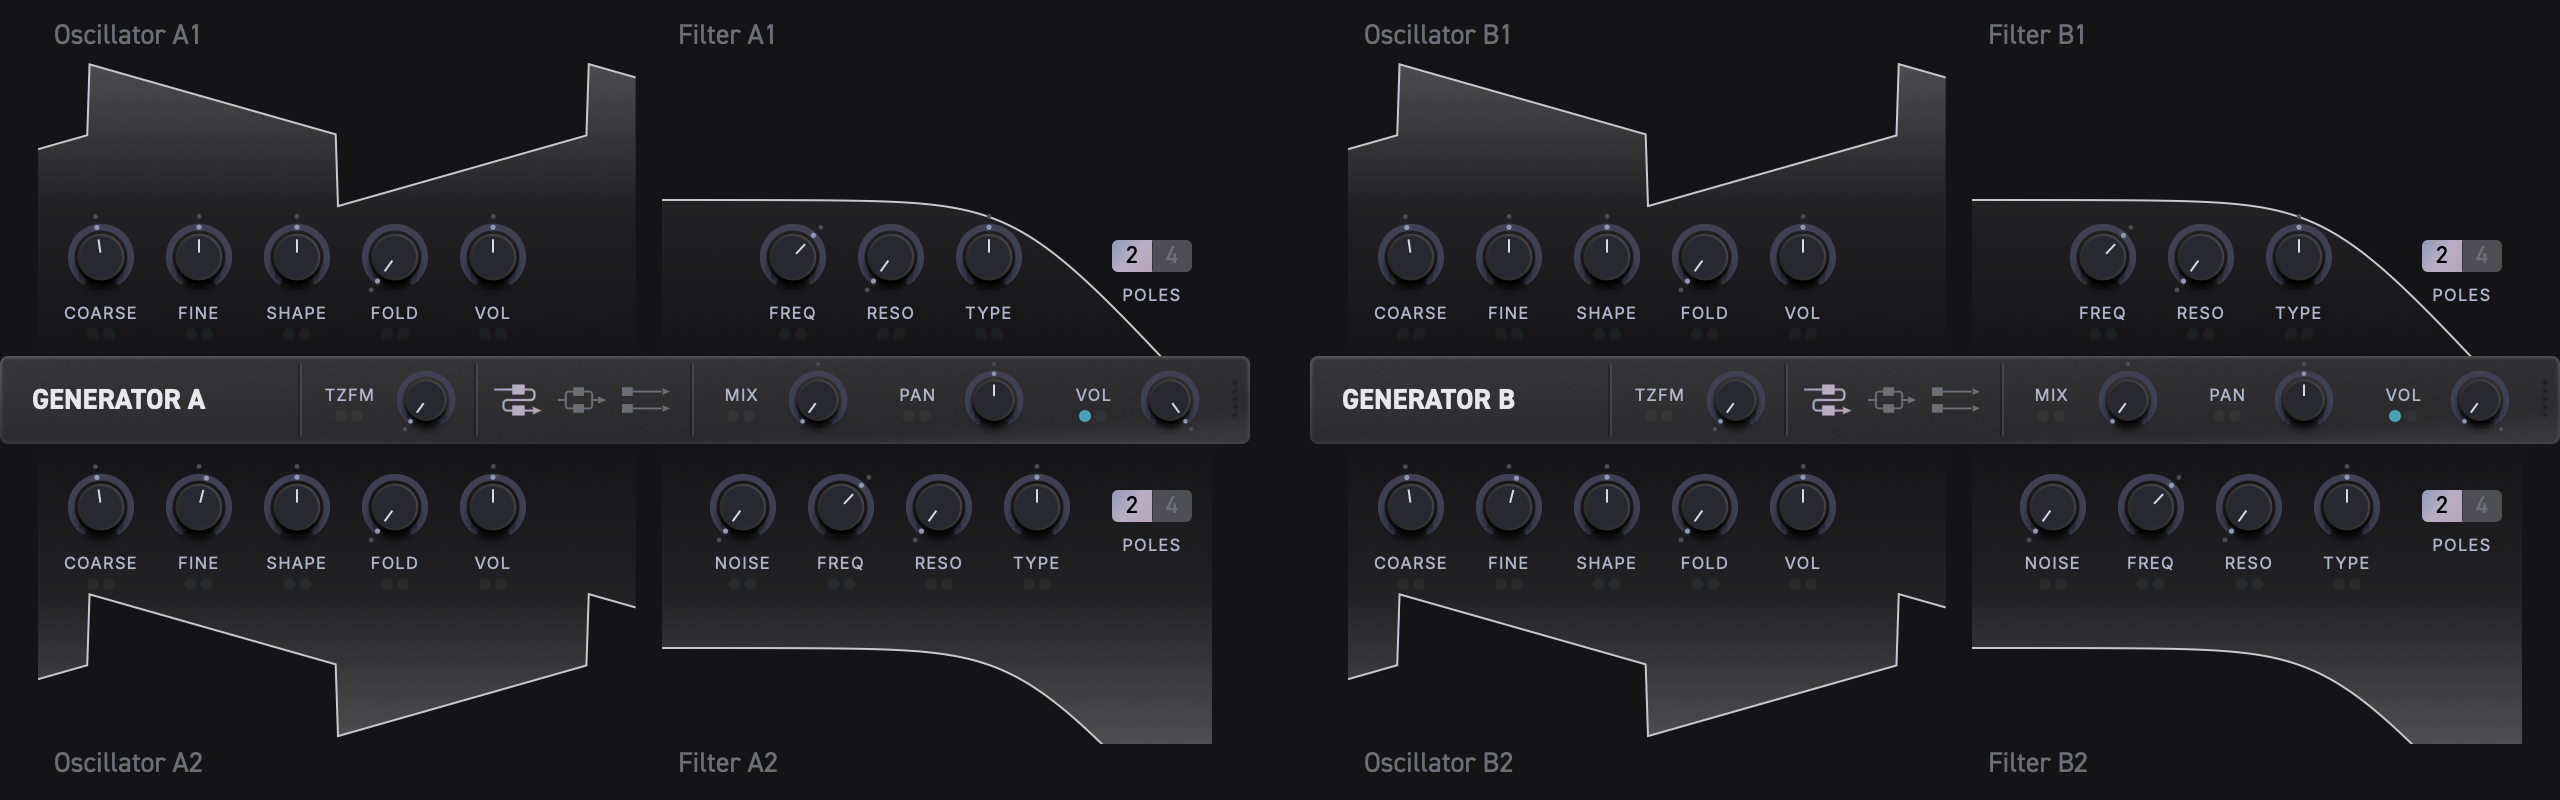
Generator Layout at a Glance
Each generator is organized into five areas:
| Area | Position | Contents |
|---|---|---|
| Oscillator 1 | Top-left | Waveform visualizer + 5 knobs |
| Filter 1 | Top-right | Frequency response visualizer + 3 knobs + Poles button |
| Control Bar | Middle strip | Generator label, TZFM, Routing, F1/F2 mix, Vol |
| Oscillator 2 | Bottom-left | Waveform visualizer + 5 knobs (mirrored) |
| Filter 2 | Bottom-right | Frequency response visualizer + 4 knobs + Poles button |
The control bar in the middle displays ANALOG A or ANALOG B to identify which generator you are editing. Generator A and Generator B share the same controls and signal flow but have completely independent parameter values.
Signal Flow
Understanding how sound moves through a generator will help you shape your patches effectively. Each generator has three filter-routing modes: Serial, Parallel, and Split.
Serial:   Osc 1 + Osc 2 ──► Filter 1 ──► Filter 2 ──► Output mix
Parallel: Osc 1 + Osc 2 ──┬──► Filter 1 ──┐
                          └──► Filter 2 ──┴──► Output mix
Split:    Osc 1 ─────────────► Filter 1 ──┐
          Osc 2 ─────────────► Filter 2 ──┴──► Output mix
- Oscillator 1 and Oscillator 2 each produce a waveform. Their levels are set by their individual VOL knobs.
- In Serial and Parallel, the two oscillator signals are summed before filtering. In Split, Oscillator 1 and Oscillator 2 remain separate.
- The oscillator signal is sent into Filter 1 and Filter 2 according to the routing mode (Serial, Parallel, or Split -- see Control Bar).
- The F1/F2 slider in the control bar blends between the Filter 1 and Filter 2 outputs.
- The final Vol knob in the control bar sets the overall generator output level.
Oscillators
Oscillator 1 and Oscillator 2 share the same set of five parameters. Each oscillator has a real-time waveform visualizer that updates live as you adjust the knobs.
Parameters
| Knob | Description | Range | Default |
|---|---|---|---|
| COARSE | Pitch tuning in semitones (MIDI note number) | 0 -- 127 | 60 (C4) |
| FINE | Fine-tune offset in semitones | -1.0 -- +1.0 | 0.0 |
| SHAPE | Continuous waveform morph | 0.0 -- 1.0 | 0.5 |
| FOLD | Wavefolder intensity | 0.0 -- 1.0 | 0.0 (off) |
| VOL | Oscillator output level using the audio taper | 0.0 -- 1.0 | about -12 dB |
Waveform Shape
The SHAPE knob smoothly morphs through four classic waveforms as you turn it from left to right:
- Sine -- pure, smooth tone (far left)
- Triangle -- slightly brighter, odd harmonics
- Pulse -- hollow, reedy character
- Sawtooth -- full harmonic spectrum (far right)
The morph is continuous, so any position between these landmarks produces a blend of the two nearest waveforms. For example, setting SHAPE halfway between Sine and Triangle gives you a hybrid that combines qualities of both.
Tip: The waveform visualizer behind the knobs updates in real time, so you can see exactly what the oscillator is producing as you turn the SHAPE knob.
Wavefolder
The FOLD knob adds harmonic complexity by folding the waveform back on itself. At 0.0 the waveform passes through unchanged. As you increase the value, the waveform is progressively folded, generating rich overtones and increasingly complex timbres.
Wavefolding works especially well with simple waveforms like Sine and Triangle, transforming them into harmonically dense sounds without needing to change the SHAPE setting.
Tip: Combine a moderate FOLD amount with a Sine wave for vintage-style harmonic distortion that stays musically useful.
Pitch and Tuning
COARSE sets the base pitch as a MIDI note number. The note you play on your controller transposes from this base pitch. FINE offsets the pitch by up to one semitone in either direction, useful for detuning Oscillator 2 against Oscillator 1 to create chorus-like thickness.
Oscillator VOL uses an audio taper rather than a simple linear gain display. The default leaves headroom at about -12 dB, so two oscillators and modulation can sum without immediately clipping.
Tip: Set Oscillator 2's COARSE a fifth or octave above Oscillator 1 for classic interval stacking.
Filters
Each generator has two independent filters. Filter 1 and Filter 2 have mostly the same controls, with one addition: Filter 2 has a NOISE knob.
Each filter section includes a real-time frequency response visualizer that shows the current cutoff, resonance, and filter type at a glance.
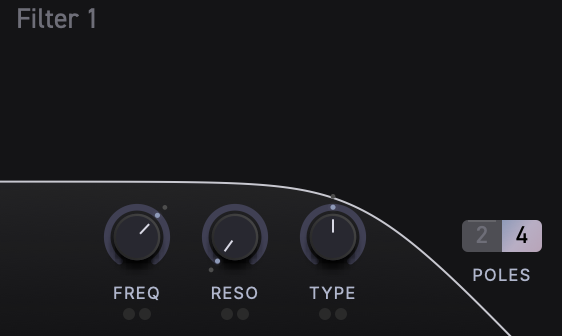
Filter 1 Parameters
| Knob / Button | Description | Range | Default |
|---|---|---|---|
| FREQ | Cutoff frequency (as MIDI note) | 0 -- 143 | 93 |
| RESO | Resonance / Q | 0.0 -- 1.0 | 0.0 |
| TYPE | Continuous filter type morph | 0.0 -- 1.0 | 0.5 (Lowpass) |
| POLES | Filter slope toggle | 2 or 4 | 4 |
Filter 2 Parameters
Filter 2 has all the same controls as Filter 1, plus one extra:
| Knob / Button | Description | Range | Default |
|---|---|---|---|
| NOISE | Crossfade between oscillator signal and noise | 0.0 -- 1.0 | 0.0 (pure signal) |
| FREQ | Cutoff frequency (as MIDI note) | 0 -- 143 | 93 |
| RESO | Resonance / Q | 0.0 -- 1.0 | 0.0 |
| TYPE | Continuous filter type morph | 0.0 -- 1.0 | 0.5 (Lowpass) |
| POLES | Filter slope toggle | 2 or 4 | 4 |
Filter Type Morph
The TYPE knob continuously morphs between three filter modes:
- Far left (
0.0) -- Bandpass: passes only frequencies near the cutoff, attenuating both lows and highs. - Center (
0.5) -- Lowpass: passes frequencies below the cutoff, the classic subtractive synthesis filter. - Far right (
1.0) -- Highpass: passes frequencies above the cutoff, removing bass and low-mid content.
Just like the oscillator SHAPE knob, every position between these points produces a smooth blend.
Resonance
Turning up RESO boosts frequencies right at the cutoff point, creating a sharper, more pronounced peak. At high settings the filter begins to self-resonate, producing a ringing, pitched tone at the cutoff frequency.
Poles (Filter Slope)
Click the POLES button to toggle between two slope settings:
- 2 -- 12 dB/octave (gentler slope, more of the original signal bleeds through)
- 4 -- 24 dB/octave (steeper slope, more aggressive filtering)
The button displays the current setting. When set to 4, it appears highlighted.
Noise (Filter 2 Only)
The NOISE knob on Filter 2 crossfades the filter input between the oscillator signal and a noise source. At 0.0, Filter 2 receives only the oscillator signal (or Filter 1's output in Serial mode). At 1.0, it receives only noise. Intermediate values blend the two using an equal-power crossfade.
Tip: A small amount of NOISE mixed into Filter 2 with high RESO creates airy, breathy textures -- great for pads and atmospheric sounds.
Visualizers
Each oscillator and filter section includes a real-time visualizer:
-
Oscillator visualizers show the current waveform shape, reflecting SHAPE, FOLD, and (for Oscillator 1) the effect of TZFM modulation from Oscillator 2. The waveform display updates as you adjust any relevant parameter or play notes.
-
Filter visualizers show the frequency response curve, reflecting the current FREQ, RESO, TYPE, and POLES settings. You can see the cutoff peak move and the response shape change in real time.
Both visualizers also respond to modulation, so if an envelope or LFO is moving a parameter, you will see the visualizer animate accordingly.
Control Bar
The control bar is the horizontal strip between the oscillator/filter areas, labeled ANALOG A or ANALOG B. It contains the generator's routing and output controls.

Control Bar Parameters (left to right)
| Control | Type | Description | Range | Default |
|---|---|---|---|---|
| Label | Text | Displays "ANALOG A" or "ANALOG B" | -- | -- |
| TZFM | Knob | Through-zero FM depth | 0.0 -- 1.0 | 0.0 (off) |
| Routing | Toggle buttons | Serial, Parallel, or Split filter topology | Serial / Parallel / Split | Serial |
| F1 / F2 | Slider | Output mix between Filter 1 and Filter 2 | 0.0 -- 1.0 | 0.5 (equal blend) |
| Vol | Knob | Generator output volume | 0.0 -- 1.0 | 1.0 |
Through-Zero FM (TZFM)
The TZFM knob controls through-zero frequency modulation, where Oscillator 2's output modulates Oscillator 1's frequency. This produces complex, harmonically rich timbres -- metallic, bell-like, and clangorous tones that are difficult to achieve with standard synthesis.
- At
0.0, there is no FM -- Oscillator 1 runs at its normal pitch. - As you increase TZFM, Oscillator 2's waveform pushes Oscillator 1's frequency up and down, even through zero Hz, creating the characteristic "through-zero" sound without the pitch-drift artifacts of simpler FM implementations.
The resulting timbre depends heavily on the frequency ratio between the two oscillators. Try tuning Oscillator 2 to simple intervals (octaves, fifths, fourths) relative to Oscillator 1 for more harmonic results, or use non-integer ratios for inharmonic, bell-like sounds.
Tip: The Oscillator 1 waveform visualizer shows the effect of TZFM in real time, so you can see how Oscillator 2 is reshaping the waveform as you turn up the depth.
Filter Routing
The routing toggle in the control bar determines how the two filters receive the oscillator signal. Three icon buttons represent the available modes:
Serial (default)
Osc mix ──► Filter 1 ──► Filter 2 ──► Output
The mixed oscillator signal enters Filter 1 first. Filter 1's output then feeds into Filter 2. This cascaded arrangement lets you sculpt the sound in two successive stages -- for example, a lowpass followed by a highpass to create a bandpass-like effect with independent control over each cutoff.
Parallel
              ┌──► Filter 1 ──┐
Osc mix ──────┤               ├──► Output
              └──► Filter 2 ──┘
Both filters receive the same mixed oscillator signal independently. Their outputs are then blended together using the F1/F2 slider. This is useful for creating dual-filter sounds where each filter contributes a different character to the final tone.
Tip: In Parallel mode, try setting Filter 1 to Lowpass and Filter 2 to Highpass for a "formant-like" split that emphasizes two different frequency regions.
Split
Oscillator 1 ──► Filter 1 ──┐
Oscillator 2 ──► Filter 2 ──┴──► Output
Oscillator 1 feeds Filter 1 while Oscillator 2 feeds Filter 2. The two filtered paths are then blended with the F1/F2 slider. This keeps the oscillators separate through the filter stage, which is useful for dual-oscillator patches where each oscillator needs its own filter shape.
Tip: In Split mode, use Oscillator 1 for a stable low foundation through Filter 1 and Oscillator 2 for a brighter or noisier layer through Filter 2.
Output Mix (F1 / F2)
The F1/F2 slider in the control bar blends between the outputs of Filter 1 and Filter 2 using an equal-power crossfade:
- Hard left -- only Filter 1's output is heard.
- Center (default) -- an equal blend of both filters.
- Hard right -- only Filter 2's output is heard.
This gives you a single control to balance two different filter characters, which is especially powerful in Parallel and Split routing modes where each filter contributes a distinct path.
Generator Output Volume
The Vol knob at the far right of the control bar sets the overall output level of the generator. This is the final gain stage before the signal leaves the generator and enters the effects chain.
The default value of 1.0 sets the generator at full level. Turn it down if your patch is clipping, or automate it with modulation for tremolo and swell effects.
Generator Modulation
Every knob-based parameter in the generator section can be modulated by envelopes, LFOs, and MIDI sources (velocity, pressure, slide, pitch bend, and more). Small colored LED indicators below each knob show whether a modulation source is connected.
Modulation setup is covered in detail in Modulation.
Two Generators Working Together
Generator A and Generator B are completely independent. Each has its own pair of oscillators, pair of filters, TZFM, routing, and output volume. Their outputs are combined downstream in the effects and mixer stages.
Some strategies for using both generators:
- Layer two timbres -- use Generator A for a bright, cutting lead and Generator B for a warm pad underneath.
- Split the performance range -- use the Split panel to send different notes or MPE channels to Generator A and Generator B. See Voice and Split for Note Split and MPE Split setup.
- Detune for thickness -- set both generators to similar patches but slightly detune them for a massive unison sound.
- Contrast -- set one generator to a simple waveform with heavy filtering and the other to a complex, folded waveform with an open filter for textural contrast.
Tip: Each generator's Vol knob lets you balance the two generators against each other without reaching for a separate mixer.
Modulation
Erae Sound's modulation system is designed around one powerful idea: every knob has its own complete modulation engine. Instead of a centralized modulation matrix, each parameter carries its own envelope, LFO, MIDI sources, response curves, and cross-modulation connections. Click any knob to reveal and edit its modulation in the panels below.
Concept: Per-Parameter Modulation
In most synthesizers, modulation is handled by a global matrix where you pick a source, pick a destination, and set a depth. Erae Sound takes a different approach.
Every parameter in Erae Sound -- oscillator pitch, filter cutoff, effect mix, and so on -- owns a complete modulation system. When you click a knob, the bottom section of the interface shows that parameter's envelope, LFO, response curves, and modulation depths. There is no separate modulation matrix page to navigate.
This means:
- No slot limits. Every parameter can be modulated by every source simultaneously.
- No context switching. Select a knob and everything about its modulation appears right below.
- Independent depths. Two parameters can share the same LFO shape but have completely different modulation amounts.
Tip: Click any knob label or right-click the knob itself to select it. The bottom panels instantly update to show that parameter's modulation settings.
Modulation Display Section
The Modulation Display is a horizontal strip located in the middle of the screen, between the generator area and the bottom panels. It shows all modulation sources for the currently selected parameter using a rolling history of roughly two seconds.

Fixed Sources
Seven sources are always visible, in this order:
| Label | Source | Description |
|---|---|---|
| ENV | Envelope | ADSR envelope output for the selected parameter |
| LFO | Modulator | LFO / modulator output for the selected parameter |
| PITCH | Pitch Bend | Pitch bend value from your controller |
| VEL | Velocity | Note-on velocity |
| PRES | Pressure | Channel aftertouch / pressure |
| SLIDE | Slide | MPE slide (CC74) |
| RELVEL | Release Velocity | Note-off velocity |
Erae Layout Sources
Additional sources appear to the right of the fixed sources when your Erae layout includes faders, buttons, XY pads, or other control zones. These are labeled with the zone name from your Erae layout (for example, "Fader 1" or "XY Pad X"). Up to 8 layout sources can appear simultaneously.
Per-voice sources show the currently relevant voice activity, while FX parameters use global modulation traces. When the LFO POLY switch is enabled, the display follows per-voice LFO behavior; otherwise it reflects the shared/global LFO behavior for the selected parameter. Layout sources can be grouped and scrolled when the layout exposes more sources than fit on screen.
Visualizer and Depth Fader
Each source cell contains two layers:
- Waveform display. A real-time oscilloscope showing the source's current output as a rolling waveform.
- Depth fader overlay. A vertical fader that sets how much this source affects the selected parameter. Drag up or down to set the depth from
-100%(bottom) to+100%(top), with0%at the center.- Positive depth values are shown as a yellow-tinted fill.
- Negative depth values are shown as a red-tinted fill.
Tip: The ENV and LFO depth knobs use quadratic scaling for finer control near zero. Small knob movements near the center produce subtle depth changes, while larger movements toward the extremes ramp up more aggressively. MIDI source faders (VEL, PRES, SLIDE, etc.) use linear scaling.
Cross-Modulation Connection Points
Each source cell also acts as a connection point for cross-modulation (see Cross-Modulation). You can drag from one source to another to create a cross-mod connection.
Envelope (ADSR)
The Envelope panel sits in the bottom-left area of the screen. It provides a standard ADSR (Attack, Decay, Sustain, Release) envelope generator for the currently selected parameter.
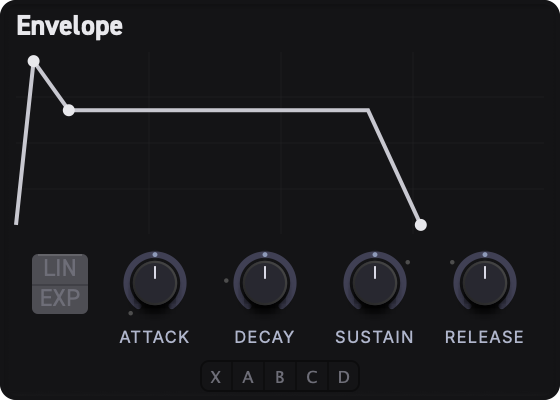
Envelope Shape Preview
The upper portion of the panel shows a live ADSR shape visualization. The curve updates in real time as you adjust the knobs, giving you instant visual feedback of the envelope contour.
Parameters
| Parameter | Range | Description |
|---|---|---|
| Attack | approx. 0.002 s -- 10 s | Time for the envelope to rise from zero to full level after a note-on |
| Decay | approx. 0.002 s -- 10 s | Time for the envelope to fall from full level down to the sustain level |
| Sustain | 0% -- 100% | Level the envelope holds at while the note is held |
| Release | approx. 0.002 s -- 10 s | Time for the envelope to fall from the sustain level back to zero after note-off |
All time parameters use an exponential scaling curve, so the lower portion of the knob range gives you fine control over short times while the upper portion covers longer sweeps.
Using the Envelope
- Select a knob (for example, Filter Cutoff).
- In the Modulation Display, drag the ENV depth fader upward to a positive value.
- Adjust Attack, Decay, Sustain, and Release to shape the modulation contour.
The envelope triggers on every note-on and enters its release phase on note-off.
Tip: To create a pluck-like filter sweep, set a short Attack (
~5 ms), moderate Decay (~300 ms), low Sustain (~10%), and short Release (~200 ms). Then assign a positive ENV depth to the filter cutoff.
Link Buttons
Below the four knobs, you will find the A, B, C, D link buttons. These assign the parameter's envelope to a shared link group (see Modulation Linking).
Modulator (LFO)
The LFO panel sits beside the Envelope panel at the bottom of the screen. It provides a continuously variable modulator (LFO) for the currently selected parameter.
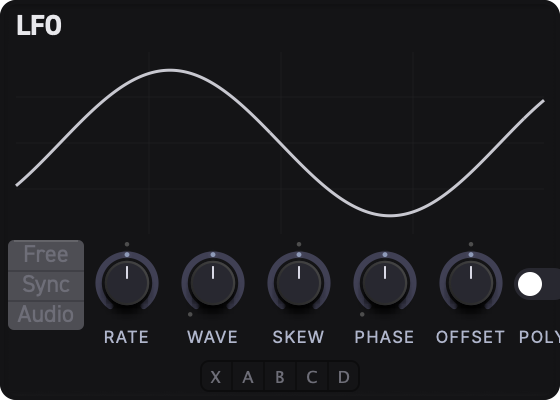
Waveform Preview
The upper portion of the panel shows a preview of the current waveform shape, updating live as you change the Wave and Skew knobs.
Mode Selector
A vertical card on the left side of the controls offers three rate modes:
| Mode | Rate Meaning |
|---|---|
| Free | Rate in Hz (0.01 -- 20 Hz). The LFO runs at a fixed frequency independent of the host tempo. |
| Sync | Rate locked to the host tempo. Choose from musical divisions (1/64 through 4 bars). See the Tempo Sync Reference Table for all available values. |
| Audio | Rate as a MIDI note frequency (C-2 through G8). Useful for audio-rate FM or AM effects. |
Parameters
| Parameter | Description |
|---|---|
| Rate | LFO speed. The unit changes depending on the mode (Hz, sync division, or note). |
| Wave | Waveform shape. Continuously morphs through five shapes: Sine -- Triangle -- Saw Up -- Square -- Sample & Hold. Intermediate positions produce smooth crossfades between adjacent shapes. |
| Skew | Waveform symmetry / phase distortion. At 50% (center) the waveform is symmetrical. Turning left or right compresses or stretches the first half of each cycle, changing the character of the shape. |
| Phase | Starting phase offset for the LFO cycle. |
| Offset | Shifts the LFO output range up or down. |
| POLY | Switches between one shared LFO and per-voice LFO behavior. |
Retrigger
Retrigger is available from the Voice panel as the Retrig toggle. When enabled, repeated note-ons restart the voice envelopes from the beginning, which gives repeated notes a consistent attack. When disabled, held notes can continue smoothly into the next note for legato playing.
Use Retrig with short envelopes for tight percussive patches, and leave it off for smoother lead lines or pads. The LFO's Phase and POLY controls still define how LFO motion starts and whether it runs per voice or globally.
Using the Modulator
- Select a knob (for example, Oscillator Pitch).
- In the Modulation Display, drag the LFO depth fader to set the modulation amount.
- Set the Mode (Free, Sync, or Audio).
- Adjust Rate, Wave, Skew, Phase, Offset, and POLY to shape the LFO output.
Tip: For a classic vibrato, select the oscillator Pitch knob, set the LFO depth to a small positive value (
~5%), choose Free mode, set Rate to around5 Hz, and leave Wave fully on Sine.
Link Buttons
Below the three knobs, you will find the A, B, C, D link buttons. These assign the parameter's LFO to a shared link group (see Modulation Linking).
MIDI Modulation Sources
Erae Sound responds to several expressive MIDI sources. Each source has an independent depth fader per parameter, allowing fine-grained control over how performance gestures affect every aspect of your sound.
Available Sources
| Source | Label | Default Polarity | Description |
|---|---|---|---|
| Velocity | VEL | Unipolar (0 to 1) | Note-on velocity. Higher velocity = larger modulation. |
| Pressure | PRES | Unipolar (0 to 1) | Channel aftertouch. Continuous pressure while holding a note. |
| Slide | SLIDE | Unipolar (0 to 1) | MPE slide / CC74. Usually mapped to finger position along the Y axis on the Erae. |
| Pitch Bend | PITCH | Bipolar (-1 to +1) | Pitch bend wheel or MPE per-note pitch. Center = no modulation. |
| Release Velocity | RELVEL | Unipolar (0 to 1) | Note-off velocity. How quickly you release the note. |
Depth Faders
Each source's depth fader in the Modulation Display sets the modulation amount for the selected parameter, ranging from -100% to +100%. A depth of 0% means the source has no effect.
- Positive depth: The source adds to the parameter value. For example, higher velocity increases filter cutoff.
- Negative depth: The source subtracts from the parameter value. For example, higher velocity decreases filter cutoff.
Response Curves and Polarity
Each MIDI source can have its own response curve and polarity setting per parameter. These are edited in the Curve Editor panel (see Modulation Curves).
- Polarity determines whether the source operates in unipolar (
0to1) or bipolar (-1to+1) range. - Curves reshape the source's response (for example, making velocity more or less sensitive in certain ranges).
Tip: If you want velocity to only affect loud notes, apply an exponential curve to the VEL source. Soft notes will produce very little modulation while hard notes produce a lot.
Modulation Linking (A/B/C/D)
Link groups let multiple parameters share the same Envelope or LFO settings. This is useful when you want several knobs to respond to the same modulation shape without having to duplicate settings manually.
How It Works
Both the Envelope and the Modulator have four link groups: A, B, C, and D. Each parameter can independently assign its envelope to one group and its LFO to another (or to no group at all).
| Assignment | Behavior |
|---|---|
| Dedicated (no button highlighted) | The parameter uses its own private envelope or LFO. Changes only affect this parameter. |
| A, B, C, or D | The parameter shares envelope or LFO settings with every other parameter assigned to the same group. Changing the Attack knob in group A updates it for all group-A parameters. |
Important Details
- Depths remain independent. Even when two parameters share group A's envelope, each parameter keeps its own ENV depth fader. One can have
+80%depth while the other has-20%. - Envelope and LFO link separately. A parameter can use Envelope link group B and LFO link group C at the same time.
- Radio-button behavior. The link buttons act like radio buttons -- clicking one deselects any previously selected button. To return to Dedicated mode, click the currently active button to deselect it.
Assigning a Link Group
- Select a knob.
- In the Envelope or LFO panel, click one of the A / B / C / D buttons.
- The panel knobs now control the shared group settings.
- Select another knob and assign it to the same group letter.
- Both parameters now share the same envelope or LFO shape.
LED Indicators
Each modulable knob has a small colored LED indicator below it. The LED shows the link group assignment at a glance:
- No LED color = Dedicated (no link group assigned)
- Colored LED = Assigned to a link group. The color corresponds to the group (A, B, C, or D) and whether it is an envelope or LFO link.
The LED is split into two halves -- one side for the envelope link and the other for the LFO link -- so you can see both assignments at once.
Tip: Use link groups to keep filter cutoff and resonance on the same envelope shape, while giving each a different depth. Assign both to Envelope group A, then set the cutoff depth high and the resonance depth low.
Modulation Curves
The Curve Editor panel lets you reshape how each modulation source responds before it reaches a parameter. Instead of a straight-line relationship between source value and modulation amount, you can create custom response curves.
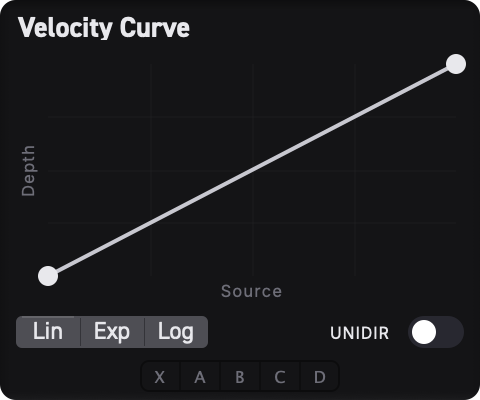
Panel Layout
The Curve Editor sits alongside the Envelope and LFO panels in the bottom section. It automatically shows the curve for the most recently clicked modulation source (VEL, PRES, SLIDE, PITCH, or any Erae layout source). The panel title updates to reflect the active source (for example, "Velocity Curve" or "Slide Curve").
Modulation curves also apply when editing modulator sub-parameters. When you select a modulator knob (such as Attack, Rate, or Skew), the Curve Editor shows the response curve for whichever MIDI source is active on that sub-parameter. This lets you fine-tune how velocity, pressure, or slide affects your envelope times and LFO settings.
Editing Curves
The main area displays a graph with a curve drawn from bottom-left (input = 0) to top-right (input = 1).
- Drag a control point to reshape the curve.
- Double-click on empty space to add a new control point (and immediately drag it).
- Double-click an existing point to remove it.
- The first point is locked at x =
0and the last point is locked at x =1. - You can have between 2 and 9 control points.
Preset Curves
Three quick-preset buttons appear below the curve graph:
| Button | Curve Shape |
|---|---|
| Lin | Linear -- straight diagonal line (no reshaping) |
| Exp | Exponential -- gentle at low values, steep at high values |
| Log | Logarithmic -- steep at low values, gentle at high values |
Polarity Toggle
The Uni / Bi button switches the source polarity:
- Uni (Unipolar): Source values range from
0to1. Good for velocity, pressure, and slide. - Bi (Bipolar): Source values range from
-1to+1. Good for pitch bend, which naturally centers at zero.
Pitch bend defaults to bipolar. All other sources default to unipolar.
Curve Link Groups (A/B/C/D)
Just like Envelope and LFO settings, curves can be shared across parameters via link groups A, B, C, D. When multiple parameters share a curve link group for the same source type, editing the curve for one updates it for all of them.
- Click a link button to assign the curve to that group.
- Click the active button again to return to Dedicated mode.
Copy and Paste
Use the Copy and Paste buttons to transfer a curve shape from one source or parameter to another. Copy the curve, select a different parameter or source, then paste.
Cross-Modulation
Cross-modulation lets one modulation source control another source's depth. This creates layered, dynamic modulation behaviors that evolve during performance.
What Is Cross-Modulation?
Normally, each modulation source has a fixed depth fader. Cross-modulation makes that depth vary in real time based on another source's output.
Examples:
- Envelope depth modulated by Velocity. The ENV modulation amount grows when you play harder, and shrinks when you play softly.
- LFO depth modulated by Pressure. Vibrato increases as you press harder into the surface.
- Velocity depth modulated by an Erae fader. Use a fader from the active Erae layout to control how much velocity affects the sound.
Creating a Cross-Mod Connection
- Select a knob to view its modulation sources in the Modulation Display.
- Drag from one source cell to another. For example, drag from the VEL cell to the ENV cell.
- A connection line appears between the two sources.
- The connection has its own depth control ranging from
-100%to+100%.
How It Works
When a cross-mod connection exists, the target source's depth is dynamically adjusted:
effective depth = base depth + (cross-mod source output x cross-mod depth)
For instance, if the ENV depth fader is set to +50% and Velocity cross-modulates ENV at +30%, then:
- At velocity = 0: effective ENV depth =
+50% - At velocity = 1: effective ENV depth =
+80%
Limits and Safety
- Maximum 64 connections across the entire patch.
- Cycle detection prevents feedback loops. You cannot create a chain where Source A modulates Source B's depth while Source B simultaneously modulates Source A's depth.
- Each cross-mod connection can be independently adjusted or removed.
Managing Connections
- Adjust depth: Click on a connection line to edit its depth.
- Remove: Delete connections from the Modulation Overview (see Modulation Overview) or by using the connection's delete control.
Modulation Overview
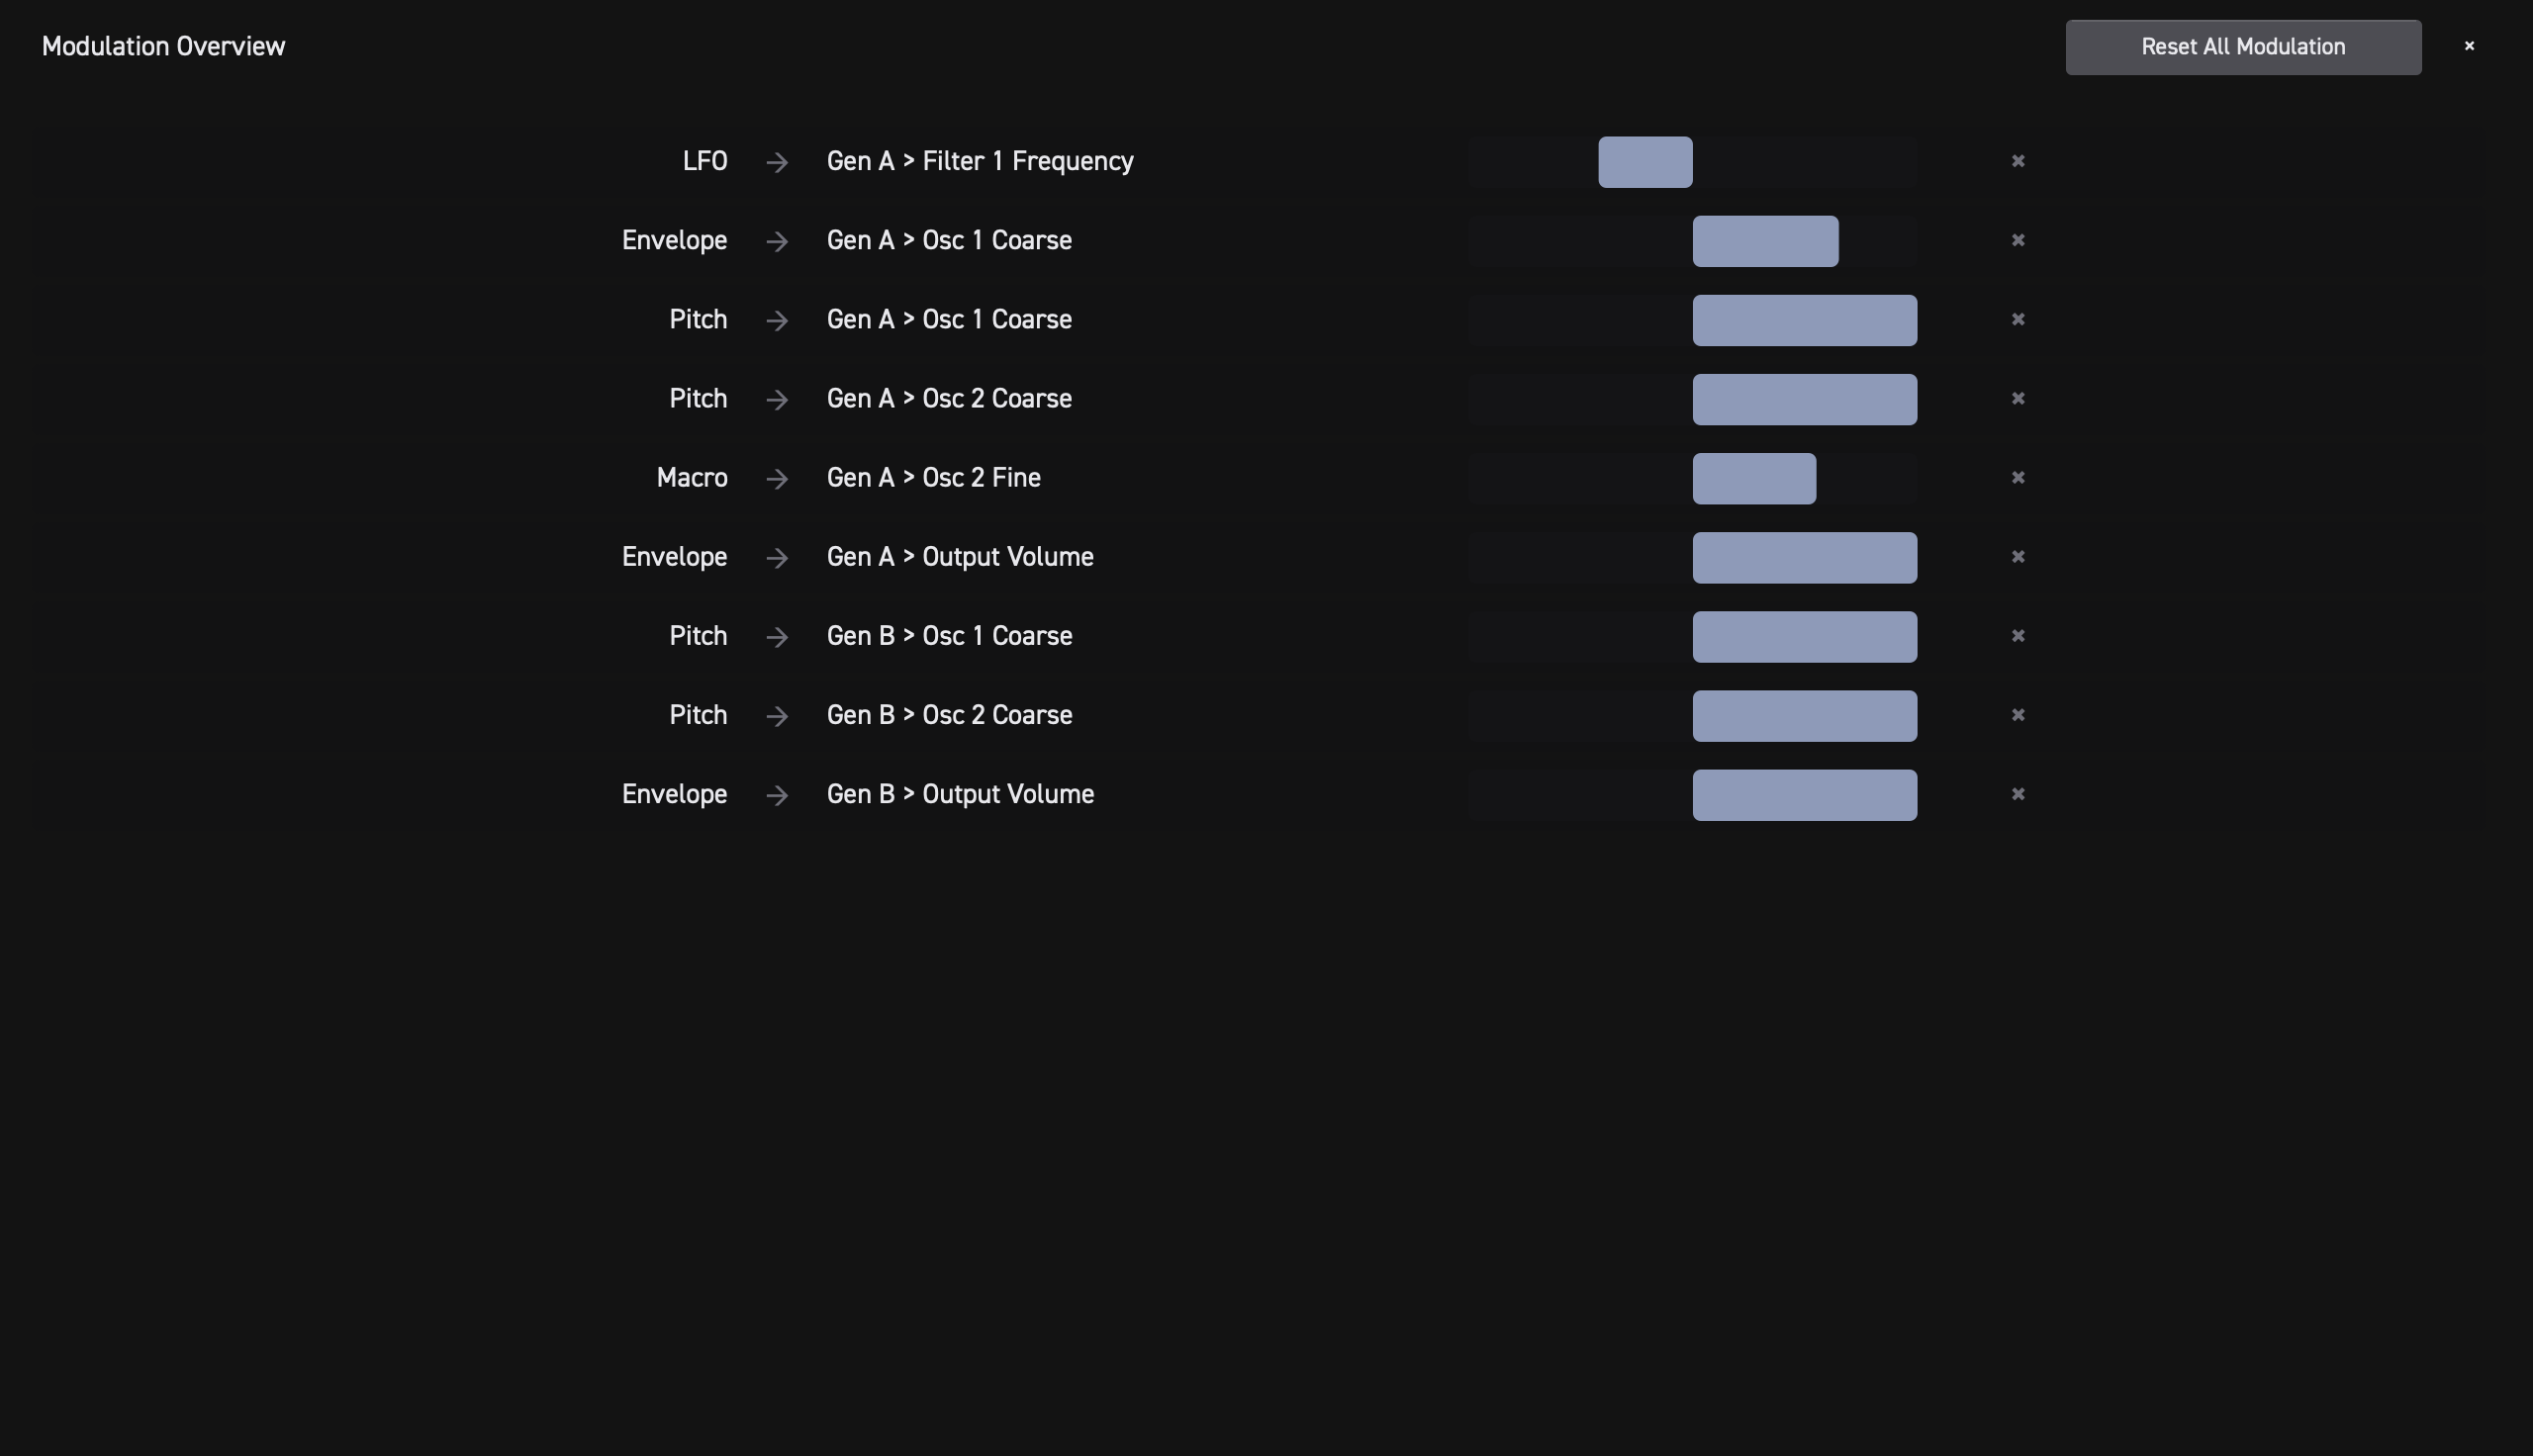
The Modulation Overview is a full-screen overlay that shows every active modulation connection across all parameters in your patch. It is your bird's-eye view of the entire modulation routing.
Opening the Overview
Click the Modulation Overview button in the header bar (top of the screen, near the volume control). The overview appears as a scrollable overlay on top of the main interface.
What You See
Each row in the overview represents one active modulation assignment:
- Parameter name -- which knob is being modulated
- Source name -- which source is providing the modulation (ENV, LFO, VEL, PRES, etc.)
- Depth slider -- editable slider showing the current modulation depth
- Delete button -- removes this modulation assignment
Editing from the Overview
You can adjust any depth fader directly in the overview without leaving the screen. You can also delete connections you no longer need. Changes take effect immediately.
When to Use It
- To audit your patch and see all active modulation at a glance.
- To quickly zero out or clean up unused modulation assignments.
- To get an overview after loading a complex preset.
Press Escape or click the close button to dismiss the overlay and return to normal editing.
Multiple Erae Devices
When more than one Erae device is connected, choose the active device in Erae Lab. Erae Sound follows Erae Lab's active device selection when device-backed layout sources are used.
DAW Host Automation
Erae Sound exposes its parameters to your DAW so you can record and play back automation from Ableton Live, Logic Pro, Cubase, or any host that supports plug-in automation.
There are two layers:
- Base parameters are exposed directly. Every oscillator, filter, FX, link-group, voice, and routing knob shows up in your DAW's automation list (around 595 parameters total). Pick them from the DAW's parameter chooser exactly like any other plug-in's controls.
- Modulation depths -- the per-source depth faders shown on every visualizer in the Modulation Display -- are routed through 64 Host Automation Slots. Slots are opt-in: assign a depth to a slot, and that slot becomes the automation lane your DAW writes to.
This split keeps the DAW automation list manageable while still letting you automate any modulation depth you care about.
Assigning a Modulation Depth to a Host Slot
- In the Modulation Display, find the source whose depth you want the DAW to control.
- Right-click the depth fader on that visualizer.
- A small menu opens with a header showing what is being assigned (for example,
Host Automation: env -> filter1_freq). - Pick one of:
- Auto-assign to next free slot -- the fastest path; Erae Sound chooses the lowest unused slot.
- Choose specific slot... ▶ -- opens a submenu listing all 64 slots so you can pick one (useful when you want consistent slot numbers across presets, or to swap an existing binding).
Once assigned, the slot's host_slot_N parameter mirrors the modulation depth in both directions: moving the depth fader in Erae Sound moves the DAW automation lane, and DAW automation moves the depth fader.
Replacing or Removing a Binding
Right-click the same depth fader again to:
- Unassign -- frees the slot. The DAW lane stays present (it always exists for
host_slot_N) but no longer drives any depth. - Choose specific slot... -- picking a different slot moves the binding. The previous slot becomes free.
Host Slots Tab
The Modulation Overview has a Host Slots button in the header that switches its main panel to a 64-row list showing every slot's current binding, live value, and an X button to unassign that slot.
Use it to audit a complex preset, free up slots in bulk with Clear All, or check which depths a DAW automation lane is currently driving.
Slot Names in the DAW
The slots appear in the DAW's parameter chooser as Slot 1, Slot 2, ... Slot 64. They keep these generic names while a session is open: Erae Sound does not push live name updates to the host (some DAWs interpret the refresh request as a parameter-set change and behave unpredictably). The slot's actual binding is always visible inside Erae Sound on the Host Slots tab. When you reload the project or rescan the plug-in, your DAW will pick up the latest binding names if it supports name updates between scans.
Bindings and Presets
Host slot bindings are saved with the preset, so loading a preset restores both the modulations and which depths are mapped to which DAW automation slots. If two presets bind different depths to the same slot, the slot follows the preset that was last loaded.
Tip: Use Auto-assign for most modulation depths. Reserve specific slot numbers (
Slot 1,Slot 2, ...) for the few macros you want at consistent positions across all your presets, so muscle memory transfers between patches.
Tempo Sync Reference Table
When the Modulator is set to Sync mode, the Rate knob selects from the following musical divisions. The T suffix indicates a triplet division.
| Division | Label |
|---|---|
| 1/64 note | 1/64 |
| 1/32 note triplet | 1/32T |
| 1/32 note | 1/32 |
| 1/16 note triplet | 1/16T |
| 1/16 note | 1/16 |
| 1/8 note triplet | 1/8T |
| 1/8 note | 1/8 |
| 1/4 note triplet | 1/4T |
| 1/4 note | 1/4 |
| 1/2 note triplet | 1/2T |
| 1/2 note | 1/2 |
| 1 bar | 1 bar |
| 2 bars | 2 bars |
| 4 bars | 4 bars |
The LFO completes one full cycle over the selected division. At 1/4 and 120 BPM, for example, the LFO completes one cycle per quarter note (2 Hz).
Tip: For a tremolo effect synced to eighth notes, set the Modulator to Sync mode, choose
1/8, apply an LFO depth to the generator Vol knob, and set the Wave to a smooth Sine or Triangle.
Summary
Erae Sound's per-parameter modulation system gives you deep, intuitive control over every aspect of your sound:
| Feature | What It Does |
|---|---|
| Per-parameter modulation | Every knob owns its own complete modulation engine |
| Modulation Display | Real-time visualization and depth control for all sources, with live modulation indicators on modulator sliders |
| Envelope (ADSR) | Shape modulation with Attack, Decay, Sustain, Release |
| Modulator (LFO) | Free, Sync, or Audio-rate modulation with morphable waveforms |
| MIDI Sources | Velocity, Pressure, Slide, Pitch Bend, Release Velocity |
| Link Groups (A/B/C/D) | Share Envelope, LFO, or Curve settings across multiple parameters |
| Modulation Curves | Custom response shaping with presets and polarity control |
| Cross-Modulation | Sources modulating other sources' depths for layered dynamics |
| Modulation Overview | Full-patch view of all active modulation assignments |
| DAW Host Automation | Direct automation of all base parameters plus 64 opt-in slots for modulation depths |
For more on how modulation interacts with the Erae controller, see Erae Integration. For effect parameter modulation, see Effects.
Effects
Erae Sound includes a built-in effects chain that processes the output of your generators before it reaches the final mix. You can stack up to four effects in series, each with independent controls, to sculpt everything from subtle ambience to dramatic sonic transformations.
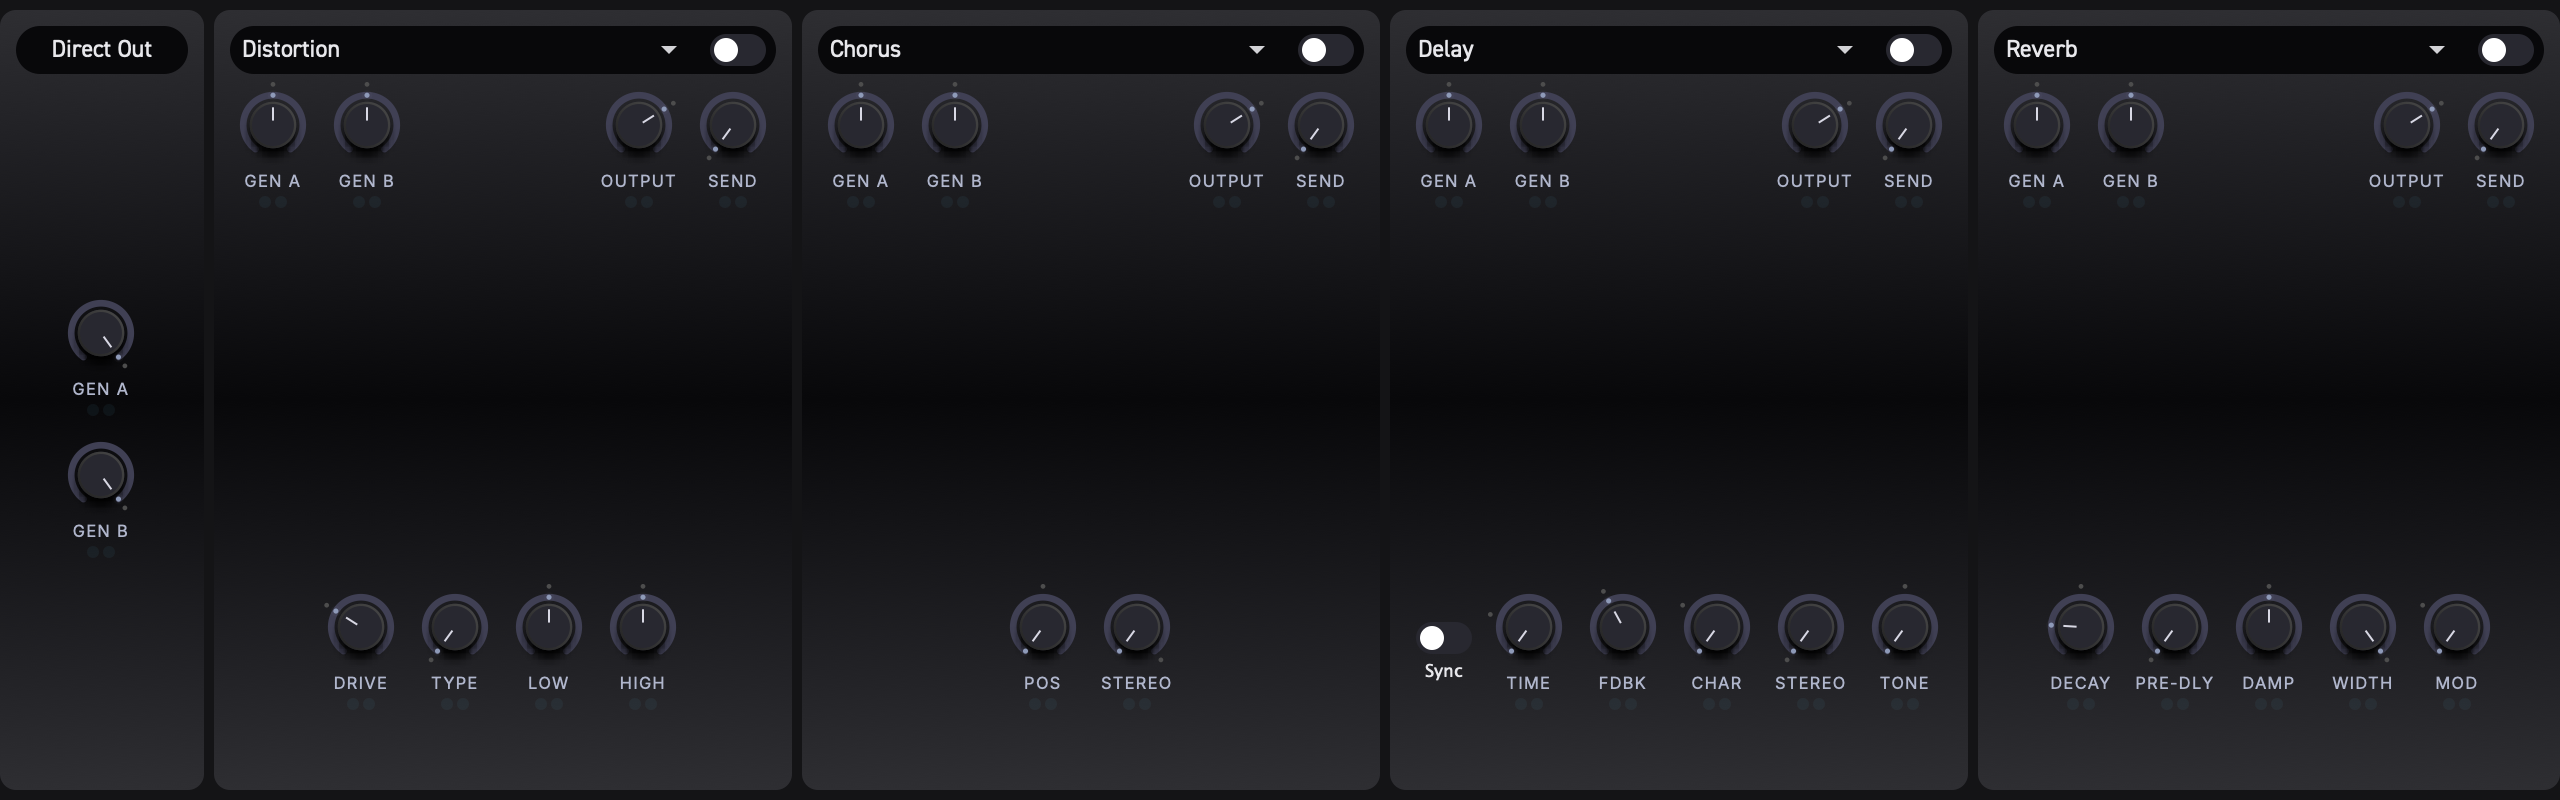
FX Chain Overview
The effects chain consists of 4 slots arranged in series. The audio signal flows through them in order:
Slot 1 --> Slot 2 --> Slot 3 --> Slot 4 --> Output
Each slot can hold one effect type at a time, or be set to None to let the signal pass through untouched. You can place any combination of effects in any order -- for example, Distortion in Slot 1, Chorus in Slot 2, and Reverb in Slot 4.
Tip: The order matters. Placing a reverb before a distortion will produce a very different result than placing it after. Experiment with slot ordering to discover new textures.
Available Effect Types
Use the dropdown at the top of each slot to choose from the following:
| Type | Description |
|---|---|
None | Disables the slot (signal passes through unchanged) |
Distortion | Multi-algorithm overdrive and fuzz with low/high tone shaping |
Chorus | Juno-style BBD chorus with position and stereo controls |
Flanger | Classic flanger with adjustable feedback and manual offset |
Phaser | 4-stage phaser with stereo offset |
Delay | Analog-style delay with character morphing |
Reverb | Plate reverb with modulation |
Shimmer | Pitch-shifted reverb for ambient textures |
Compressor | Dynamics control with threshold, ratio, timing, and makeup gain |
Param EQ | Two-band parametric equalizer |
Common Controls
Every active FX slot shares the same set of routing controls, regardless of the effect type loaded.

Bypass (BYP)
The BYP button at the top of each slot bypasses the effect. When engaged, the signal passes through the slot unprocessed. This is useful for quick A/B comparisons without removing the effect from the chain.
D/W A and D/W B
Each slot provides two independent wet-send controls:
- D/W A -- sets how much Generator A is sent into this effect.
- D/W B -- sets how much Generator B is sent into this effect.
At 0.0, that generator does not feed the effect input. At 1.0, it feeds the effect at full send level. Direct dry output is controlled separately by the generator/direct output path, not by these knobs.
Having separate controls for each generator lets you apply different effect amounts to each sound source. For example, you might drench Generator A in reverb while keeping Generator B mostly dry.
Output
The Output knob controls the overall output level of the slot after the dry/wet mix has been applied. Use this to balance the volume between slots in the chain.
Send
The Send knob controls how much of the slot's output is passed forward to the next slot in the chain as an additional send signal. This is set to 0.0 by default.
Tip: All FX parameters -- including these common routing controls -- can be modulated using the same modulation system available to generators. See Modulation for details.
Distortion
A multi-algorithm distortion effect featuring classic drive circuits and low/high tone shaping.
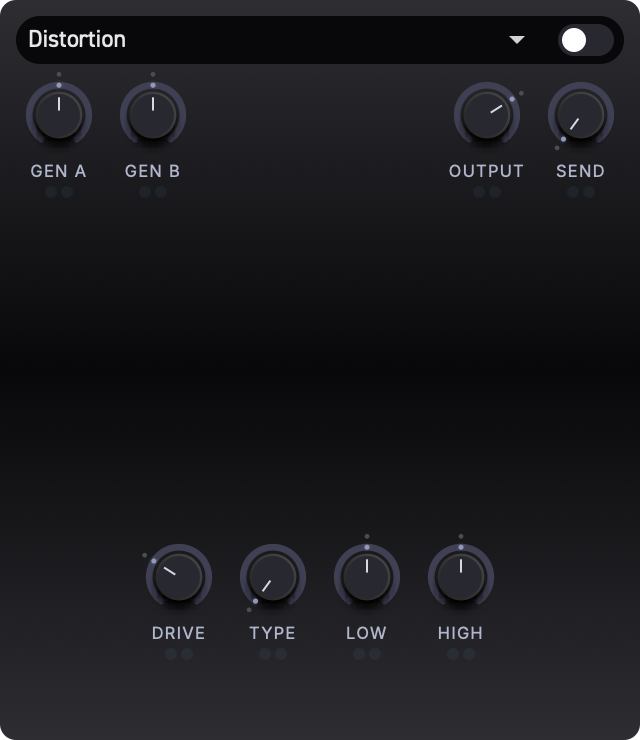
Parameters
| Label | Description | Default |
|---|---|---|
| Drive | Amount of gain applied before the distortion stage. Higher values produce more saturation and harmonic content. | 0.3 |
| Type | Selects the distortion algorithm (see below). This is a continuous control that morphs smoothly between adjacent algorithms. | 0.0 |
| Low | Shapes low-frequency tone after the drive stage. Center position is neutral. | 0.5 |
| High | Shapes high-frequency tone after the drive stage. Center position is neutral. | 0.5 |
Distortion Algorithms
The Type knob sweeps continuously through six distortion algorithms. As you turn it, the sound morphs smoothly between adjacent models -- you are never limited to just one algorithm at a time.
From left to right, the algorithms are:
- Clean Boost -- a transparent gain stage with gentle saturation.
- Tube Screamer -- warm, mid-focused overdrive inspired by classic pedal circuits.
- RAT -- aggressive, clipping distortion with a harder edge.
- Big Muff -- thick, sustaining fuzz with a scooped midrange.
- Fuzz Face -- vintage silicon fuzz with a buzzy, gated character.
- Tape -- smooth tape saturation with soft compression.
Tip: Because the Type control morphs continuously, you can find unique tones between the classic algorithms. Try setting it halfway between Tube Screamer and RAT for a blend of warmth and bite.
The low/high tone controls sit after the distortion stage, letting you shape the driven signal without adding a separate EQ slot.
Chorus
A lush chorus effect modeled after the classic Roland Juno synthesizer chorus circuit. It uses bucket-brigade device (BBD) delay line emulation for an authentic analog character.
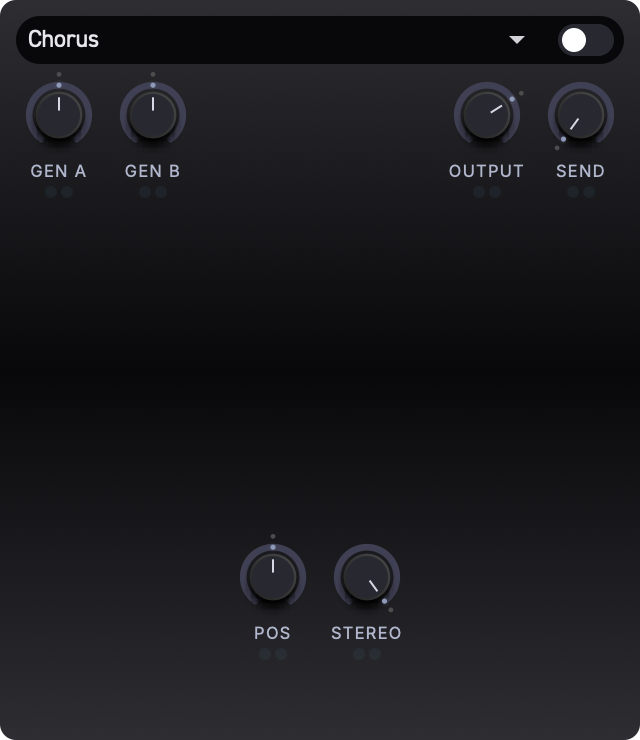
Parameters
| Label | Description | Default |
|---|---|---|
| Pos | Manual position within the chorus delay/modulation character. | 0.5 |
| Stereo | Selects the chorus mode (see below). | 1.0 |
Stereo Modes
The Stereo knob selects between three operating modes inspired by the Juno-60/106 chorus:
- At
0.0-- Mode I: A slower LFO rate (approx. 0.5 Hz) with both channels in phase. Produces a subtle, warm thickening. - At
0.5-- Mode II: A faster LFO rate (approx. 0.9 Hz) with both channels in phase. More noticeable movement and animation. - At
1.0-- Mode I+II: Both LFO rates combined with inverted phase between left and right channels, creating a wide stereo spread.
Values between these positions crossfade smoothly for in-between variations.
Tip: Mode I+II is the signature Juno chorus sound -- a wide, immersive stereo effect. Start there and dial back if you want something more subtle.
Flanger
A classic flanger effect built on short modulated delay lines with feedback. Produces sweeping, jet-like tones that range from subtle movement to metallic resonance.
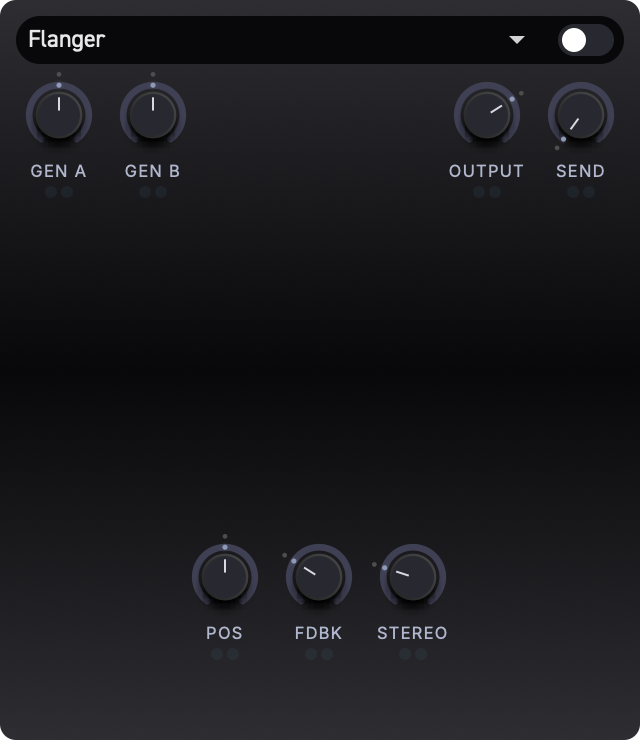
Parameters
| Label | Description | Default |
|---|---|---|
| Pos | Sets the manual delay/sweep position. Adjusting this shifts the harmonic character of the flanging. | 0.5 |
| Fdbk | Amount of the output fed back into the input. Higher values produce more resonant, metallic tones. | 0.3 |
| Stereo | Phase offset between the left and right LFOs. At 0.0, both channels sweep together. Higher values create a wider stereo image. | 0.25 |
Tip: For a classic jet-plane tone, set Fdbk high and sweep Pos slowly. For a more subtle doubling effect, reduce Fdbk.
Phaser
A 4-stage phaser that sweeps a series of notches through the frequency spectrum. The result ranges from gentle swirling to deep, resonant swooshes.
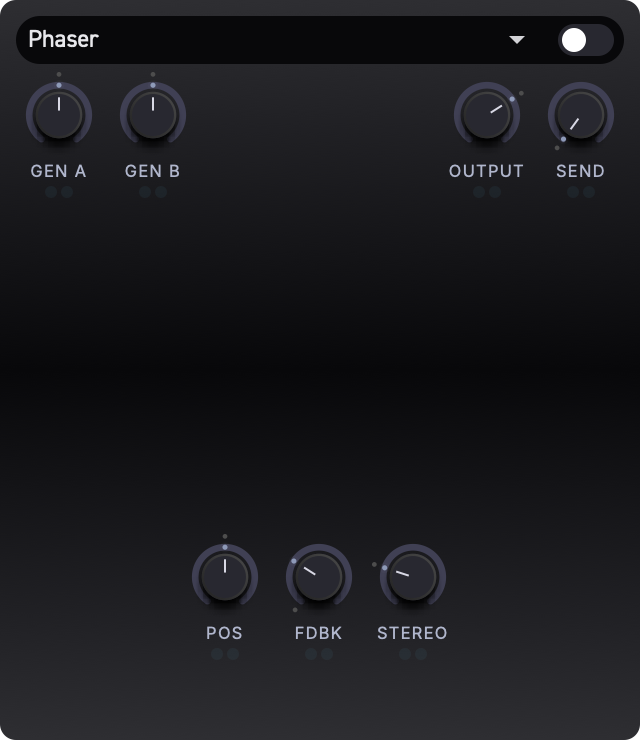
Parameters
| Label | Description | Default |
|---|---|---|
| Pos | Manual notch position. | 0.5 |
| Fdbk | Feeds the output back into the input, intensifying the notches and producing a sharper, more resonant effect. | 0.0 |
| Stereo | Phase offset between the left and right channel LFOs. Higher values create a wider stereo spread. | 0.25 |
Tip: Phaser with zero feedback produces a smooth, gentle movement. Adding feedback makes the effect more dramatic and pronounced -- great for leads and pads.
Delay
An analog-style delay with a continuously morphing character control that blends between pristine digital repeats and degraded lo-fi echoes.
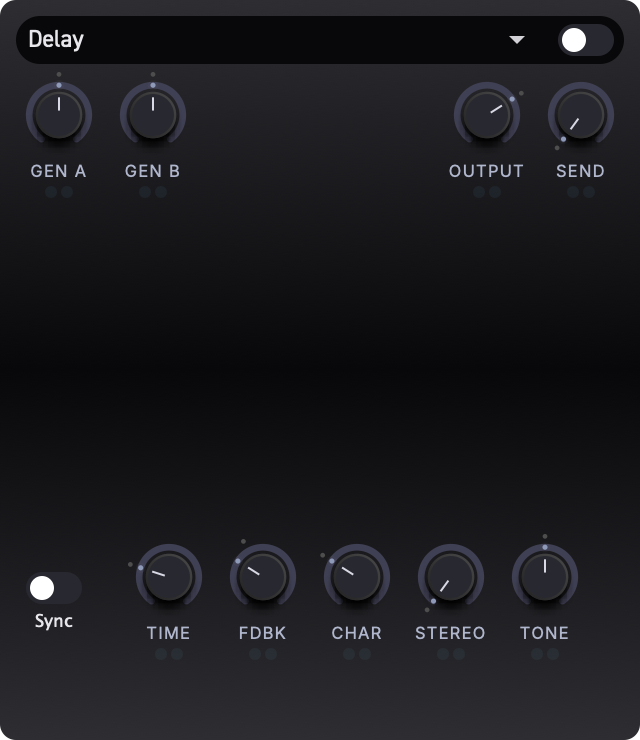
Parameters
| Label | Description | Default |
|---|---|---|
| Time | Delay time, ranging from 100 ms to 2000 ms. | 0.3 |
| Fdbk | Amount of the delayed signal fed back into the input. Higher values produce more repeats. | 0.4 |
| Char | Character of the delay repeats (see below). | 0.3 |
| Stereo | Stereo spread of the delay. At 0.0, both channels have the same delay time. Higher values create a ping-pong or offset stereo image. | 0.0 |
| Tone | A tilt EQ applied to the delay line. Lower values darken the repeats; higher values brighten them. | 0.5 |
Delay Character
The Char knob morphs continuously between three delay personalities:
- At
0.0-- Clean: Pristine, digital-quality repeats with no degradation. - At
0.5-- Tape: Warm, analog-style echoes with subtle saturation, wow and flutter, and soft high-frequency rolloff. - At
1.0-- Lo-Fi: Heavily degraded repeats with aggressive filtering, diffusion, and noticeable artifacts.
Values in between blend the characteristics smoothly, letting you find exactly the right amount of grit for your sound.
Tip: A little bit of Char (around
0.2-0.4) adds warmth and life to delay repeats without making them obviously lo-fi. This works especially well on pads and atmospheric sounds.
Reverb
A high-quality plate reverb based on the Dattorro algorithm. It produces lush, smooth reverb tails suitable for everything from tight rooms to expansive halls.

Parameters
| Label | Description | Default |
|---|---|---|
| Decay | Length of the reverb tail. Low values produce short, tight reflections; high values create long, sustained tails. | 0.5 |
| Pre-Dly | The time between the dry signal and the onset of reverb. Adds space and separation between the source and the reverb. | 0.0 |
| Damp | High-frequency damping applied to the reverb tail. Higher values absorb more treble with each reflection, producing a warmer, darker reverb. | 0.5 |
| Width | Stereo width of the reverb output. At 0.0, the reverb is mono. At 1.0, it fills the full stereo field. | 1.0 |
| Mod | Amount of internal modulation within the reverb tank. Adds subtle pitch variation that smooths out the tail and reduces metallic ringing. | 0.3 |
Tip: A small amount of Pre-Dly (around
0.1-0.2) helps the dry signal stay clear and upfront even with long reverb tails. This is especially useful for lead sounds.
Shimmer
A pitch-shifted reverb designed for creating ethereal, ambient textures. The reverb feeds into a pitch shifter, whose output is fed back into the reverb, building shimmering layers of harmonics.
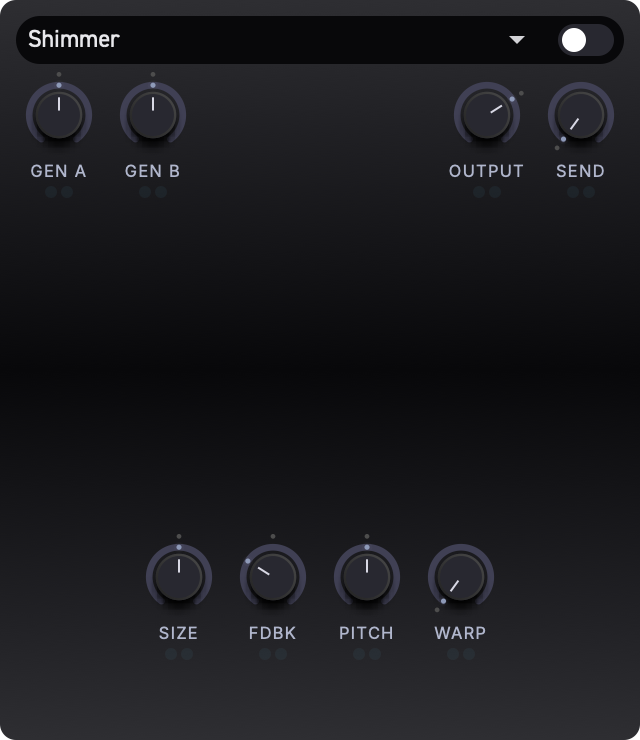
Parameters
| Label | Description | Default |
|---|---|---|
| Size | Size of the reverb space. Higher values produce longer, more diffuse tails. | 0.5 |
| Fdbk | Amount of the pitch-shifted signal fed back into the reverb. Higher values build up denser harmonic layers over time. | 0.7 |
| Pitch | Pitch shift amount applied to the reverb signal. At center (0.5), no pitch shift is applied. Values above and below shift the pitch up or down respectively. | 0.5 |
| Warp | Additional spectral warping applied to the feedback path. Adds unusual, evolving tonal characteristics to the shimmer tail. | 0.0 |
Tip: For a classic shimmer sound, set Pitch slightly above center (an octave up) and Fdbk around
0.5-0.7. For more experimental textures, increase Warp and push Fdbk higher.
Compressor
A dynamics processor for controlling peaks, adding sustain, or tightening the output before later FX slots.
Parameters
| Label | Description | Default |
|---|---|---|
| Thresh | Level where compression begins. Lower settings compress more of the signal. | 0.5 |
| Ratio | Compression strength once the signal crosses the threshold. | 0.3 |
| Atk | How quickly compression reacts to peaks. | 0.2 |
| Rel | How quickly gain recovers after compression. | 0.3 |
| Makeup | Output gain after compression. | 0.0 |
Param EQ
A two-band parametric equalizer for corrective or creative tone shaping.
Parameters
| Label | Description | Default |
|---|---|---|
| Freq 1 | Center frequency of EQ band 1. | 0.3 |
| Gain 1 | Gain of EQ band 1. Center is neutral. | 0.5 |
| Q 1 | Width/resonance of EQ band 1. | 0.3 |
| Freq 2 | Center frequency of EQ band 2. | 0.7 |
| Gain 2 | Gain of EQ band 2. Center is neutral. | 0.5 |
| Q 2 | Width/resonance of EQ band 2. | 0.3 |
Modulating FX Parameters
All FX parameters can be modulated using the same modulation system used by the generators. This means you can assign envelopes, LFOs, or performance controllers (such as aftertouch or slide) to any knob in the effects chain.
Cross-Modulation
Cross-modulation connections also work on FX parameters. You can wire one FX modulation source to control another source's depth, just as you would for generator parameters. See Modulation for cross-modulation details.
For example, you could:
- Modulate Decay on a reverb with aftertouch, so pressing harder into a key creates a longer tail.
- Use an LFO to sweep the Char knob on a delay for evolving echo textures.
- Map velocity to the distortion Drive for touch-sensitive overdrive.
To set up modulation on an FX parameter, select the parameter by clicking its knob, then assign a modulation source and depth. See Modulation for full instructions.
Signal Flow Summary
The complete effects signal path looks like this:
Generator A ──┐
              ├── FX Slot 1 ── FX Slot 2 ── FX Slot 3 ── FX Slot 4 ── Output
Generator B ──┘
At each slot, the D/W A and D/W B controls determine how much of each generator's signal enters the effect. The processed signal is scaled by the Output level and can be passed to the next slot with Send. Direct generator output is controlled separately from the FX wet sends.
Setting a slot to None passes the signal through without any processing, so you do not need to fill all four slots to use the chain.
Erae Integration
Erae Sound works with Erae through the current shared connection and layout-sync model. Erae Lab and the device own project slots and keep them synchronized; Erae Sound owns sound presets and uses layout uniqueID values to relate presets to device slots.
Tip: You do not need an Erae to use Erae Sound. The synth works in Erae Lab or as a DAW plugin. Erae-specific modulation sources appear when a compatible layout is active.
Connection Model
Inside Erae Lab, Erae Sound follows Erae Lab's active device selection and shares the same device connection. In a DAW, Erae Sound uses the active Erae layout context supplied through the normal integration layer.
If multiple devices are connected, choose the active device from Erae Lab.
Layout Slots and Presets
A preset and a device slot are considered related when they contain the same layout uniqueID.
When Sync is enabled:
- Changing the active slot on the device or in Erae Sound checks the slot layout
uniqueID. - Erae Sound searches its preset library for a preset with the same embedded layout
uniqueID. - If it finds one, that preset loads automatically.
- If it does not find one, Erae Sound applies the slot layout directly and marks the current preset as modified until you save.
When Sync is disabled, slot switching applies the slot layout without automatically changing the current sound preset. This is useful in DAW sessions or multi-instance setups where you do not want one hardware slot change to replace a plugin instance's sound.
Loading Presets With Layouts
When a preset contains an Erae layout and a device is connected:
- Erae Sound applies the preset locally.
- Erae Sound checks all device slots for a matching layout
uniqueID. - If a slot matches, Erae Sound switches the device to that slot and links to it.
- If no slot matches, Erae Sound sends the layout as a preview and stays unlinked.
If no device is connected, the preset still loads normally. The layout becomes active inside Erae Sound and will be evaluated against the device later if you connect one.
Assigning a Layout to a Slot
Normal use is automatic, but you can assign the current Erae Sound layout to a real device slot when needed. Long-hold a target slot for about 1.5s, either on the device or in Erae Sound, when you want the current layout inside Erae Sound to become that slot's layout.
Erae as Modulation Source
After a layout is active, Erae Sound analyses the zones in that layout and creates modulation sources for them. These appear in the Modulation Display alongside internal sources such as envelopes, LFOs, velocity, pressure, and slide.
Typical sources include:
- keyboard X/Y position
- keyboard relative movement
- fader positions
- fader pressure
- buttons and keys with CC outputs
All Erae sources still travel as standard MIDI data, so they remain recordable and editable in your DAW.
Using Erae Sound without Erae
Erae Sound works fully without connected hardware.
- Presets still load.
- The synth engine, modulation, and FX still work.
- Erae-specific sources stay inactive until a matching layout becomes active.
If you load a preset that was saved with Erae modulation assignments, those assignments are preserved in the preset data and become active again when a matching layout is available.
What's Next
- To learn how modulation sources connect to parameters, see Modulation.
- To explore saving and recalling patches, see Presets.
- For voice and split configuration, see Voice and Split.
Presets
Presets capture your entire Erae Sound configuration in a single file. Loading a preset restores every parameter, effect chain setting, voice configuration, split layout, Erae layout reference, and modulation assignment -- exactly as it was when saved.

Browsing Presets
Header Navigation
The header bar provides quick access to presets without opening the full library.
- Preset name -- the center of the header shows the name of the currently loaded preset. Click it to open a dropdown list of all available presets.
- Dropdown arrow -- click the down-chevron to the left of the preset name to open the same dropdown list.
- Previous / Next arrows -- use the left and right arrow buttons to step through presets one at a time. This is a fast way to audition presets sequentially.
Selecting a preset from the dropdown loads it directly. The previous/next arrows may ask what to do with unsaved changes before loading another preset.
Library Browser
For more powerful browsing, click the Library button (the book icon to the left of the preset navigation area). This opens the library overlay with search, a preset list, and a close button.
Search Bar
Above the preset list, the search bar lets you narrow results further:
- Search field -- type any text to filter presets by name. Results update as you type.
- Types dropdown -- filter by preset type (e.g., Pad, Bass, Synth). Select
All Typesto clear the filter. - Designers dropdown -- filter by the creator of the preset. Select
All Designersto clear the filter. - Banks dropdown -- filter by bank. Select
All Banksto clear the filter. - User toggle -- when enabled, only user-created presets are shown (factory presets are hidden).
All filters combine together. For example, you can search for "warm" with the Type set to Pad and the User toggle on to find only your own pad presets with "warm" in the name.
Preset List
The main area displays matching presets in a sortable table with these columns:
| Column | Description |
|---|---|
| Name | The preset name |
| Type | The preset type category |
| Designer | The creator of the preset |
| Bank | The preset bank |
| Delete icon | Remove a user preset (not available for factory presets) |
Click a column header to sort by that column. The currently loaded preset is highlighted in the list. Where available, partial-load chips let you load only parts of a preset instead of replacing the whole sound.
To load a preset, click its row or double-click it.
Tip: Factory presets are displayed in a subtler color so you can quickly distinguish them from your own user presets.
Factory and User Presets
Erae Sound separates presets into two ownership types:
- Factory presets -- bundled sounds installed with Erae Sound. They are read-only and may be refreshed by application/component updates.
- User presets -- sounds you create, import, or save with Save As.... These are editable and live in your user preset library.
Factory presets can be loaded, played, and edited temporarily while you design a sound, but the factory preset file itself cannot be renamed, deleted, or overwritten. The library disables direct metadata editing and deletion for factory rows, and the header Save action will not overwrite a factory preset.
To keep changes made from a factory preset, use Save As... and give the sound a new name. Erae Sound writes an editable user preset and leaves the factory original unchanged.
Factory content updates may add or replace read-only factory presets. Editable user presets and Save As... copies are preserved, even if they share a similar filename.
Saving Presets
To save the current state as a preset or preset variation:
- Click the Save button (floppy disk icon) in the header, to the right of the preset navigation area.
- The preset name becomes an editable text field. Type a new name, or keep the existing one.
- Press Enter or click the checkmark button to confirm.
The save button flashes briefly to confirm the preset was saved.
You can also right-click the preset area to open the preset context menu:
- Save -- immediately overwrites the current user preset when it is editable.
- Save As... -- enters the name-entry flow and creates a new user preset.
- Import Preset... -- imports one or more
.espresetfiles into the user preset library. - Open Presets Folder -- reveals the preset folder in the file browser.
For factory presets, Save is disabled because the preset is read-only. Use Save As... to store your edited version as a user preset.
The header save button always uses the name-entry flow. If the current preset is dirty, an asterisk (*) appears after its name. Previous/next navigation may prompt Save, Don't Save, or Cancel before loading another preset. Dropdown selection currently loads the chosen preset directly.
Canceling a Save
- Press Escape to cancel without saving.
- Click anywhere outside the name field to cancel.
Save Warnings
Erae Sound validates the preset name before saving:
- Empty name -- you will see a warning: "Name cannot be empty."
- Read-only factory preset -- if you try to save over a factory preset with the same name, you will see: "Cannot overwrite read-only preset." Use Save As... or give it a different name to save your own version.
- Duplicate name -- if another preset already has the same name, you will see: "A preset with this name already exists." Choose a unique name.
Tip: To create a variation of a factory preset, load it, tweak the settings, then choose Save As... and type a new name. Your version is saved as a user preset while the factory original stays untouched.
Organizing Presets
Tags and Filters
Preset metadata can store liked/color information, and current library filters may expose a subset such as Liked, Red, Orange, and Yellow. The current UI does not expose a full color-tag assignment workflow for every stored color.
Editing Metadata
For user presets, you can edit metadata directly in the library list. Double-click the Name, Type, or Designer cell to enter edit mode, type your changes, and press Enter to confirm. This makes it easy to re-categorize presets or fix typos without leaving the library view.
Factory preset metadata cannot be edited. Load a factory preset and use Save As... if you want an editable copy.
Deleting Presets
To delete a user preset, click the delete icon (X) on the right side of its row in the library. A confirmation dialog will appear before the preset is permanently removed.
Factory presets cannot be deleted from the library. They are managed by Erae Sound's installed factory content.
Importing Presets
Import Preset... copies selected .espreset files into your user preset library. If a name collides with an existing preset, Erae Sound adds a suffix to keep both files. When several presets are imported at once, the first imported preset is loaded automatically.
Preset File Format
Erae Sound presets use the .espreset file extension. Each preset file is self-contained and stores:
- All synthesizer parameter values
- FX chain configuration (effect types, slot settings, routing)
- Voice settings (polyphony, unison, retrigger, detuning, stereo spread)
- Split configuration
- Erae layout reference
- Modulation assignments
Loading a preset restores the complete synth state. You can share .espreset files with other Erae Sound users -- simply copy the file and load it on another system.
Tip: Preset metadata such as type, designer, and bank is embedded in the file. When you share a preset, the recipient will see all of this information in their library.
Voice and Split
The Voice and Split panels sit in the bottom section of the Synth / FX view. Together they control how many notes can play at once, how those notes are stacked and spread, and how the keyboard is divided between Generator A and Generator B.
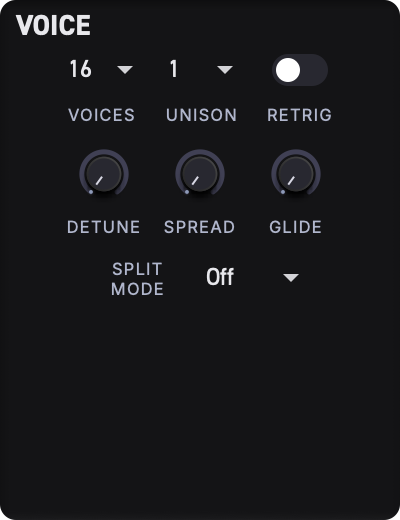
Voice Panel
The Voice panel sets polyphony, unison, and portamento for the entire instrument.
Parameters at a Glance
| Parameter | Control | Range | Default | Description |
|---|---|---|---|---|
| Voices | Dropdown | 1 -- 16 | 16 | Maximum number of notes that can sound at once |
| Unison | Dropdown | 1 -- 8 | 1 | Number of stacked voices per note |
| Retrig | Toggle | On / Off | Off | Restart envelopes when a new note is played |
| Detune | Knob | 0.0 -- 100.0 cents | 0.0 | Pitch spread between unison voices |
| Spread | Knob | 0.00 -- 1.00 | 0.00 | Stereo width of unison voices |
| Glide | Knob | 0.00 -- 1.00 | 0.00 | Portamento time between consecutive notes |
Voices
Voices sets the maximum polyphony -- the number of notes that can sound simultaneously. With Voices set to 1, the synth behaves as a monophonic instrument: each new note cuts the previous one. At 16, up to sixteen independent notes can ring out at once.
Tip: Lowering the voice count saves CPU. If your patch only needs a few notes at a time, try
4or8instead of the full16.
Unison
Unison stacks multiple copies of each note on top of one another. Setting Unison to 4, for example, plays four voices every time you press a single key.
Unison voices share the same note but are spread apart in pitch and stereo position by the Detune and Spread controls (see below). The total number of voices used is Voices x Unison, so keep an eye on both settings if CPU is a concern.
Retrig
When Retrig is turned on, every new note restarts all envelopes from the beginning -- even when playing legato or in mono mode. When it is off, held notes allow envelopes to continue smoothly into the next note, which is useful for legato lead lines.
Detune
Detune sets how far apart the unison voices are spread in pitch, measured in cents (hundredths of a semitone). At 0.0, all unison voices play exactly the same pitch. Increasing the value creates a wider, chorused sound.
Tip: A small Detune of
5--15cents gives a classic analog "thickness." Values above50start to sound more like a deliberate detuned effect.
Spread
Spread controls the stereo positioning of unison voices. At 0.00, all voices sit in the center. At 1.00, voices are distributed across the full stereo field from hard left to hard right.
Glide
Glide (portamento) smoothly slides the pitch from one note to the next instead of jumping instantly. At 0.00, notes change pitch immediately. Turning the knob up increases the glide time, producing longer, more noticeable slides.
Glide works well in combination with a low Voices count for expressive mono or duo leads.
Split Panel
The Split panel divides incoming notes between Generator A and Generator B. This lets you layer different sounds across the keyboard or assign separate timbres to different MIDI channels.
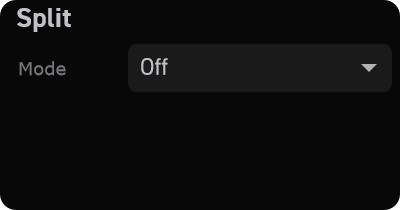
Split Mode
Mode selects how notes are routed:
| Mode | Behavior |
|---|---|
Off | Every note plays through both generators |
Note Split | Notes are divided by pitch at a chosen split point |
MPE Split | Notes are divided by MIDI channel |
When Mode is set to Off, the Split point knob is hidden since it is not needed.
Note Split
In Note Split mode, a Split knob and note-name display appear below the mode selector. The split point can be set anywhere from MIDI note 0 (C-1) to 127 (G9), and the display shows the corresponding note name (for example, C4).
- Notes below the split point are sent to Generator A only.
- Notes at or above the split point are sent to Generator B only.
This is perfect for creating keyboard splits -- for instance, a bass sound on the left hand and a pad on the right.
Tip: The default split point is
C4(middle C), which is a natural place to divide most keyboard layouts.
MPE Split
In MPE Split mode, notes are routed by their MIDI channel rather than their pitch:
- By default, MIDI channels 1 -- 8 are sent to Generator A.
- By default, MIDI channels 9 -- 16 are sent to Generator B.
The Split Ch control moves the split channel and is clamped to channels 2 through 14. Its default is 8, which produces the channel split above. This is especially useful with MPE controllers (like the Erae) that assign each finger to a unique MIDI channel.
Tip: See Erae Integration for details on configuring Erae zones to work with MPE Split.
MPE Support
Erae Sound is built around MPE (MIDI Polyphonic Expression). Every active voice responds independently to three expressive dimensions:
- Pitch bend -- per-note pitch deviation with a range of 48 semitones, allowing dramatic pitch sweeps on individual notes.
- Pressure -- per-note aftertouch, often mapped to filter cutoff, amplitude, or other timbral parameters through the modulation system.
- Slide -- per-note timbre control (CC 74), typically driven by vertical finger movement on an MPE surface.
These three signals are available as modulation sources throughout Erae Sound. See Modulation for how to route them to any parameter.
Tip: Even without an MPE controller, you can still use Erae Sound's voice and split features normally. Standard MIDI keyboards work with polyphonic note and channel aftertouch as expected.
Practical Recipes
Thick Unison Lead
- Set Voices to
1(mono). - Set Unison to
4. - Dial Detune to around
10--20cents. - Set Spread to
0.50for a wide stereo image. - Turn Retrig off and add a short Glide for smooth legato transitions.
Split Keyboard (Bass + Pad)
- Open the Split panel and set Mode to
Note Split. - Set the Split point to
C3. - Configure Generator A with a bass preset.
- Configure Generator B with a pad preset.
- Play bass notes with your left hand and pad chords with your right.
MPE Dual-Timbre Performance
- On your MPE controller, assign Zone 1 to MIDI channels 1--8 and Zone 2 to channels 9--16.
- In the Split panel, set Mode to
MPE Split. - Design a different sound on Generator A and Generator B.
- Each zone now plays its own timbre with full per-note expression.
Shortcuts and Interactions
This chapter is a quick-reference guide to every keyboard shortcut, mouse gesture, and interaction pattern available in Erae Sound. Keep it handy while you work.
Keyboard Shortcuts
| Action | macOS | Windows / Linux |
|---|---|---|
| Undo | Cmd + Z | Ctrl + Z |
| Redo | Cmd + Shift + Z | Ctrl + Y |
These shortcuts are available globally -- they work no matter which tab or panel is in focus.
Press Escape to close the preset library overlay or Modulation Overview when either overlay is open.
Knob and Slider Interactions
Every rotary knob and slider in Erae Sound responds to the same set of mouse gestures.
| Gesture | What it does |
|---|---|
| Click + drag (up/down or left/right) | Adjust the parameter value. Drag up or right to increase, down or left to decrease. |
| Shift + drag | Fine adjustment -- the knob moves at one-tenth of the normal speed for precise edits. |
| Double-click | Reset the parameter to its default value. |
| Right-click | Open a context menu with a Reset to Default option. |
| Mouse wheel | Increment or decrement the value one step at a time. |
| Hover | Display a value tooltip just below the knob (see Parameter Tooltips below). |
Tip: Hold Shift while dragging any knob to dial in exact values. This is especially useful for filter frequencies and envelope times.
Parameter Selection
Clicking a knob does more than change its value -- it also tells Erae Sound which parameter you want to modulate. The Modulation Display and modulator controls (bottom half of the Synth and FX tabs) update automatically to reflect the selected parameter.
| Gesture | What it does |
|---|---|
| Click a knob label | Select that parameter for modulation editing. The Modulation Display updates to show all sources connected to it. |
| Right-click a knob | Select that parameter for modulation editing (same as clicking the label). |
| Right-click an envelope or LFO knob (Attack, Decay, Rate, etc.) | Select that modulator sub-parameter. The Modulation Display drills down to show its connections. |
| Click an envelope or LFO label (Attack, Decay, Rate, etc.) | Select that modulator sub-parameter, same as clicking the slider itself. |
For full details on modulation routing, see Modulation.
Modulation Display Interactions
The Modulation Display (middle strip of the Synth and FX tabs) shows oscilloscope-style visualizers for each modulation source connected to the selected parameter. Each visualizer has a built-in depth fader and a connection point.
Depth Faders
| Gesture | What it does |
|---|---|
| Click + drag inside a visualizer | Set the modulation depth for that source. Drag up for positive depth, down for negative depth. The center line is zero. |
| Double-click a visualizer | Reset the depth to zero. |
| Right-click the depth fader on a visualizer | Open the Host Slot assignment menu so a DAW can automate this depth. See DAW Host Automation. |
| Hover a knob in the generator or FX section | The knob displays a depth indicator showing how much modulation is applied, and the visualizers temporarily show that knob's current modulation depths with a highlighted overlay. |
Depth values are bipolar, ranging from -100% to +100%. Positive depth is shown in yellow, negative depth in red.
Cross-Modulation Connections
Each visualizer has a small connection point (circle) in its top-right corner. You can wire modulation sources together by dragging between these points.
| Gesture | What it does |
|---|---|
| Drag from one connection point to another | Create a cross-modulation connection between those two sources. A curved arrow appears to show the link. |
| Click + drag a cross-mod fader | Adjust the cross-modulation depth (the colored fader that appears after a connection is made). |
| Double-click a cross-mod fader | Remove the cross-modulation connection. |
Hover Highlighting
| Gesture | What it does |
|---|---|
| Hover over a source visualizer | Highlights the corresponding zone on the Erae layout thumbnail (for Erae-linked sources). |
| Hover over an Erae zone on the layout thumbnail | Highlights the matching source visualizers in the Modulation Display. |
This bidirectional highlighting makes it easy to see which Erae zones feed which modulation sources. See Erae Integration for more on the layout thumbnail.
Parameter Tooltips
When you hover over or drag a knob, a small tooltip appears just below it showing the current value in a human-readable format. The display format depends on the parameter type:
| Parameter type | Tooltip format | Example |
|---|---|---|
| General (level, mix, depth, etc.) | Percentage | 75% |
| Oscillator pitch | Note name + octave | C4, F#3 |
| Filter cutoff | Frequency (Hz or kHz) | 440 Hz, 2.5 kHz |
| LFO rate (free-running) | Frequency in Hz | 0.25 Hz, 4.0 Hz |
| LFO rate (tempo-synced) | Note division | 1/4, 1/8 dot |
The tooltip appears on hover and stays visible while you drag. It disappears when you move the mouse away from the knob.
Visual Feedback Summary
Erae Sound provides consistent visual cues across all interactive controls:
| Control state | What you see |
|---|---|
| Normal | Grey track with accent-colored value arc. |
| Hover | Track brightens slightly; a subtle outer glow appears around the knob. |
| Dragging | Value arc brightens further; the glow intensifies. |
| Modulated | Modulator sliders (Attack, Rate, etc.) display a live offset indicator showing real-time modulation from MIDI sources. |
| Disabled | The knob is dimmed to 40% opacity and does not respond to input. |
Quick Reference Card
| I want to... | Do this |
|---|---|
| Undo my last change | Cmd + Z (Mac) or Ctrl + Z (Win/Linux) |
| Redo an undone change | Cmd + Shift + Z (Mac) or Ctrl + Y (Win/Linux) |
| Make a fine adjustment | Hold Shift while dragging a knob |
| Reset a knob to default | Double-click it, or right-click and choose Reset to Default |
| Select a parameter for modulation | Click the knob's label, or right-click the knob |
| Set modulation depth | Drag up or down inside the source visualizer |
| Reset modulation depth to zero | Double-click the source visualizer |
| Automate a modulation depth from the DAW | Right-click the depth fader, then pick Auto-assign or a specific slot |
| Create a cross-mod connection | Drag from one visualizer's connection point to another |
| Remove a cross-mod connection | Double-click the cross-mod fader |
| Scroll a value by small steps | Use the mouse wheel over a knob |
| Select a modulator sub-parameter | Click its knob or its label text |
| Close an overlay | Press Escape |
Layout Bar Interactions
When an Erae layout bar is visible, clicking a slot previews or switches to that slot according to the current Sync state. Long-hold a slot for about 1.5s to assign the current Erae Sound layout to that real device slot.
Troubleshooting
This chapter covers the most common issues you may encounter when using Erae Sound and how to resolve them. If your problem is not listed here, please visit the Embodme support page for further assistance.
Problem: Plugin doesn't appear in DAW
After installing Erae Sound, your DAW may not list it among available instruments. First, verify that the plugin files are in the correct location for your platform:
- macOS:
~/Library/Audio/Plug-Ins/VST3/ - Windows:
%ProgramFiles%\Common Files\VST3\ - Linux:
~/.vst3/
Once you have confirmed the files are in place, run a plugin rescan from your DAW's preferences or plugin manager. On macOS, the system Gatekeeper may quarantine newly downloaded plugins -- if the plugin still does not appear, open System Settings > Privacy & Security and allow Erae Sound to run. See Installation for full setup instructions.
Problem: No sound
If Erae Sound loads but produces no audio, check the following:
- MIDI routing -- Make sure your DAW is sending MIDI to the Erae Sound track. The instrument needs to receive MIDI note data to produce sound.
- Preset -- Verify that a preset is loaded. An empty or uninitialized state will not generate audio. See Presets for how to browse and load presets.
- Vol knob -- Check that the master Vol knob in the header bar is turned up. If it is set to its minimum value, the output will be silent.
- VU meter -- Look at the VU meter in the header. If it shows activity, the synth is producing sound and the issue is likely downstream in your DAW's mixer or audio routing.
Problem: High CPU usage
Erae Sound's CPU consumption depends primarily on voice count and active effects. To reduce load:
- Lower the Voices value in the Voice panel. Fewer simultaneous voices means less processing. See Voice and Split for details on voice management.
- Disable any effects you are not using by setting unused FX slots to None. Each active effect adds to CPU overhead. See Effects.
- Increase your audio interface buffer size in your DAW's audio settings. A larger buffer (e.g.,
512or1024samples) gives the CPU more time to process each block of audio.
Problem: Erae not connecting
If Erae Sound does not detect your Erae controller:
- Confirm that the Erae is connected to your computer via USB and is powered on.
- Current builds negotiate the Erae connection automatically through Erae Lab. If the connection does not appear, unplug and reconnect the USB cable, then restart Erae Lab if needed.
- If using Erae Sound in a DAW, make sure Erae Lab is running when you need device-backed layout context.
See Erae Integration for a full overview of how Erae Sound communicates with the Erae.
Problem: Audio glitches or crackling
Clicks, pops, or crackling during playback usually indicate that your system cannot process audio fast enough. To resolve this:
- Increase your audio interface buffer size. A setting of
512or1024samples is a good starting point for stable playback. - Reduce polyphony by lowering the Voices parameter in the Voice panel. See Voice and Split.
- Close other CPU-intensive applications running on your system. Background tasks such as web browsers, video editors, or other plugins competing for CPU time can cause audio dropouts.
Problem: Preset won't save
If you are unable to save a preset, check for these common causes:
- The preset name field must not be empty. Enter a name before saving.
- Factory presets are read-only and cannot be overwritten, renamed, or deleted. If you want to keep changes made from a factory preset, use Save As... and give the sound a new name.
- Duplicate names may cause conflicts. If a preset with the same name already exists in your user library, choose a different name or confirm that you want to replace the existing preset.
- Demo mode can restrict saving after the demo expires. Activate a license or restart the allowed demo flow if available.
See Presets for more details on managing your preset library.
Problem: CC macros don't respond in a DAW
If a key's CC outputs (Key Pressure, X, Y) or a fader's CCs reach Erae Sound but the matching macro does not move, the cause is almost always a MIDI channel mismatch introduced by the host.
Most DAWs collapse incoming MIDI to a single channel (typically channel 1) before delivering it to a VST or AU instrument, unless the track is explicitly configured for MPE. Ableton Live, Logic without per-track MPE, Cubase, FL Studio, and Reaper all behave this way to some degree. The plugin receives the CC value but on a different channel than the layout assigned it to, so the macro mapping does not match.
To resolve:
- Use a single MIDI channel for all macro CCs in a layout when the layout is intended for a DAW plugin. Channel 1 is the safest default.
- Or enable MPE mode on the DAW track, which preserves per-channel routing (Ableton Live 11+, Logic Pro, Cubase 12+, Bitwig, Reaper).
- Avoid assigning the same CC number to elements on different channels within one layout. Even with a fallback in place, the plugin cannot disambiguate which element a CC value targets when the host strips the channel.
See Appendix C: DAW Setup in the Erae 2 manual for per-DAW MPE configuration steps.
Problem: Modulation not working
If a modulation source (envelope or LFO) does not seem to affect a parameter:
- Make sure you have selected the target parameter by clicking its knob first. The selected parameter is shown in the Modulation Display at the bottom of the interface.
- Check that the depth fader in the Modulation Display is not set to zero. A depth of zero means the modulation source will have no effect on the parameter, regardless of its configuration.
- Verify that the modulation source itself is properly configured. For example, an envelope with all stages set to the same level, or an LFO with its rate at zero, will not produce meaningful modulation.
See Modulation for a complete guide to setting up modulation routing.
Problem: Licensing or demo activation fails
- If a magic link does not work, request a fresh link and open it on the same machine where Erae Sound is running.
- If you reached the machine limit, deauthorize another machine from the auth dialog or contact support.
- If the demo expired, saving and some editing flows may be disabled until you activate a license.
In-App Bug Reports
When available, the bug report button opens an in-app report form. Reports can include the current preset, Erae layout context, current-session device diagnostics, app metadata, and recent logs. Reconnect the device and reproduce the issue before submitting when possible so the report captures the relevant timeline.
If the button is not visible, contact support and include your Erae Sound version, operating system, host application, connected Erae model, and steps to reproduce.
Stuck Notes
If you are running inside Erae Lab, stop playback, release all held notes, then reconnect the Erae or MIDI controller if notes remain stuck. In plugin mode, use your DAW's panic/all-notes-off command because the host owns final MIDI routing. If stuck notes repeat after layout switching, submit a bug report with device diagnostics if available.
Appendix A: Parameter Reference
This appendix lists every user-facing parameter in Erae Sound, organized by section. Generators A and B share an identical set of parameters -- they are listed once below and apply to both.
All parameters support modulation unless otherwise noted. For details on assigning envelopes, LFOs, and MPE sources to parameters, see Chapter 6 (Modulation).
Generator -- Oscillator 1
| Parameter | Range | Default | Description |
|---|---|---|---|
| COARSE | 0 -- 127 (MIDI note) | 60 (C4) | Sets the base pitch of Oscillator 1 in semitone steps. |
| FINE | -1.00 -- +1.00 semitones | 0.00 | Fine-tunes Oscillator 1 pitch in fractions of a semitone. |
| SHAPE | 0.00 -- 1.00 | 0.50 | Morphs the oscillator waveform continuously from sine through triangle and pulse to sawtooth. |
| FOLD | 0.00 -- 1.00 | 0.00 | Applies wavefolding to the oscillator output for added harmonic content. |
| VOL | 0.00 -- 1.00 | about -12 dB | Sets the output level of Oscillator 1 before it enters the filter stage. |
Generator -- Oscillator 2
| Parameter | Range | Default | Description |
|---|---|---|---|
| COARSE | 0 -- 127 (MIDI note) | 60 (C4) | Sets the base pitch of Oscillator 2 in semitone steps. |
| FINE | -1.00 -- +1.00 semitones | 0.00 | Fine-tunes Oscillator 2 pitch in fractions of a semitone. |
| SHAPE | 0.00 -- 1.00 | 0.50 | Morphs the oscillator waveform continuously from sine through triangle and pulse to sawtooth. |
| FOLD | 0.00 -- 1.00 | 0.00 | Applies wavefolding to the oscillator output for added harmonic content. |
| VOL | 0.00 -- 1.00 | about -12 dB | Sets the output level of Oscillator 2 before it enters the filter stage. |
Generator -- Filter 1
| Parameter | Range | Default | Description |
|---|---|---|---|
| FREQ | 0 -- 143 (MIDI note, approx. 8 Hz -- 32 kHz) | 93 (approx. 1.4 kHz) | Sets the cutoff frequency of Filter 1. |
| RESO | 0.00 -- 1.00 | 0.00 | Controls the resonance (emphasis) at the cutoff frequency. |
| TYPE | 0.00 -- 1.00 | 0.50 | Morphs the filter response continuously: Bandpass at 0.0, Lowpass at 0.5, Highpass at 1.0, with smooth blending between adjacent types. |
| POLES | 2 / 4 | 4 | Toggles between 2-pole (12 dB/oct) and 4-pole (24 dB/oct) filter slopes. Not modulatable. |
Generator -- Filter 2
| Parameter | Range | Default | Description |
|---|---|---|---|
| FREQ | 0 -- 143 (MIDI note, approx. 8 Hz -- 32 kHz) | 93 (approx. 1.4 kHz) | Sets the cutoff frequency of Filter 2. |
| RESO | 0.00 -- 1.00 | 0.00 | Controls the resonance (emphasis) at the cutoff frequency. |
| TYPE | 0.00 -- 1.00 | 0.50 | Morphs the filter response continuously: Bandpass at 0.0, Lowpass at 0.5, Highpass at 1.0, with smooth blending between adjacent types. |
| POLES | 2 / 4 | 4 | Toggles between 2-pole (12 dB/oct) and 4-pole (24 dB/oct) filter slopes. Not modulatable. |
| NOISE | 0.00 -- 1.00 | 0.00 | Injects pink noise into Filter 2's input for adding texture or breathiness. |
Generator -- Control Bar
| Parameter | Range | Default | Description |
|---|---|---|---|
| TZFM | 0.00 -- 1.00 | 0.00 | Controls the amount of through-zero frequency modulation from Oscillator 2 into Oscillator 1, producing metallic, bell-like timbres. |
| Routing | Serial / Parallel / Split | Serial | Selects how the two filters are connected: Serial routes the mixed oscillator signal through Filter 1, then Filter 2; Parallel sends the mixed signal to both filters independently; Split sends Oscillator 1 to Filter 1 and Oscillator 2 to Filter 2. Not modulatable. |
| F1/F2 | 0.00 -- 1.00 | 0.50 | Crossfades between the outputs of Filter 1 and Filter 2 before the generator output. At 0.0 only Filter 1 is heard; at 1.0 only Filter 2. |
| Vol | 0.00 -- 1.00 | 1.00 | Sets the overall output level of the generator after the filter stage. The default envelope depth for this parameter is 1.0, so it responds to the amplitude envelope out of the box. |
FX Slot -- Common Parameters
Every FX slot (1 through 4) has these shared routing parameters, regardless of which effect type is loaded.
| Parameter | Range | Default | Description |
|---|---|---|---|
| Type | None, Distortion, Chorus, Flanger, Phaser, Delay, Reverb, Shimmer, Compressor, Param EQ | None | Selects the effect algorithm loaded into this slot. Not modulatable. |
| BYP | Off / On | Off | Bypasses the effect, passing audio through unprocessed. Not modulatable. |
| D/W A | 0.00 -- 1.00 | 0.50 (Reverb: 0.33) | Sets the wet send level from Generator A into this effect. |
| D/W B | 0.00 -- 1.00 | 0.50 (Reverb: 0.33) | Sets the wet send level from Generator B into this effect. |
| Output | 0.00 -- 1.00 | 1.00 | Controls the volume of this effect's output mixed into the main audio bus. |
| Send | 0.00 -- 1.00 | 0.00 | Controls how much of this effect's output is sent to the next FX slot's input. |
FX: Distortion
Multi-algorithm distortion with continuous morphing between circuit models and low/high tone controls.
| Parameter | Range | Default | Description |
|---|---|---|---|
| Drive | 0.00 -- 1.00 | 0.30 | Sets the amount of gain applied before the distortion circuit. |
| Type | 0.00 -- 1.00 | 0.00 | Morphs continuously between six distortion algorithms: Clean Boost, Tube Screamer, RAT, Big Muff, Fuzz Face, and Tape Saturation. Adjacent algorithms blend smoothly. |
| Low | 0.00 -- 1.00 | 0.50 | Post-distortion low tone control. Center position is flat. |
| High | 0.00 -- 1.00 | 0.50 | Post-distortion high tone control. Center position is flat. |
FX: Chorus
Juno-style BBD chorus with dual bucket-brigade delay lines.
| Parameter | Range | Default | Description |
|---|---|---|---|
| Pos | 0.00 -- 1.00 | 0.50 | Manual position within the chorus delay/modulation character. |
| Stereo | 0.00 -- 1.00 | 1.00 | Adjusts the stereo spread of the chorus by controlling the phase relationship between the left and right delay lines. |
FX: Flanger
Through-zero flanger with analog-style feedback path.
| Parameter | Range | Default | Description |
|---|---|---|---|
| Pos | 0.00 -- 1.00 | 0.50 | Sets the manual delay/sweep position. |
| Fdbk | 0.00 -- 1.00 | 0.30 | Sets the amount of delayed signal fed back into the input, intensifying the comb-filtering effect. |
| Stereo | 0.00 -- 1.00 | 0.25 | Offsets the LFO phase between the left and right channels for stereo width. |
FX: Phaser
4-stage analog-modeled allpass phaser.
| Parameter | Range | Default | Description |
|---|---|---|---|
| Pos | 0.00 -- 1.00 | 0.50 | Sets the manual notch position. |
| Fdbk | 0.00 -- 1.00 (maps to 0 -- 95%) | 0.00 | Feeds the phaser output back into the input for a more resonant, pronounced sweep. |
| Stereo | 0.00 -- 1.00 | 0.25 | Offsets the LFO phase between the left and right channels for stereo width. |
FX: Compressor
Dynamics processor with threshold, ratio, timing, and makeup gain.
| Parameter | Range | Default | Description |
|---|---|---|---|
| Thresh | 0.00 -- 1.00 | 0.50 | Sets the level where compression begins. |
| Ratio | 0.00 -- 1.00 | 0.30 | Sets compression strength. |
| Atk | 0.00 -- 1.00 | 0.20 | Sets compression attack time. |
| Rel | 0.00 -- 1.00 | 0.30 | Sets compression release time. |
| Makeup | 0.00 -- 1.00 | 0.00 | Adds gain after compression. |
FX: Param EQ
Two-band parametric equalizer.
| Parameter | Range | Default | Description |
|---|---|---|---|
| Freq 1 | 0.00 -- 1.00 | 0.30 | Center frequency of EQ band 1. |
| Gain 1 | 0.00 -- 1.00 | 0.50 | Gain of EQ band 1. Center is neutral. |
| Q 1 | 0.00 -- 1.00 | 0.30 | Width/resonance of EQ band 1. |
| Freq 2 | 0.00 -- 1.00 | 0.70 | Center frequency of EQ band 2. |
| Gain 2 | 0.00 -- 1.00 | 0.50 | Gain of EQ band 2. Center is neutral. |
| Q 2 | 0.00 -- 1.00 | 0.30 | Width/resonance of EQ band 2. |
FX: Delay
Analog-style delay with character morphing and stereo spread.
| Parameter | Range | Default | Description |
|---|---|---|---|
| Time | 0.00 -- 1.00 (maps to 100 -- 2000 ms) | 0.30 | Sets the delay time. |
| Fdbk | 0.00 -- 1.00 | 0.40 | Controls the amount of delayed signal fed back into the delay line, creating repeating echoes. |
| Char | 0.00 -- 1.00 | 0.30 | Morphs the delay character from clean digital through tape-style warmth to lo-fi degradation, adding saturation, filtering, and wow/flutter. |
| Stereo | 0.00 -- 1.00 | 0.00 | Controls the stereo spread of the delay, from mono to ping-pong. |
| Tone | 0.00 -- 1.00 | 0.50 | Tilts the frequency balance of the delayed signal from dark to bright. |
FX: Reverb
Dattorro plate reverb algorithm for rooms, halls, and plates.
| Parameter | Range | Default | Description |
|---|---|---|---|
| Decay | 0.00 -- 1.00 | 0.50 | Controls how long the reverb tail sustains before fading to silence. |
| Pre-Dly | 0.00 -- 1.00 | 0.00 | Adds a short delay before the reverb onset, creating a sense of distance between the dry sound and the reverb. |
| Damp | 0.00 -- 1.00 | 0.50 | Attenuates high frequencies in the reverb tail; higher values produce a warmer, darker reverb. |
| Width | 0.00 -- 1.00 | 1.00 | Controls the stereo spread of the reverb output, from mono to full stereo. |
| Mod | 0.00 -- 1.00 | 0.30 | Adds subtle pitch modulation inside the reverb tank, reducing metallic artifacts and adding lushness. |
FX: Shimmer
Shimmer reverb with pitch-shifting feedback for ambient and evolving textures.
| Parameter | Range | Default | Description |
|---|---|---|---|
| Size | 0.00 -- 1.00 | 0.50 | Controls the overall size of the reverb space. |
| Fdbk | 0.00 -- 1.00 | 0.70 | Sets the feedback amount within the reverb network, affecting both decay length and how much the pitch-shifted signal accumulates. |
| Pitch | 0.00 -- 1.00 | 0.50 | Controls the pitch-shift interval applied to the reverb feedback path, creating rising or falling harmonic layers. |
| Warp | 0.00 -- 1.00 | 0.00 | Applies spectral warping and detuning to the pitch-shifted feedback, adding dissonance and otherworldly textures. |
Voice
| Parameter | Range | Default | Description |
|---|---|---|---|
| Voices | 1 -- 16 | 16 | Sets the maximum number of simultaneous polyphonic voices. Not modulatable. |
| Unison | 1 -- 8 | 1 | Sets the number of unison voices stacked per note. Not modulatable. |
| Retrig | Off / On | Off | When enabled, re-triggers envelopes when a note is stolen or retriggered. Not modulatable. |
| Detune | 0.0 -- 100.0 cents | 0.0 | Sets the maximum random detuning spread between unison voices, in cents. Not modulatable. |
| Spread | 0.00 -- 1.00 | 0.00 | Controls the stereo spread of unison voices across the stereo field. Not modulatable. |
| Glide | 0.00 -- 1.00 | 0.00 | Sets the portamento time for pitch gliding between consecutive notes. At 0.0 glide is off; at 1.0 the glide is at its longest. Not modulatable. |
Split
| Parameter | Range | Default | Description |
|---|---|---|---|
| Mode | Off, Note Split, MPE Split | Off | Selects the split mode. Off sends all notes to both generators. Note Split divides the keyboard at the split point. MPE Split assigns notes based on MPE channel. Not modulatable. |
| Split Point | 0 -- 127 (MIDI note) | 60 (C4) | Sets the keyboard split point for Note Split mode. Notes below this value go to Generator A; notes at or above go to Generator B. Only visible when Mode is set to Note Split. Not modulatable. |
| Split Ch | 2 -- 14 | 8 | Sets the MPE Split channel boundary. Only visible when Mode is set to MPE Split. Not modulatable. |
Master
| Parameter | Range | Default | Description |
|---|---|---|---|
| Vol | 0.00 -- 1.00 | 0.65 | Controls the master output volume of the entire synth, located in the header bar. A dB-to-linear curve is applied internally. Not modulatable. |
Host Automation Slots
The DAW automation list also includes 64 generic slots named Slot 1 ... Slot 64 (parameter IDs host_slot_0 through host_slot_63). These slots are inert by default and only carry a value when a modulation depth has been assigned to them from inside Erae Sound.
| Parameter | Range | Default | Description |
|---|---|---|---|
| Slot 1 .. Slot 64 | -1.00 -- +1.00 | 0.00 | Bipolar host-automation slot. When bound to a modulation depth, its value drives that depth in both directions (DAW automation -> depth, and manual depth changes -> DAW lane). Bound from the right-click menu on any depth fader. See DAW Host Automation. |
Appendix B: MIDI Reference
This appendix lists every MIDI message that Erae Sound responds to, organized by category. Use it as a quick-reference when setting up controllers, recording automation in your DAW, or troubleshooting modulation routing.
For details on how to assign these sources to parameters, see Modulation. For Erae-specific setup, see Erae Integration.
Standard MIDI Sources
Erae Sound listens for five standard MIDI message types. Each one is available as a modulation source for every parameter in the synth.
| Source | Modulation Display Label | MIDI Message | Value Range | Description |
|---|---|---|---|---|
| Velocity | VEL | Note On velocity | 0 -- 127 (normalized to 0.0 -- 1.0) | How hard you strike the key. Captured once at note-on and held for the life of the note. |
| Release Velocity | RELVEL | Note Off velocity | 0 -- 127 (normalized to 0.0 -- 1.0) | How quickly you release the key. Captured once at note-off. Useful for controlling release character. |
| Pressure | PRES | Channel Pressure (Aftertouch) | 0 -- 127 (normalized to 0.0 -- 1.0) | Continuous pressure applied while holding a note. Updates in real time. In MPE mode, this is per-voice. |
| Slide | SLIDE | CC 74 (MPE Timbre) | 0 -- 127 (normalized to 0.0 -- 1.0) | Vertical finger position on an MPE surface. Updates continuously while a note is held. |
| Pitch Bend | PITCH | Pitch Bend | 14-bit (normalized to -1.0 -- +1.0) | Pitch deviation from the played note. In MPE mode, this is per-voice. See the Pitch Bend section below for range details. |
Note: Velocity and Release Velocity are "snapshot" sources -- they capture a single value at note-on or note-off and hold it. The other sources stream continuous values that update throughout the note.
Pitch Bend Range
Erae Sound uses a fixed pitch bend range of 48 semitones (four octaves in either direction). This wide range is designed for expressive MPE performance, where per-note pitch gestures benefit from a large sweep.
The pitch bend range applies equally to all voices and affects both standard pitch bend and MPE per-note pitch bend.
MPE (MIDI Polyphonic Expression)
Erae Sound is an MPE instrument. It uses a lower-zone MPE configuration with 15 member channels (channels 2--16), plus channel 1 as the MPE manager channel.
Per-Voice Expression
In MPE mode, each voice responds independently to three expressive dimensions:
| Dimension | MIDI Message | Per-Voice? | Description |
|---|---|---|---|
| Pitch Bend | Pitch Bend (per channel) | Yes | Smooth pitch deviation per finger. Fixed range of 48 semitones. |
| Pressure | Channel Pressure (per channel) | Yes | Aftertouch per finger. Each note responds to the pressure on its own MPE channel. |
| Slide | CC 74 (per channel) | Yes | Timbre control per finger. Typically mapped to vertical finger movement on the playing surface. |
Channel Allocation
Erae Sound allocates voices across MIDI channels 2--16 (the 15 member channels of the lower MPE zone). When a new note arrives on a member channel, Erae Sound assigns it to an available voice. If all voices are in use, voice stealing kicks in -- the oldest or quietest voice is reassigned to the new note.
MPE Split
When MPE Split mode is active in the Split panel, notes are routed by channel:
- Channels 1 -- 8 play through Generator A
- Channels 9 -- 16 play through Generator B
This lets you play two different timbres from separate zones on an MPE controller. See Voice and Split for setup details.
Using Erae Sound without MPE
Erae Sound also works with standard (non-MPE) MIDI controllers. In that case, pitch bend and channel pressure are shared across all voices on the same MIDI channel, rather than being per-voice. Velocity and release velocity work identically in both modes.
Erae-Sourced MIDI CCs
When an Erae controller is connected and a layout is active, Erae Sound discovers all the control zones in the layout and registers them as additional modulation sources. These sources appear in the Modulation Display alongside the standard sources listed above.
How CC Numbers Are Assigned
The specific MIDI CC numbers used by Erae sources depend entirely on your Erae layout configuration. Erae Sound reads the layout and automatically maps each zone to the correct CC number and MIDI channel. You do not need to know or configure the CC numbers yourself -- Erae Sound handles this for you.
DAW Compatibility
All Erae sources transmit standard MIDI CC messages. This means:
- Every gesture is recordable in your DAW's MIDI editor.
- Recorded CC data can be played back to drive Erae Sound, even without the Erae hardware connected.
- You can edit and automate Erae-sourced parameters just like any other MIDI CC.
Erae Source Types
The table below lists every type of Erae modulation source that Erae Sound can discover from a layout. Which sources actually appear depends on what zones your layout contains and which axes are enabled.
Keyboard Position Sources
| Source Type | Example Label | Description |
|---|---|---|
| Keyboard X | KB1 X | Absolute horizontal finger position across the keyboard |
| Keyboard Y | KB1 Y | Absolute vertical finger position (front-to-back on the surface) |
| Keyboard X Relative | KB1 XR | Horizontal movement relative to the initial touch point |
| Keyboard Y Relative | KB1 YR | Vertical movement relative to the initial touch point |
The number increments for each keyboard in the layout (KB1, KB2, etc.).
Note: Keyboard pressure and slide use the built-in PRES and SLIDE sources listed in the Standard MIDI Sources section. They are not separate Erae sources.
1D Fader Sources
| Source Type | Example Label | Description |
|---|---|---|
| Fader position | Fader 1 | Position along the fader's single axis |
| Fader pressure | Fdr1 Pres | Finger pressure on the fader surface |
2D Fader (XY Pad) Sources
| Source Type | Example Label | Description |
|---|---|---|
| Fader X | Fdr1 X | Horizontal position on the pad |
| Fader Y | Fdr1 Y | Vertical position on the pad |
| Fader pressure | Fdr1 Pres | Finger pressure on the pad surface |
Button Sources
| Source Type | Example Label | Description |
|---|---|---|
| Button | Btn 1 | CC value sent by the button |
Individual Key Sources
| Source Type | Example Label | Description |
|---|---|---|
| Key Pressure | Key1 P | Pressure on the individual key |
| Key X | Key1 X | Absolute horizontal finger position on the key |
| Key Y | Key1 Y | Absolute vertical finger position on the key |
| Key X Relative | Key1 XR | Horizontal movement relative to the initial touch point |
| Key Y Relative | Key1 YR | Vertical movement relative to the initial touch point |
Quick Reference: All Modulation Sources
This table summarizes every modulation source available in Erae Sound.
| Category | Source | Label | Always Available? |
|---|---|---|---|
| Standard MIDI | Velocity | VEL | Yes |
| Standard MIDI | Release Velocity | RELVEL | Yes |
| Standard MIDI | Pressure | PRES | Yes |
| Standard MIDI | Slide (CC 74) | SLIDE | Yes |
| Standard MIDI | Pitch Bend | PITCH | Yes |
| Built-in | Envelope (ADSR) | ENV | Yes |
| Built-in | Modulator (LFO) | MOD | Yes |
| Erae | Keyboard position (X, Y, XR, YR) | e.g. KB1 X | Only with Erae layout |
| Erae | 1D Fader (position, pressure) | e.g. Fader 1 | Only with Erae layout |
| Erae | 2D Fader (X, Y, pressure) | e.g. Fdr1 X | Only with Erae layout |
| Erae | Button | e.g. Btn 1 | Only with Erae layout |
| Erae | Individual Key (pressure, X, Y, XR, YR) | e.g. Key1 P | Only with Erae layout |
Tips for DAW Integration
- Record everything. All MIDI sources -- including Erae CCs -- are standard MIDI data. Arm your track for MIDI recording and every gesture will be captured.
- Playback without hardware. Once recorded, MIDI CC automation plays back through Erae Sound regardless of whether an Erae or any other controller is connected.
- Pitch bend resolution. Erae Sound reads full 14-bit pitch bend messages, giving you smooth, high-resolution pitch control.
- MPE-aware DAWs. For the best experience with per-voice expression, use a DAW that supports MPE (most modern DAWs do). This ensures that per-channel pitch bend, pressure, and slide are routed correctly to individual voices.
For general troubleshooting, see Troubleshooting.